Greetings. This is the master list for this blog, where I list everything I’ve done here. Please note that none of these links open in a new tab by default, so you’ll have to right click to do such.
Awful Archives
This is my review series. Please note that the game doesn’t have to be bad, but rather it’s simply that the game has a negative reputation. I try to get one of these done a month, but that doesn’t always happen. Awful Archives also marks the start of the modern era of the Squid Chamber.
A smaller series where I review the combo weapons from the Dead Rising Series to talk about what I do and don’t like from them, as well as talking about what I think of them as a whole. Currently, two of the four articles in this series are done.
Basically a showcase for what a game could be. These are my favorite to make, so naturally they take forever to do, seeing how I have several yet to be finished and posted.
In this day and age, Editorials and Think Pieces may as well be the same. But these just refer to articles exploring a single topic or idea, but are not in a given series.
These are articles made before my rebranding. As such, they contain quite a few opinions on vidya I don’t stand by anymore, and it’s painfully clear that I was trying to find my footing while still being a knock off of other content creators. Still, nice to step back and see how far one’s progressed from their start, huh?
Since the advertisements for Mario Strikers: Battle League left me very underwhelmed, I thought about more of what I’d want from a Mario Strikers game. Upon doing some digging through my Google Drive, I found a write-up I did around a year ago (well before Battle League was announced), so I decided to touch it up and show it here. Basically, this is what I’d like to see added to Charged in a sequel.
“So you just want the same game again with a bit more too it?”
In terms of the Mario Sports Games: Yes, and I’m tired of pretending I don’t. These aren’t yearly franchises like Mario Party. I don’t need them to reinvent the wheel literally every time so they can be justified in making a new game.
Anyway, enough ranting. Onto the ideas. I’ll be focusing on what would be new instead of repeating what most of you already know about Strikers.
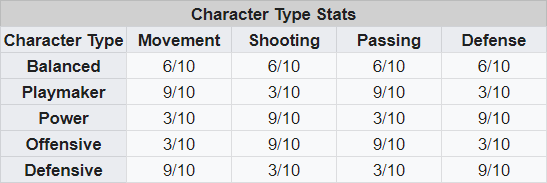
New Characters
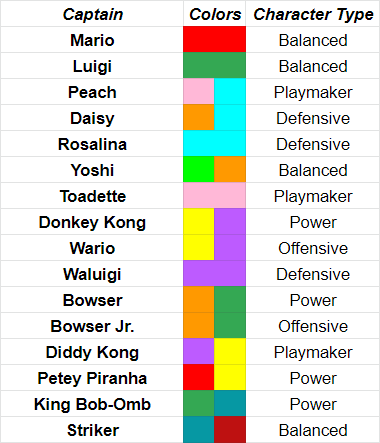
New Captains
Toadette
Type: Playmaker
Musical Motif: Eurobeat
Mega Strike: Toadette strikes the ball with a diamond pickax
Super Ability:Picky. Toadette smashes a giant pickax into the ground, similar to Hammer Bro. It has a shockwave effect and can be done three times.
Deke: Toadette has a light jump. Is identical to Toad’s deke, but with slightly more coverage.
Default Team: Toad, Shy Guy, Paragoomba
Availability: Toadette is available from the start.
Rosalina
Type: Playmaker
Musical Motif: Defensive
Mega Strike: Rosalina raises her hand while holding her hand out over the ball. After charging up, she waves her wand forward to strike the ball with yellow magic.
Super Ability:Cold Shoulder. Rosalina unleashes a single blast of cold air around her, freezing any players nearby. The more players frozen, the faster they break out.
Deke: Rosalina spins around as if she was ice skating, making her one of the few defensive characters with an offensive Deke.
Default Team: Dry Bones, Koopa Troopa, Hammer Bro
Availability: The player must earn the Bronze Star Cup in the Championship mode to unlock Rosalina.
King Bob-Omb
Type: Power
Musical Motif: Military Brass
Mega Strike: King Bob-Omb flies up with a Bullet Bill before smashing it into the ball.
Super Ability:Minefield. The King launches a bunch of team-colors Bob-Ombs into the air. Once they land, they only go off if an enemy walks to close to them. No one if safe from the blast, though.
Deke: King Bob-Omb will strike a pose (like that of a sumo wrestler) before causing an explosion. This Deke can easily hit his own teammates, and there’s an opening before the explosion to tackle him.
Default Team: Boo, Birdo, Shy Guy
Availability: The player must earn the Silver Bullet Cup in the Championship mode to unlock King Bob-Omb
Striker
Type: Balanced
Musical Motif: Robot Pop
Mega Strike: The Striker Robot uses it’s hands to gather energy, focuses it into it’s one eye, and then unleashes a red laser to strike the ball.
Super Ability:Discharged. The Striker Robot unleashes lightning out of it’s left hand. It can also fire a second one out of it’s right at any point. It’s range is fairly limited.
Deke: The Striker can perform a tackle when having the ball, but it has half the range.
Default Team: Rusty x3
Availability: The player must earn the Gold Striker Cup in the Championship mode to unlock Striker
Sidekicks
Para-Goomba
Type: Offensive
Musical Motif: Flight Of The Bumblebee
Skill Shot: Para-Goomba spins around to make a mini twister to spin around the goalie before going for the shot.
Deke: Para-Goomba will jump backwards while pushing enemies in front of him away by flapping his wings.
Magikoopa
Type: Balanced
Musical Motif: Carnie Music
Skill Shot: Magikoopa fires an ice-ball. If hit, the goalie will be frozen for just under two seconds, and be slowed down for an extra 3 seconds once thawed.
Deke: Magikoopa can teleport, which behaves like most teleport moves do.
Chargin’ Chuck
Type: Defensive
Musical Motif: NFL-eque music
Skill Shot: Chuck will attempt to fake out the goalie by throw a football before actually taking a shot. Too close, and the ball is swatted away. To far and the goalie won’t be fooled.
Deke: Chuck does a body tackle.
Rusty
Description: These are the same robots are Striker, but heavily rusted over.
Type: Balanced
Musical Motif: Goal Theme 3 from Super Mario Strikers
Skill Shot: Rusty performs a Super Strike. While it can be blocked, it can leave the goalie dazzed for a follow up.
Deke: Mimics Yoshi’s dodge move.
Items
Piranha Plant: Plants a team-colored Piranha Plant on the spot. It will snipe at players of the enemy team who get too close. It can be used defensively if placed next to a goalie. It will eat the ball indiscriminately if it rolls next to it with no players possessing it.
POW Block: Creates a shockwave next the the active player, sending the ball and/or any player (friend or foe) into the air should they be next to them.
Zap Orb: Covers the actively player in electricity. While it can be used to enhance your next tackle, it’s main use is to counter the next player who tackles you. It’s only good for one zap.
Metal Box: Makes the player more resistant to tackling.
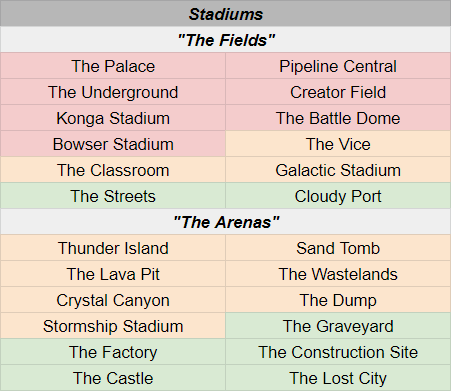
Stages
The Fields: These stages have no gimmicks to them.
The Streets: A normal, everyday street. The pavement makes no meaningful difference.
Cloudy Port: A pier with a gate set up for the sport to be played. It can get foggy and reduce visibility beyond the gates, but does not directly impact the port.
The Arenas: These stages have gimmicks to them.
The Graveyard: The terrain is more uneven here, and gravestone can pop up periodically. They can be damage and destroyed with items, tackles, or just kicking the ball at them.
The Factory: Vents align the floor that spew out gas that reverses controls for 5 seconds if inhaled.
The Construction Site: the floor is made of plywood, making the ball bounce more when not in the possession of a player. Wind can also push the ball around, although falling out of the ring is not possible here.
The Castle: A medieval castle (that’s not owned by Bowser) with a rugged for a floor. Instead of an electric fence, it uses a purple magic force-field at serves as a bumper when tackled into, allowing for faster recoveries but forced towards the center.
The Lost City: A city completely underwater. The field is more of a fence then a floor, so the ball loses momentum faster. water will fall from the ceiling from time to time. This will lock the ball into it’s current level of power for a bit should the ball get wet. The leaking water also sends the gates into overdrive, meaning players are shocked twice as long.
Unlocking Stages:
Unless stated otherwise, the stage is available from the start.
The Graveyard: Earn the Bronze Star Cup
The Factory: Earn the Silver Bullet Cup
Stormship Stadium: Earn the Gold Striker Cup
The Lost City: Earn the Platinum Cup
The Castle: Earn the Hotfoot and Brick Wall Medals for any one cup.
The Wastelands: Earn the Hotfoot and Brick Wall Medals for all three main cups.
Crystal Canyon: Complete half of the Captain Events
Galactic Stadium: Collect all 20 trophies in the game.
Trophies
The game features 20 trophies in all to collect. 4 are part of the Championship mode, while the other 16 are part of the Captain Events AKA The Challenge Cups. The Hotfoot and Brick wall Medals are rewarded in three of the Champion Cups. The Hotfoot Cups, in universe, require the player to score the most goals while Brick Wall involves having the fewest scored against you over the tourney, not counting the Championship match. Mechanically speaking, both have thresholds the player must meet to earn. Challenge Cups, on the other hand, involve playing as a certain team against another while trying to win within certain parameters.
Championship Cups
Bronze Star Cup:
Conditions: Four Teams, including the player. Play against each team twice. Top two teams compete head to head. Winner battles the champion (Rosalina by default) in a best of three.
Hotfoot Minimum: 10 goals
Brick Wall Maximum: 12 goals
Silver Bullet Cup:
Conditions: Six Teams, including the player. Play against each team twice. Top four move on to an elimination bracket, with the survivor going to battle the champion (King Bob-Omb by default) in a best of 3.
Hotfoot Minimum: 20 goals
Brick Wall Maximum: 8 goals
Gold Striker Cup:
Conditions: Ten Teams, including the player. Play against each team once. Top four go on to a separate tournament, which plays out the same as the Bronze Cup does. Winner battles the champion (Striker by default) in a best of five.
Hotfoot Minimum: 30 goals
Brick Wall Maximum: 5 Goals
Platinum Cup:
Conditions: The same as the Bronze Cup, but the champion will be against a Super Team. This team will be Mario, Luigi, Peach, and Daisy. If you play as one of them, Yoshi will replace them.
Challenge Cups
Mushroom Cup:
Player: Mario
Opponent: Wario
Mission Title: Something To Prove
Description: Both teams are tired after a long, drawn-out match. Neither team has it in them for Megastrikes or Skill Shots. Win the match!
Time: 2:00
Score: 3-3
Stage: Pipeline Central
Fire Flower Cup:
Player: Luigi
Opponent: Mario
Mission Title: Sibling Rivalry
Description: Luigi has a chance to finally take his cup back from his brother, but being down by two points is not a good omen.
Time: 3:00
Score: 0-2 Player Down
Stage: Crater Field
Heart Cup:
Player: Peach
Opponent: Bowser
Mission Title: Damsel In Distress
Description: In an ugly tackle, Peach lost her star sidekick just as she was starting to come back. Is a turnaround still possible, or did Peach’s chances get benched alongside Koopa?
Time: 1:30
Score: 5-6 Player Down
Stage: Lava Pit
Ice Flower Cup:
Player: Daisy
Opponent: Waluigi
Mission Title: Dirty Cheater
Description: Waluigi tampered with the ball before the match, meaning Daisy can’t charge the ball through passing anymore. She managed to get a goal, but he’s gunning for a Megastrike
Time: 1:00
Score: 1-0 Player Up
Stage: The Dump
Star Cup:
Player: Rosalina
Opponent: Donkey Kong
Mission Title: Massive Mistake
Description: Rosalina, in a competitive folly, preformed an illegal body check on DK’s teammate, giving him a free Mega Strike. She’s already down, so it’s Kritter’s time to shine.
Time: 1:40
Score: 4-3 Player Down
Stage: Galactic Stadium
Egg Cup:
Player: Yoshi
Opponent: Luigi
Mission Title: Mean Green Machine
Description: Yoshi and Luigi are deadlocked. But if this goes into Overtime mode, Luigi will start to bring his A-Game.
Time: 0:30
Score: 3-3
Stage: The Vice
Diamond Cup:
Player: Toadette
Opponent: Peach
Mission Title: Coming Up Short
Description: Down by 6 goals, Toadette’s team much battle against Peach’s team. Wrose yet, the clouds have started to clear up…
Time: 2:40
Score: 0-6 Player Down
Stage: Crystal Canyon
Banana Cup:
Player: Donkey Kong
Opponent: Petey Piranha
Mission Title: Gorilla Tactics
Description: DK is ahead of Petey and set to winning the match. But to make it to the finals, he must win by 5 goals to beat Mario’s current standings.
Time: 3:30
Score: 7-8 Player Up
Stage: Battle Stadium
Garlic Cup:
Player: Wario
Opponent: Yoshi
Mission Title: As A Team
Description: Wario isn’t going to settle for just coming back, but every single member of his team is going to get a goal just to rub it in!
Time: 3:00
Score: 7-4 Player Down
Stage: The Underground
Eggplant Cup:
Player: Waluigi
Opponent: Luigi
Mission Title: No Mercy
Description: Waluigi and Luigi both haven’t scored once. Waluigi has a goal in mind: score a single goal, and don’t let Luigi score a single point.
Time: 1:00
Score: 0-0
Stage: The Streets
Ztar Cup:
Player: Bowser
Opponent: Petey Piranha
Mission Title: The Super Team
Description: Petey Piranha convinced Daisy, who brought Luigi, who brought Mario. Bowser accepts this as a test of strength.
Time: 4:00
Score: 0-0
Stage: Sand Tomb
Koopa Cup:
Player: Bowser Jr.
Opponent: King Bob-Omb
Mission Title: Explosive Ego
Description: A lot of King Bob-Ombs mines were duds, but they’re starting to turn on. Can Jr. keep the lead?
Time: 1:25
Score: 4-2 Player Up
Stage: The Factory
Strawberry Cup:
Player: Diddy Kong
Opponent: Daisy
Mission Title: Record Breaking
Description: Diddy Kong is on the verge of beating his own record for scoring 100 goals in the fastest time possible. Take the Strawberry Cup and a new record by scoring 10 goals!
Time: 3:25
Score: 5-3 Player Down
Stage: The Castle
Cactus Cup:
Player: Petey Piranha
Opponent: Toadette
Mission Title: No Straight Roads
Description: Both partners are down by 2 sidekicks. Trying to settle the score is going to be painful.
Time: 1:50
Score: 1-0 Player Down
Stage: The Graveyard
Special Cup:
Player: King Bob-Omb
Opponent: Rosalina
Mission Title: The Art Or War
Description: The King is so close to taking Rosalina’s cup. To get the Brick Wall and Hotfoot Medals along side this, he must score a total of seven goals while not letting Rosalina get more than one more.
Time: 2:40
Score: 5-4 Player Down
Stage: Bowser Stadium
Golden Mushroom Cup:
Player: Striker
Opponent: Mario
Mission Title: A Flaw In The Programming
Description: Striker has discovered something unnerving: Mario crushing his Rusty counterparts has left them weaker to water, so they’ll be electrocuted if they get wet. If only the stage wasn’t underwater.
I made a video going over the books in the original Dead Rising and ranking them from worst to best. I won’t directly reveal what ranked where, as you can watch it yourself if you’re interested.
For a secondary system in a first attempt, I think Dead Rising 1 did a pretty good job. While there’s definitely some books that could stand to have stronger effects or affect more weapons, the worst of D and C Tier books are victims of the game’s mechanics or their placements. I find the biggest weakness to the system being the lack of certain effects. Only four weapons can be triple booked, and only about 15 weapons in total can be affected by more than one book. Even so, it was fun to critically look at these books, it gave me a stronger appreciation for the first game than I had before.
For this short little tie-in article, I’ll be going over what I would change about the books in Dead Rising and then mentioning ones I would add to the first game. Do take note that I’m not aiming to make every single book into an S Tier book like [SPOILER] and [REDACTED] are in the video. Some books are going to be of more limited use than others, and I’m fine with that.
So instead, I grouped some of the books together by type simply for the ease of discussion. The total of 13 books cover every kind of “buff” a book could receive, and hopefully provide some extra insight into how much the game itself determines the use of the books, instead of vise versa. Many books will also be given more than one plausible buff. This isn’t saying that both should be applied at the same time but instead each buff I believe on its own would make all the difference with these books; whether or not any of these buffs would work well together or would be overpowered I’ll leave for you to think about.
Skill Books
Weekly Photo Magazine
Buff 1: +25% PP from Photo Opportunities And PP Stickers. This doesn’t need to override the current effect, but simply making it so that the player gets extra PP but only from certain types of Photos feels like a natural perk, and one that strangely doesn’t exist in the game proper.
Buff 2: Gray/Yellow Marker Over PP Stickers. Making it so the player doesn’t need an online guide or several playthroughs to find these wouldn’t be the worst thing ever, and would fit in with the book’s current effect pretty well.
Cycling
Buff 1: Make Bikes More Common. How someone can justify using this book when only two bikes spawn in the entire mall and can’t be used in half the locations is beyond me. To give some more exact locations: I’d spawn one in the park right next to the Food Court, one in Wonderland Plaza behind the stuff bunny that Nick and Sally hang from, and two in the underground tunnels (one below the North PLaza and one below the Entrance Plaza.
Buff 2: Combine with Cycling for Extreme Sports. My preference of the two buffs, as Skateboarding (not pictured above) is a bit limited in its own right. So having an “Extreme Sports” book would be way more useful.
Cooking
Buff: Food Items Expire More Slowly. So on top of making mixed drinks that last twice as long, the game would also spawn double-lasting versions of food items that eventually expire. That covers raw meat, uncooked pizza, ice pops, and frozen vegetables. The time would go from having 20 real time minutes to eat these to 40, and the “X2” marker would get the message across.
Brainwashing Tips
Buff: Spawn A Second One Earlier. This is something with the power of hindsight, but imagine if a copy can be found in the Raincult Warehouse if you let yourself get kidnapped. You’d still have to fight your way out and give up all your inventory to begin with if you wanted it earlier (not to mention an achievement).
Item/Attack Books
Engineering & Entertainment
Buff 1: Fallen Survivors. Putting these two together since they share the same buff. While both books work fine, their limitation is that a lot of the items they affect only spawn in one area (90% of construction items are limited to North Plaza, and most entertainment items only spawn in Paradise Plaza). The idea of the fallen survivor is effectively a cop zombie in terms of health, if not slightly below them. Visually, the zombie would be modeled off of Johnathon Picardsen and Gil Jimenez, as the green military fatigues and ruined suit would help it be easy to identify amidst the horde. The first type would wield lead pipes and nail guns, the latter having guitars.
Buff 2: More Weapons. Engineering should boost the durability of step ladders and paint cans. Entertainment should buff soccer balls, TVs, and HDTVs.
Buff 3: Spawn More Guitars Around The Mall. Acoustic Guitars would fit in with the vague wild-west theme of the food court, A electric and base guitar could be placed in the CD Crazy located in North Plaza as decorations. Both would also give something entertainment-related far away from Paradise Plaza.
Buff 4: Combine With Hobby. This is strictly for entertainment, and it’s more so that Hobby is so situational that it doesn’t deserve it’s own book.
Lifestyle Magazine
“Buff”: More Weapons. Not really a buff, but seriously – this is a book about common household items and neither TV is affected by it. Between that and the idea that a fence is part of interior design, I really question what malls the team visited when doing research for this game.
Wrestler
Buff 1: Make is available from the start. Just put it in the Wonderland Plaza bookstore. Since Frank’s moves either one-shot zombies normally or do not gain a big enough increase in damage to deal with night zombies, there’s no need to lock it behind a Psychopath.
Buff 2: Spitfire. So long as Frank has the book, he is under the effects of Spitfire. I mean, his spit IS an unarmed attack, and making a mixed drink effect no longer be required would actually be a good boss reward.
Buff 3: Double PP. Double the PP from skill moves and unarmed combat, that is. Would help players level up a bit faster once more executions become unlocked for Frank.
PP Books
Horror Novels 1 & 2
Buff 1: Add A Third Horror Novel. This would be a much better reward for fighting Cliff, and one that fits with him much more if you ask me. Can just give another 25% or a hefty 50% bonus (similar to how Survival is both Health 1+2 combined).
Buff 2: Divide And Conquer. Horror Novel 1 becomes a 50% Boost from Milestone PP gains. Horror novel 2 now gives a 100% bonus for individual zombie kills.
Buff 3: Better PP from Weapons. Just make more weapons and give good PP from kills beyond Frank’s Skill Moves. For example, the bowling ball giving 100 PP for every zombie hit with the ranged attack in succession.
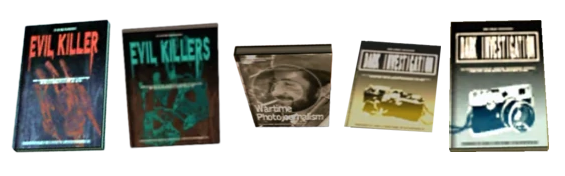
Camera 1 And Wartime Photography
Buff 1: Extra PP For Everyone! Boost the 25% to 50%. Seems self-explanatory.
Buff 2: Divide And Conquer. Camera 1 gives 50% extra PP from photos, and Wartime Photography makes PP markers and bonuses more forgiving, meaning the player won’t need to be as in focus or on center as they normally would be.
Camera 2
Buff: Give the player A Master Password For beating Sean. By doing this, it would mean the player can get all the PP Stickers without having to get kidnapped. This then means the player can, during the last hour of gameplay before the copter arrives, go around the mall and get every PP Stick for max value. Sure, you can go after the ones you haven’t gotten yet, but giving the player a means to grab them all means, on repeat runs, the player can actually have something to do for the hour during the Special Forces invading the mall.
New Books
And now the fun part: what books would I add? For the sake of visuals, i’ll be using magazines from Dead Rising 2 to represent the books in question here.
Transportation
“Shows the durability of vehicles. Hold onto vehicles twice as long.”
Dead Rising has a cut mechanic where Psychopath health parts would be on the bottom of the screen at all times instead of over their heads. This concept (as the coding seems to no longer be in the files) could be used for vehicle durability should the player be holding this book. (This meter would give the proper name of the vehicle as well).
Also, it’s strange to think of a Dead Rising game without a book for vehicles. But given how driving wasn’t intended to be a big feature in this game, it’s not hard to see why one wasn’t made. Would certainly make Zombie Genocider and Carlito’s Last resort much less tedious, though.
Location: Maintenance Tunnel Warehouse. Leaning against the center shelf.
Items affected:
Bicycle
Red Convertible
White Sedan
Motorcycle
Delivery Truck
Military Jeep
Firearm Maintenance
“Decreases damage drop off for bullets, greatly increases the effective range of guns.”
Firearms are fairly weak in the first Dead Rising when you factor in how hard they are to acquire. Handguns are more common than apples in the mall, but the damage drop off with them is so bad that it only takes a couple feet for it to take multiple headshots for zombies and cultists to be put down. SMGs only spawn in hidden locations and still suffer from that unforgiving drop off, shotguns and hunting rifles only appear in the gun shop barring the hall family or the occasional survivor, and the machine gun is basically an endgame weapon.
This book would let a handgun actually function at longer ranges beyond the common zombie in daylight. Shotguns would become the de facto horde-clearing gun, the SMG can easily shave bosses down in health from a distance, and the nail gun (I know it doesn’t use bullets. Don’t care). Not sure if this would do anything to the machine gun or hunting rifles, though. I guess body shots would be more viable.
Location: Hunting Shack, after defeating Cletus. Spawns on the counter next to the cash register.
Items Affected:
Handgun
Shotgun
Hunting Rifle
Submachine Gun
Machine Gun
Heavy Machine Gun
Nail Gun
Analyzing Evil
“Gain an extra 25% PP from defeating hostile enemies.”
Location: Everyone Luvs Books, replacing the location of “Cycling” if it were to be combined with “Skateboarding”
This one would be the compliment “World News” with this only working on bosses. Not a whole lot to say about this one, so instead here’s some juicy math: every psychopath, their (default) PP value, and then their [boosted] PP value (using the Wiki as reference):
Carlito Round 1 (20,000 PP) [25,000 PP]
Adam (20,000 PP) [25,000 PP]
Cletus (20,000) [25,000 PP]
Carlito Round 2 (30,000 PP) [37,500 PP]
Steven (30,000 PP) [37,500 PP]
Cliff (30,000 PP) [37,500 PP]
Isabela (30,000 PP) [37,500 PP]
Jo (30,000 PP) [37,500 PP]
Roger (15,000 PP) [18,750 PP]
Jack (15,000 PP) [18,750 PP]
Thomas (15,000 PP) [18,750 PP]
Sean (30,000 PP) [37,500 PP]
Paul (30,000 PP) [37,500 PP]
Kent (30,000 PP) [37,500 PP]
Carlito Round 3 (50,000 PP) [62,500 PP]
Larry (50,000 PP) [62,500 PP]
Cultist (500 PP) [625 PP]
Convict (3,000 PP) [3,750 PP]
Special Forces Soldier (5,000 PP) [6,250 PP]
Special Forces Drone (500 PP) [625 PP]
Special Force Helicopter (10,000 PP) [12,500 PP]
Inspiring Leadership
“Gain an extra 100% PP from fulfilling requests and averting mutinies.”
Every request and munity gives 10,000 PP. There are 6 total, so the PP goes from 60,000 PP to 120,000 PP. So while this book wouldn’t see the most use, holding onto it for an extra Psychopath’s worth of PP would be beneficial. The somewhat sinister part to this book would be its spawn location, which is an otherwise unassuming section of the mall.
Location: Colby’s Movieland. Theater 5, hidden between the curtain and the big screen.
Side quests affect:
Ronald’s Appetite
Floyd the Sommelier
Kindell’s Betrayal
Paul’s Present
Simone The Gunslinger
Cheryl’s Request
Kitchen Care
“Hold onto kitchenware, restaurant supplies, and cooking appliances three times as long.”
A book like this not in any Dead Rising game, which is strange given the frying pan’s prevalence alone, and how many improvised weapons come from the kitchen. While not as extensive as the sequels would go on to have with kitchen items, the first game still has a few.
Location: Food Court, Jill’s Sandwiches, on a table.
Items affected:
Frying Pan
Canned Food
Canned Sauce
Condiments
Baking Ingredients
Cleaver
Meat Cleaver
Cook Oil
King Salmon
Sausage Rack
Pet Food
First Responders
“Hold onto police equipment and other emergency supplies three times as long.”
Police weapons are among the most common weapons in the game, thanks to police zombies being in every zone in the mall. But most of the weapons are too fragile to use in any long-term manner. The nightstick only has 25 hits in it before giving out. The fire extinguisher and stun gun run out of ammo too quickly (a more dire problem with the stun gun since it’s basically a melee weapon with ammo). The handgun is also fairly weak at anything beyond chainsaw range.
In theory, coding a book to be able to increase the ammo of the stun gun, fire extinguisher, and pistol should be absolutely possible.
Location: Lovely Fashion House after drafting Jo, on the right side of her corpse.
Items affected:
Handgun
Nightstick
Stun Gun
Fire Extinguisher
Fire Ax
Canned Food
Edge Of Glory
“Perform extra attacks with knives and swords. Hold onto them three times as long as well.”
When going through the books, I began to get an appreciation for the Skateboard tricks it’s dedicated book could give as well as disappointed that only the skateboard and bikes get it. So, since knives and swords are both useful weapons and only have the tap X attack, they’d be a good candidate for a Skill Book.
Location: North Plaza, in the hostage closet that Frank unlocks after defeating Cliff.
Attacks and items affected:
Shank: Frank gives a single, strong stab forward with a knife. This is the quick stab attack the Cultists use. Works with the Hunting Knife and the Cleaver.
Deadly Unsheathing: Frank pulls the sword to his left side, then quickly strikes to the right. This attack mimics Sean’s attack, but faster. Works with the Katana, Sword, Ceremonial Sword, and Toy Laser Sword.
Gut Wrenching: Frank impales a zombie, cultist, or special forces soldier, then violently pushes them off, killing them. This move only works with the Machete, and earns 200 PP for killing zombies with it.
Hack Job: Frank performs a powerful overheal swipe, dealing heavy damage to anything he chops. This move only works with the Meat Cleaver, and earns 150 PP for killing zombies with it.
Pawn Shop Savvy
“Hold onto antiques, thrift store goods, and collectibles for three times as long.”
For a final book, it’s just another durability book. This one would have good synergy with Criminal Biology, Entertainment, and even Edge Of Glory.
Location: Everyone Luvs Books, in the back of the store.
Items affected:
Katana
Sword
Ceremonial Sword
Electric Guitar
Bass Guitar
Acoustic Guitar
Baseball Bat
Battle Ax
Vase
Painting
New Weapon Stats
So, with these new books, here’s what the new stats for booking weapons would be:
The following weapons can be triple booked now:
Katana
Sword
Ceremonial Sword
Meat Cleaver
Cleaver
The following weapons can now be double booked:
Handgun
Canned Food
Electric Guitar
Bass Guitar
Acoustic Guitar
Baseball Bat
Battle Axe
Painting
Fire Ax
Toy Laser Sword
The following weapons can have a book applied when they previously had none:
Season 6 of Spongebob was not a good time for the show. Sure, the previous 2 seasons had their criticisms, but seasons 4 and 5 also have a lot of people’s favorite episodes, and still have more good than bad episodes in general. Season 6 was when the show both had more bad episodes and had begun to reuse a lot of concepts for episodes (Spongebob and Patrick annoying Squidward being the most revisited one). Characters got simplified and would generally be more annoying with their quirks being turned up to 11. And episodes were generally more filled with filler, which is weird given they’re 11-minute episodes.
While not quite the worst episode in the season, the TV Movie Truth Or Square embodies the worst traits of this season on top of previews and trailers that lie about what the special is. Yeah, the special built this up as a story-driven affair along the lines of Gary Come Home, and literally every story event of the trailer (Mr. Krabs and Spongebob traveling the world, Spongebob and Sandy getting married, etc) was nothing more than a joke. The punchline to each joke being “this was a nothing burger” got real old real quick. This was apparently meant to be a parody of clip shows, but nothing in the episode itself (even when removed from the ads) comes off like that.
Then there are the Patchy Segments, which have the highlights of the special (the song Scurvy from Pink and some of the Robin Williams joke of Nickelodeon being where careers go to die) but also doubled the length of an episode that is already mostly filler. And while it has the best moments, it also has far more of the worst bits; most of the “celebrity” cameos and jokes aren’t that funny, and that sadly includes more of Robin Williams’ segment (I’m convinced that entire section was just bad improv with one killer joke). They used most of these cameos in the ads, too, despite none of them wanting anything to do with it. To be fair, that’s the joke – Patchy is annoying to the point where dealing with him isn’t worth meeting Spongebob over – but let it be known those ads killed a lot of what were probably meant to be jokes by promoting them as something they never were.
So in short, Truth Or Square was a bad episode loaded with bad live-action segments that were made all the worse by ads that promised the moon by putting a microscope to gravel. So naturally, the video game adaption doesn’t have the highest bar to reach.
Except it does.
This game was published by THQ, but more importantly, was developed by Heavy Iron Studios. This was the Studio behind Battle For Bikini Bottom and the tie-in to the first Spongebob Movie, which are legends as far as licensed games go. This game also uses the general gameplay style of those games, so comparisons are inevitable… despite how this game likely wasn’t given more than a year to be made (this was originally a different Spongebob game that was re-themed to fit with the Truth Or Square special). Even more tragic is that this was the last game done by Heavy Iron Studios as far as Spongebob is concerned. Every game since this one has been a cheap licensed game (not counting Rehydrated). So this game is based on a hated special while using the gameplay style of beloved older games for what would go on to be the final game to do so. That is what got this game set for the Awful Archives.
It being free for Xbox Gold members certainly doesn’t hurt, though.
Story
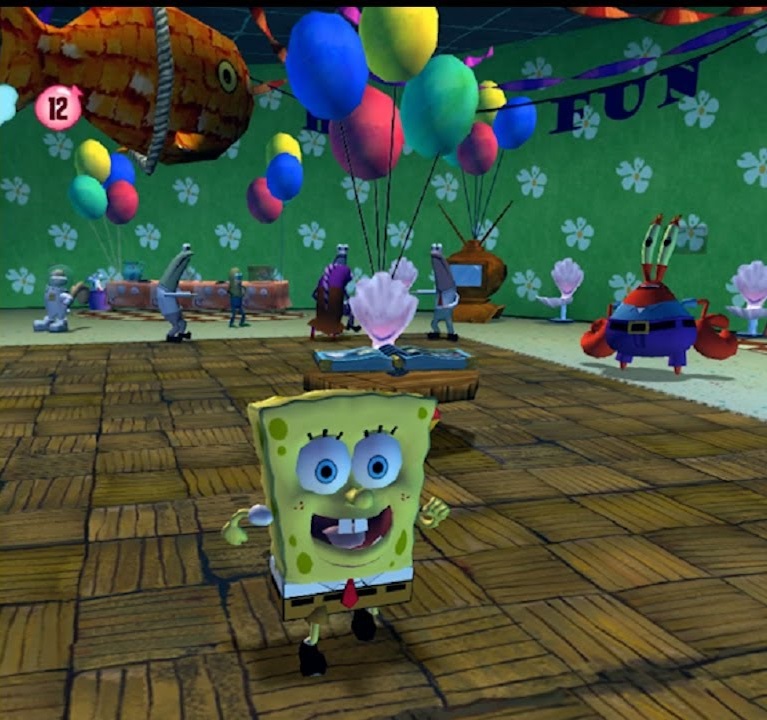
The plot of the game starts with Spongebob celebrating the “Eleventy-Seventh” anniversary of the Krusty Krab, and that’s where the similarities with the special end. While the special had the main cast running through the vents the whole time after getting locked in the freezer, the game has an actual plot of sorts. Spongebob can’t remember where he hid the secret formula, and Plankton offers to help him remember it for what is surely just out of the goodness of his heart. He does this by putting Nanobots into Spongebob’s head, but after accidentally destroying the remote decides he needs to enter manually to look for it. The rest of the game is in Spongebob’s head, with him trying to cheer himself up with happy memories so he can think clearly enough to remember.
So the goal of the game is to cure Spongebob’s crippling depression by remembering past episodes. Fair enough. What gets interesting is that (presumably because of Plankton’s Nanobots), a lot of episodes get combined together into one level. For example, the first level is based on “Jellyfishing” from Season 1, but contains elements from later episodes such as “Jellyfish Hunting”, “Jellyfish Jam”, and “Spongehenge”. More drastically, the episode “Graveyard Shift” (the episode with the Hash-Slinging-Slasher) is combined with “Rock Bottom” while having visual references to the giant red monster from the first Movie for a late-game level.
This also translated to the collectibles. Instead of getting Golden Spatulas or Goofy Goober Tokens, each level has a different object for its goal that gives Spongebob another happy memory. This can range from Spongebob’s Karate Gear to Squidward’s first Krabby Patty. And it’s not limited to the first few seasons either, as all six seasons up to that point get love and nods, like the Krusty Dog. The fanservice is also in the levels themselves, from being able to destroy Club Squidward to using Gummy from “Gift Of Gum” for puzzle solving in the second half of the game. Even Prawn from Battle For Bikini Bottom gets a cameo.
The character writing is also an improvement from the last few games. Not that it was bad, it’s just that the jokes in the dialogue are much better this time around, and there’s more of the characters talking to each other than talking to quest givers. So Spongebob and Patrick’s dynamic as friends is on full display, Squidward’s the annoyed but likable grump, Mr. Krabs is greedy but not heartless (although his voice actor once again did not return), and Plankton’s dialogue is filled with laughs. The standout to me is actually Spongebob and Sandy, as their interactions are perfect; better than the show itself if I’m honest.
All in all, if you’re a fan of Spongebob, this game is nothing short of a massive celebration of the series.
Presentation
It helps that the game looks good, too. All of the visual quirks from BFBB and The Movie Game have been thankfully worked out. Characters have many more unique animations to fit the dialogue they have, and the recycled animations are more dynamic. Spongebob himself is incredibly expressive, and in a way, no game has quite matched yet; nearly every dialogue with him has his face fully animated with unique expressions, and his eyes can now change shape as they do in the show itself. Plus, the color palette is perfect. It’s not too dull like it was in the previous two games, nor is it as overly vibrant as Rehydrated is. As sad as it may be to say, this is overall the best-looking Spongebob game.
Which is good, since it reuses a lot of assets. Most of the textures are either lifted or upscaled from the first two Spongebob games that Heavy Iron made, and all the music is either from said games or the show itself. This isn’t bad per se; those games had some good art direction and all said music still sounds good. It’s just distracting how the best-looking Spongebob game also had to cut a lot of corners.
The only part of the presentation that is actually bad is the gameplay chatter. Spongebob does not stop talking during gameplay, and comments on every possible action. He only has about 5 comments for these actions, however. It took only about 5 minutes of gameplay to hear Spongbob repeat his voice lines on picking up the “Happiness Nuggets” (the Spongebob coins you see in the game). Spongebob and Plankton’s dialogue are less repetitive, but still way too limited for how quick they are to start talking.
Gameplay
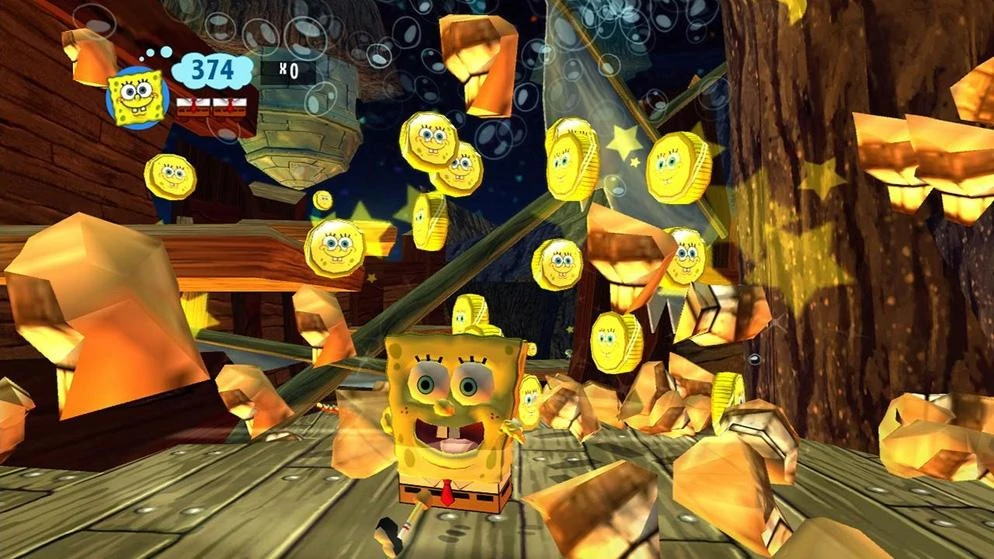
The game follows the general gameplay that Heavy Iron used for Spongebob, but it’s where the game starts to lose some luster. Spongebob himself just doesn’t have as good of a moveset this time. Moves like the Bubble Bash, Bowling Ball, and Cruise Missile are nowhere to be seen. He instead has the spatula slam, the spin attack, and a water balloon. I’m not sure why, but the game doesn’t start you with all three moves. You only have the spatula slam for the first level, giving the spin attack for the second level, and the fourth level (the third is a boss fight) gives the player the water balloon. Once you finally have all the moves, the game makes fairly good use of them; every level makes use of every move more or less equally in terms of puzzles. Platforming never needs anything beyond Spongebob’s double jump; while you can use the spin attack to extend air time shortly, it’s mostly only going to be used for correcting a jump or taking a minor shortcut through a level.
Combat, on the other hand, generally favors the spinning attack. This is because the other two attacks stop you from moving outright, meaning you’re stuck in place until the animation ends while the spin attack can let you ever so slightly adjust your positioning. The game tries to balance this by making the slam attack faster, but that slight speed increase is just never enough to account for how enemies can quickly surround the player. Both attacks stun-lock enemies, too. So while a robot locked in with the slam attacks will die faster, the spin attack can take out a large group of robots safely. Plus, the spin attack reflects projectiles, which is the only way to defeat some robots in the first place. Typically, I only ever used the slam move on single targets and/or when the game forces me to.
Lackluster enemy variety isn’t helping much. The game has eight enemies (which I think are visually better than the robots in BFBB), all based on Spongebob’s attacks. Two hammer and two spinner robots (small and big versions of each) with four projectile enemies (a straightforward one, a mortar-style variant, a teleporting one that requires the player to reflect its attack back at him, and a bomb bot that can be rolled around to blow certain things up when hit). Hammer enemies are best dodged via side-stepping the hammer smash, so the spin attack allows you to attack without changing direction. Two spin attacks cancel each other out, so if there are three or more spinning robots coming at you in the same direction, then the hammer attack is better; otherwise, just spin to stun them. And all projectiles can either be reflected or side-stepped.
However, what actually makes combat so dull is, surprisingly enough, the lack of knockback. Unlike most games, knockback in BFBB and The Movie Game applied to both the player and enemies. So dealing with enemies was a game of keep-away to avoid getting overwhelmed via knockback. It also meant that if you got hit, while enemies would start taunting, you’d be moved away to avoid retaliation while not being juggled to death. Here, however, since getting hit leaves you in place, you’ll just walk up to them while they’re taunting and start attacking. And once they’re hit, they may as well die as there’s no escape nor knocking you back outside of a few bosses. Basically, there’s no reason for every enemy to take 2-4 hits if there’s no knockback because getting hit once is a death sentence if the player is capable of hitting the same button a second time.
To be fair, combat normally doesn’t last for very long, at most lasting 30ish seconds between platforming sections. It’s mostly during the combat challenges for 100% where these faults become hard to ignore. Unlike The Movie Game (which designed difficult waves where the player must defeat every enemy with limited recovery items), these challenges just have 4 enemies that infinitely respawn while the player tries to survive for 60 seconds while enemies drop health when enough are killed. And none of the projectile enemies appear in these challenges, so repetition will set in for them.
Finally, there’s also that Spongebob is the only playable character; Patrick, Sandy, and Squidward are just power-ups, and they’re Spongebob’s normal attacks on steroids. Patrick is a super hammer, Sandy is a super spin, and Squidward is a super projectile. Sandy is the best of them hands down for reasons you can probably guess. There’s also Buff Spongebob, which doubles damage while letting the player break stone tikis. Unlike the three other characters, Musclebob isn’t on a timer and keeps going until you get hit. And since the spin attack gets a much bigger range when buff, trying to keep this buff active so you can lay waste to hordes in seconds is ironically when combat is at its most interesting since it becomes a “don’t get hit ever” challenge. It also might be while I never once died in combat.
The puzzle-solving and platforming are much more engaging. Not hard, this is a kid’s game and every puzzle is just “do the thing to push the switch.” It’s mostly the mixing and matching of the moves/ power-ups in small, 10 second tasks that the level design often allows the player to do in any order. This both keeps things engaging the first time through, and less tedious when going back on repeat runs for the extra collectibles. And a few of these tasks in the second half can start asking for more strict timing than one expects. While I just spent a while explaining how combat isn’t that great, I overall wasn’t bored playing through the game.
This is why the Boss Fights are so good in this game: they’re really just puzzles that hit back. From the giants for the end of an act (RoboPatrick being based on “No Weenies Allowed” or RoboSquidward being based on “Just One Bite) to the sub-bosses, most of them are actually about countering attacks or learning how the boss tracks the player to properly dodge. They’re hardly the most difficult fights ever, but they’re all engaging from intro to defeat.
So combat isn’t great, but the overall gameplay is simple yet engaging. So it’s both a blessing and a shame that the game is so short. There are only 10 episodes in the game: 7 levels and 3 boss stages. If 100% completion doesn’t matter to you, this game is only 5 hours long. If it does, a good 11 to 12 but with little reason to revisit beyond “it’s the Spongebob celebration and I’m in the mood.” And you know what? I’m actually okay with that.
Yes, I can’t help but wish I got a game with this kind of attention to detail and visuals, but with the Battle For Bikini Bottom structure and depth. But for what this is – a celebration of Spongebob as a series – it’s really good at achieving that. Over 10 years and an additional 6+ seasons later, Truth Or Square (the game) is still every bit a love letter as when it first launched. I focused mostly on the issues because the game is otherwise just fine. And after a year of Awful Archives covering deeply flawed games, it was nice to have a nice little game that just had room to improve. Sure, it’s not likely I’ll play this game again anytime soon, but celebrations are better once a year or so anyway.
Man, it’s been two years since I started this? Dang.
I was hoping to get Pokemon Sword And Shield done before these awards, but that ain’t happening. That’s because I somehow did even fewer awful archives this Squid year: a mere 6-7 (depending on if you count the BETA for Back 4 Blood as a separate game or not from the retail release). Not helping is that I didn’t really get any great picks this year. ALL of them were weak compared to last year’s gems like Sonic Adventure, ZombiU, or even the surprise of PocketBike Racer. That’s actually why I wanted to finish Sword/Shield first – despite how much I don’t care for Pokemon, it would probably sweep these awards.
So how does the more mediocre set of archives stack up against each other and last year’s winners? Let’s find out. Same awards as last year, with the following games being up for trophies:
The Actual Worst: This is given out to the worst game covered in the year. I try to not recommend the buying nor skipping of a game in these reviews and leave the review to speak for itself, but if there’s one game to skip this year, it’s this one.
The Literal Best: On the other end of the spectrum, this goes out to the game that was the overall best this year, or the game I most strongly recommend you play.
The Best Test Of Squid’s Blood Pressure: This goes to the game I hated the most this year. This doesn’t have to be the worst game I covered this year, but the one that I personally hated playing the most.
The Best Test Of Squid’s Blood Sugar: The game that I simply had the most fun playing, even if I had a lot of problems with it.
The Mystery Box: Everyone loves a good surprise every now and then, and this award goes to the most pleasant of this year’s surprises; the “color me impressed” award.
The Jim Sterling: The most disappointing game covered this year; the one where I found myself going “you could have been great” the most.
The Pretty Face: Awarded to the game I found to overall be the most visually pleasing.
The Ugly Mug: The game I literally don’t ever want to look at again.
As for this year’s games:
The Walking Dead: Survival Instinct
TMNT: Smash Up
YIIK: A Postmodern RPG
Back 4 Blood (Both Beta and Retail Release)
ZomBeer
Dead Rising 4
And as a fun little bonus, I’ll mention how the winners compare to last year’s.
The Actual Worst
YIIK is simply not a good game. There’s the promise with the 1.5 update later this year to make it a much better game, and I’m keeping my ear out for that. But until then, it’s a game where most of the characters suck at combat, the story is mostly full of hot air that throws it all away in the end for a “meta-narrative” that does not do a good job connecting to anything. It’s characters are weak, its combat is barely held up by Rory thanks to the 1.25 update, and the overworlds are incredibly shallow and empty. In terms of “what’s worse: bad or boring?” YIIK 1.25 doesn’t have to worry – it’s both.
Now, is it worse than Shadow the Hedgehog? No. It can be a bit close, but I had positives to say about it. I liked some of the music. The combat had positives. The aesthetics are nice at times. Hedgehog had nothing good going for it beyond concepts. YIIK just had little of note beyond Shadow somehow being worse.
The Literal Best
Man, rough year. But I said it then and I’ll say it now: Dead Rising 4 is still a Dead Rising game, and Dead Rising at its worst is still a lot more interesting and fun than most games. I hate the story and the gameplay isn’t great, but it’s not that bad [after the updates]. While it doesn’t even compare to last year’s pick of ZombiU, there are certainly worse games to play around the holidays. If nothing else, Dr4 can be a fun, mindless zombie sandbox. They may only be part of the franchise’s appeal, but it’s more than most bad sequels get right.
The Best Test Of Squid’s Blood Pressure
Two already, huh? Yeah, while last year had Origami King to have me dislike more than Shadow The Hedgehog personally, YIIK was easily both the worst game I played and the least amount of fun I had while playing it. But do I dislike it more than Origami King? In terms of playing it, yes. I had even fewer nice things to say about YIIK than Origami King. However, I truly despise what Origami King means for its franchise. A game promising to return to its routes yet refusing to play like the old games to avoid being predictable, all the while reusing set pieces and ideas for the third/fourth time in a row. YIIK was pretentious, but Origami King was continuing to shove the square peg into the round hole.
Also, there’s the promise of the 1.5 update. While I’m not holding out much hope in it saving the game, I have a lot of respect for devs freely updating a game to try and appease fans and critics. Meanwhile, Origami King, with the backing of Nintendo and over 2 million copies sold, did no such thing.
The Best Test Of Squid’s Blood Sugar
I almost went with Back 4 Blood, but the version of that game no longer exists. Survival Instinct, while I almost always play with certain New Game + perks, is just a game I can get more out of. Sure, it’s basically the “We have ZombiU at home” game, but it’s still fun. Just… a lot more fun on a repeat run with some of the BS countered via relics.
I’m not even going to humor this game being as fun as Sonic Adventure, though.
The Mystery Box/The Jim Sterling
In a strange turn of events, ZomBeer is both the most impressive and most disappointing game I’ve played. I can see everything trying to come together. The actual mechanic is really cool and has some thought to it. The visual style is distinct and memorable. But man, right when the game starts firing on all cylinders, it ends. Combine that with consistently cringe-worthy jokes and how literally unfinished the game is, and my biggest surprise this year was my biggest letdown. I wasn’t as impressed as I was with PocketBike Racer nor as let down as LEGO Indy 2, but it’s impressive it manages to hit both notes at once. It’s also fitting the game I learned about from Jim Sterling was both a massive letdown while being no where as bad as he made it out to be.
The Pretty Face
Also considered Back 4 Blood for this one, but Smash Up just has a more appealing art style – which matters more to me. That is why Origami King won this award last year, after all. The game doesn’t look great, but it’s visually very recognizable as a TMNT game. It wins through style alone.
The Ugly Mug
This game is ugly. Outside some visual dungeon design and the character portraits, nothing looks that good. And the animations are barely animated. It’s an ugly game to look at where there’s very little to do other than look at it. The best thing about the visuals is that it looks better than Big Bumping.
And that’s this year’s games: nothing is as good or quite as bad as last year’s, which is pretty accurate to my initial thoughts. But the only reason I did fewer archives was that I had other articles and write-ups I wanted to make. That, and Sword and Shield has been taken forever. Also IRL stuff. Okay, there are a lot of reasons.
Next time on Awful Archives, it’s Pokemon Sword And Shield. Maybe.
A “Roster Buster” meets a “Tier List”. This might be the most trendy thing I’ve ever done; may as well put “3 a.m. gone wrong!” in the title at this point. But with my Friend’s Meta and Arti doing a Race for Super Smash Bros (Arti is likely to lose at this rate, but I’m still rooting for him) followed by my nephews visiting and playing some Smash got me in the mood to talk about this game/series. And I have way too many ideas to write here, so for now I went to the “Roster Buster” approach. On the off chance that you don’t know what this is, a “Roster Buster” is when you cut a roster down in size (often half or more) to its bare minimum. It’s fun for most since it forces them to consider heavily who they do or don’t want and to keep every factor in mind. But I’m not like most people.
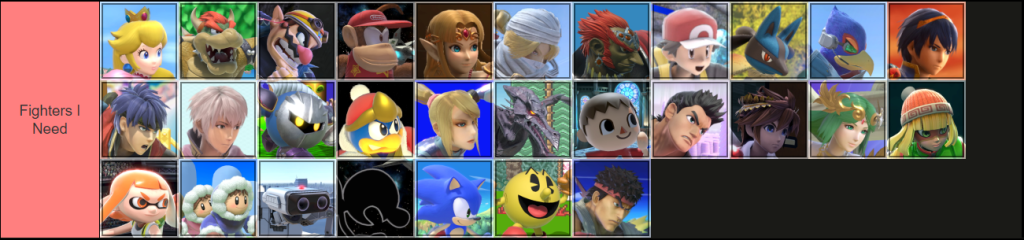
This is where the “Tier List” comes in. Instead of just cutting them out, I made a list of the “absolute musts” for me and then made tiers for how bad I want those who are left. (Characters I’d want and would prioritize, character’s I would miss but can let go of, and characters that I simply wouldn’t miss if they were dropped). I also separated some of the clones and echo fighters into a separate tier list, just to avoid tier from getting too cluttered. All images were made via Tier List Maker.
So with that said, how badly do i want certain characters to return in Smash?
The OG 12
The original 12 characters would, of course, return. The only reason I’m even bringing them up separately is because there have been times we almost didn’t get them back: Ness was going to be replaced with Lucas in Melee to go alongside Mother 3 (HA!) and Jigglyppuff was added last minute into Brawl (that’s why she didn’t appear in the Subspace Emissary; same with Toon Link and Wolf). I won’t bring them up individually here just to save time.
Fighters I Need
When combined with the OG 12, treating Pokemon Trainer as three fighters, and keeping in mind there’s an Echo Fighter I need later on the list, that brings things up to 44 characters – just a bit below Smash 4 WiiU/3DS. Basically, if these were the only returning characters, I’d be fine with only a few disappointments (provided some new characters were added in). As for the fighters themselves:
Peach: Probably always going to be in Smash. Interestingly enough, Smash really plays up the girly side to her. Fair enough, since it makes her stand out. Strange that throughout the years, she’s never really moved beyond Mario 2 USA in terms of moves.
Bowser: Make way for the King. Making him a wrestler in Smash 4 was really sweet and oddly fitting. Beyond that, I look forward to drop-kicking poor suckers into a 40% KO.
Wario: There are more games starring Wario than Samus. Also, he’s been turned into the epitome of fat and gross.
Diddy Kong: Reject Waluigi. Embrace MONKEY.
Zelda: One of my mains, and the best design for her (which is impressive, since I don’t like the art style of A Link Between Worlds). I wish the alternate colors were a bit better (a red haired version for NES Zelda would be cool), but that’s for another day.
Sheik: Would feel wrong to not have her, and I wouldn’t be able to make Naruto jokes to make my friends cringe.
Ganondorf: Another one of my mains. It’s nice for him to actually be okay again. His sword’s hitbox is evil. Pure evil.
Pokemon Trainer: I’d prefer to have the 3 Pokemon playable separately with a unique down B, but I’m not losing sleep over it.
Lucario: Hey, look! It’s blue Goku! Also, I’m a Gen 4 fanboy. In fact, it’s one of the only two pokemon gens I’ve played for any significant amount of time. Meta also doesn’t like Lucario and I’m a petty person sometimes.
Falco: What started out as a throwback to Fox’s N64 move set has been thoroughly declined, even more so than Luigi has at this point.
Marth: Hey look, it’s blue Link!
Ike: Hey look, it’s blue Roy! Also one of my mains.
Robin: Hey look, it’s a Fire Emblem character without a counter! Incorporating weapons breaking is a nice addition, and is a good representation of the Fire Emblem game that, for better and for worse, popularized the series in the West.
Meta Knight: Most people know how he ruined tournaments. I remember how 4Kids made him sound Hispanic for some reason.
King Dedede: I actually wish his 4Kids voice was an option.
Zero Suit Samus: I actually don’t like playing as Zero Suit Samus, but her move set is fairly unique.
Ridley: Gotta give the team credit: they found the perfect size for Ridley where the large size was kept intact while not being too big but also not just being shrunk to Charizard size. Very respectable.
Villager: The Killager. Just too creative of a character to drop.
Little Mac: A personal favorite, although not exactly a main. Deserves more music in the game, though.
Pit: May as well be a Sakurai original character at this point. That’s a good thing, by the way.
Palutena: One of my mains and one of my favorite characters in general.
Min-Min: A character I never knew how badly I wanted until she was added. Her inclusion made the lack of Chun Li a less bitter pill as well.
Inkling: Woomy.
Ice Climbers: Revealing them returning in the proper reveal trailer for Ultimate gave me an emotional high that the MCU could only hope to achieve. Please, never leave me again.
R.O.B.: Some people really don’t like R.O.B. for some reason. Weirdos, I’d say.
Mr. Game & Watch: The first real “meme” or “joke” character in Smash Bros, and the best.
Sonic: The first of the third party characters, and one I really don’t want to see leave. I don’t even play as him all that often, but it feels like he belongs at this point.
Pac-Man: The only character who I wanted to join Smash Bros that actually joined the roster.
Ryu: Another character I personally don’t care for, but between him and Megaman, I think I’d rather have Ryu as the Capcom Rep if I had to pick one. I also just like the stage and music, for what it’s worth.
Fighters I Want
These are characters I would prioritize to get in but could live without if their exclusion led to newer characters (especially if it was characters I wanted). There are 15 total additional characters on this list:
Mii Fighters: The Mii Fighter costumes are the best idea the Smash Team had. It helps that the costumes in Ultimate were really high quality (especially in the DLC). I could use with more options or fighter styles, but again that’s for another day.
Piranha Plant: Reject Waluigi, Embrace PLANT!
King K. Rool: I actually didn’t want King K. Rool playable in Ultimate. Not because I actively hated the character, I just had characters I wanted more. The fact he’s now a character I would really want back over others should speak to how much I enjoy playing as and against him.
Roy: I liked playing as Roy before he was good. He’s not in the clone/echo fighter section because he officially has one in the form of Chrom.
Olimar: The Flying Pikmin single-handedly turned Olimar from an annoying and gimmicky character into a tactical fighter unlike any other.
Wii Fit Trainer: A character that is payable literally because Sakurai wanted someone no one asked for.
Shulk: I should really play Xenoblade.
Pyra and Mythra: I really should play Xenoblade 2. I definitely prefer playing as these two to Shulk, and the switch mechanic from Zelda/Sheik fits them perfectly. If for whatever reason they couldn’t return, I’d like to see this mechanic return via Lana and Cia from Hyrule Warriors.
Snake: He’s so out of place here; I love it. Shame there probably wouldn’t be any new codec conversations.
Joker: The Persona summon is one of my favorite gimmicks to a fighter. He’s not useless without it and he’s not overpowered with it. The music slaps (and fits Smash really well) and the stage is one of the more interesting ones since more stages are “Battlefield but with background stuff”.
Banjo and Kazooie: Take everything I said about King K. Rool and apply it here. Both are Rareware characters, too.
Terry: My favorite of the Fighting Game fighters, hands down. I only picked Ryu over him because he’s from Street Fighter. If this list was nothing but my favorites, Terry would take his place.
Fighters I Would Miss
Now for the section where I choose characters that I still enjoy having in the game but am far more willing to let go of. AKA when my friends on Discord start to not have fun reading this.
Bowser Jr. & Rosalina: both are characters I enjoy for how creative they are, but there are plenty of Mario Characters as it is, and if I had to pick some to drop, these would be the two I personally would be the most okay with. I enjoy Bowser Jr. the most between these two.
Mewtwo and Greninja: I actually enjoy playing as both of them move set wise, I just have other characters I’d rather have if I was forced to pick, and there’s no shortage of Pokemon to play as. That’s on top of how there’s always going to be the new Pokemon added from the newer games.
Byleth: While I rolled my eyes when Byleth was revealed, the rest of the trailer and the gameplay breakdown won me over. The weapon transformations representing the adaptable nature of the units in Three Houses are clever.
Isabelle: Good Doggo. Also a massive troll character. Not sure if Isabelle is going to stick in the Animal Crossing series as the new face of the series, but it’s understandable why she’s in smash. If Animal Crossing is going to have two reps, Isabelle is a good choice. If it’s only going to have one, Villager is the better choice.
Megaman: The announcement of Megaman was the start of “Smash Hype”. It was when a character getting revealed became an event. He’s a fun projectile-only character; if the stage and music were generally better, I might have thrown him in the want category.
Simon: Of all the fighters in this section, he’s easily my favorite to play as. But I like the music and stage more than the character if I’m honest.
Cloud And Sephiroth: Falls into the category of Megaman where I like playing as the characters, but the stage and music (what little there is) I enjoy more. That said, I play as Tifa via Mii Costumes more than either of these two.
Fighters I Wouldn’t Miss
I’m going to get some colorful commentary on Discord for these.
Incineroar: While I love the visual style and flair of this character, he’s my least favorite newcomer in Ultimate and the only one to actively disappoint me. His move set just never clicked with me.
Corrin: Unbelievable – a Fire Emblem character I don’t like. Corrin, similar to Byleth, was thrown in to advertise the newest Fire Emblem game. Now ignoring how Three Houses was much more well-received than Fates, Corrin had to have all of his gimmicks toned down harshly in Ultimate to make him fair, and at that point, I’d rather play as Zero Suit Samus. Combine that with a surplus of Fire Emblem characters, and I would actively vote Corrin off the roster if given the chance.
Duck Hunt: A creative character, but Ice Climbers are a better representation of the NES era of Nintendo with a better gimmick to boot. A character I find more boring than anything.
Hero: I may like TF2, but Smash Bros. does not play well with random crits. I wouldn’t have as big of an issue if the Hero could at least receive random crits as well as deal them – a risky character through and through. But instead, the Hero’s RNG is the spell system, making it really hard to actually perform an attack you might want. Also, Kamikaze can burn in hell. The music is honestly the best thing about the Hero DLC.
Sora: The opposite of Hero – I kinda like playing as Sora, but the rest of the additions – especially the stage and music – were really underwhelming. I know to most Sora was a dream come true, but I’m not a Kingdom Hearts fan. It was funny to make jokes about locking people in the Disney Vault, but it’s not a joke I need to make in every Smash game moving forward.
Bayonetta: Bayo ended up in this tier through a combination of there being other SEGA characters I’d rather see and sheer indifference.
Steve: The reveal was really funny, and the fact you need to play Minecraft to play as him is funnier. That said, it also makes him really annoying to play in a remotely serious environment. For both Steve and Sora, I’m glad they were added, but I don’t need them back for more. The stage was cool, though.
Kayuza: The only DLC character I didn’t like. His reveal trailer wasn’t all that interesting, his gimmick is that he has eight directional attacks (meaning it’s twice as easy to perform the wrong smash attack), and his special moves really left me underwhelmed. I like the music – Namco fighters always have a great OST – but I’ll take Yoshimitsu any day, sword fighter complaints be damned.
Echoes and Clones
And now for all the characters based on other fighters. They get their own mini section since they take comparatively few man-hours to make and as such their inclusion rarely comes at the cost of content elsewhere, according to Sakurai himself. I didn’t count any characters who had been “declined” over the years like Luigi, Falco, or Ganondorf. That said, I put them all here at once this time.
Daisy: Best girl. If anything, I’d like to see her be given her sports outfit(s) and have her represent the sports spin-offs, but having Peach’s move set on a redhead is perfectly fine with me.
Dr. Mario: I think the good doctor would be a nice collection of Mario’s original move set, so keeping him here would give them a reason to experiment with Mario’s moves more in future entries.
Toon Link: Take what I said about Dr. Mario, but apply it to Link, and with the most adorable character Nintendo ever made. Wind Waker is still better than Majora’s Mask, by the way.
Lucina: My nephew would kill me if I didn’t put her in this tier.
Pichu: Another good joke character. I like the idea of a character with a strong attack and good throws having the downside of hurting itself. That said, Pichu really benefits from the decimal percentage values, allowing for better scaling with the self-damaging than Melee could ever hope to achieve.
Ken: Ken’s cool. Just not someone I’m desperate to have back.
Dark Pit: I’m fine with him, and would in fact expect him to return. Just not someone I’d riot over if he was gone.
Dark Samus: I’m fine with her, and would in fact expect her to return. Just not someone I’d riot over if she was gone.
Lucas: Sorry Arti, I know he’s a favorite of yours (especially from the Brawl days). It’s just that I rarely play either Ness or Lucas in the first place.
Richter: If Simon comes back, bring Richter along. If not, no reason to have him.
Chrom: Similar to Dr. Mario, Roy serves as a fighting style of the old version of Marth. Chrom is just Roy with Ike’s recovery while lacking Ike’s side special that makes up for his otherwise awful recovery. So yeah, into the Corrin bin with Chrom.
Wolf: Eh. Never cared for Wolf in Smash, even if the character himself is rather cool.
Young Link: Was cool to see him back for Ultimate. I don’t need to see him again, though. Toon Link is just better.
Newcomers
I have several, as does literally everyone else. I have a list of 20 characters I really wanted in Smash Bros. Ultimate. Needless to say, I didn’t get a single one. However, none of those 20 are here. Instead, these are a different set of 20 characters I chose from a tier list maker that are not part of the list I’m currently working on.
Chun-Li: I was hoping for her as a new addition since she’s one of the few Street Fighter characters I played as back in the SF4 days. I’d be fine with M. Bison, too.
Jack: I don’t care how toned down it’d have to be, but having the Madworld soundtrack in any form would actually make me flip. I’m also curious how Jack’s chainsaw arm would translate to Smash.
Bandana Waddle Dee: I have a lot of respect for Sakurai not wanting to over-represent his own creation, but I think one more Kirby character would be totally forgiven. Especially if said character was the hardest boss in all of existence.
Ratchet And Clank: I’m a simple person. A gun-toting redneck with a talking jetpack sounds like fun.
Kasumi: “Do you really just want to play as a hot red-haired ninja girl?” Yes, and I’m tired of pretending I don’t.
Sly Cooper: My favorite Sony mascot. He’d be in Rachet’s place if I could more easily imagine a move set.
Raiden: If we get a second Metal Gear rep, I can’t think of someone more deserving. And while I find the Metal Gear Rising soundtrack just a bit overrated, it’s still a damn good soundtrack.
Scorpion: I’d like him to visually be based more on the arcade games, but having the tether kombatant from hell in Smash would be… surreal, actually. Surreal is usually a good thing here, though.
Paper Mario: I think Sakurai would take notes from all of the games, instead of just old or modern PM. I would just focus on characters from the DK, Yoshi, and Wario series first.
Cooking Mama: Such an amazing chance for a joke character. But if I’m being honest, a Mii Fighter Costume would leave me just as happy. So I can’t put her any higher.
Lloyd: I just remember playing him in Super Smash Flash 2 and having fun with him. So seeing an official take on the character would be cool.
Juan: I just want a brawler style of character that isn’t Incineroar. Also curious how such a stylized character would look in Smash’s art style.
Geno: Not a character I personally care for, especially since Rosalina exists. But I’m not opposed to him or anything.
Heavy: Look, I love the TF2 cast, but Smash just isn’t for them. Now, if this was about Mario Kart…
Crash: Has always been firmly in the “characters I just can’t get interested in” category. My thoughts on Crash as a series could be its own article someday, but for now, I just don’t see his moves as interesting and have dozens of characters I’d rather have.
Tracer: Being a cute waifu shouldn’t be enough for a Smash slot.
Fawful: I don’t get the appeal behind this character. At all. Even in the RPGs, there are several better characters.
Freddy: I’ve seen actual requests for this character from people who aren’t children. Kill me.
Chorus Kids: The Smash 4 Leak is the only reason people want this character in my opinion. Nothing about the characters is noteworthy otherwise.
Waluigi: Do people like Waluigi? Or do they just like Waluigi memes? Because if you think he’s this fourth-wall-breaking mastermind of a character… then you like the memes a lot more than the character.
As for everyone else I really want (on par with Chun-Li and Jack), that’ll have to wait a while longer I’m afraid. This article was just something I did over a weekend because I was put in the mood for it. I’m hoping to have a proper Awful Archive by the end of the month (got an interesting game lined up), so look forward to that.
It takes a good deal to get me to quit a game, especially for the Archives. Several of my all-time favorite games are heavily flawed, but the strengths keep me invested. That’s just the kind of critic I am: if there’s something to enjoy, I typically will enjoy them while playing it. A game being boring might make me hesitate to pick it up and play it, but it won’t stop me once I start playing it – especially if I enjoy parts of it. This is actually why the Pokemon Sword and Shield Archive hasn’t come out yet – I find Pokemon as a series quite dull, but when I do pick up Sword and Shield I actually have a good deal of fun with it.
For me to actively swear off a game before I finished it, it’s typically one of two things. The first is a general lack of positive traits. This actually stopped me from properly reaching the last story in Shadow The Hedgehog before reviewing it (I didn’t bring this up because it was irrelevant to the points made in that archive). The second is when the negative aspects there are so bad that not even the parts I enjoy can keep me in. This ultimately happened with Back 4 Blood thanks to the November update.
Yeah, I didn’t properly finish this one, but having played the game for 40+ hours, on top of playing and reviewing the Beta already, I’m confident in my assessment. I wasn’t planning on doing an archive on this game until this very month, but not because I didn’t finish it. I simply don’t like to do these archives for live service games; at any given moment, an update can launch for a live service where even a basic change to a core mechanic can have a trickling effect on the game. So for example, let’s say I think only the assault rifles are worth using and spend 3 paragraphs explaining the knock-on effect that has. But then the game gets updated and makes shotguns OP while nerfing automatic weapons across the board. Now, that’s a chuck of the archive no longer really of any use nor accurate to the game these days. Sure, in the era of patches this could happen to any game, but live services are designed for these kinds of adjustments from day one while receiving them way more often.
Between that and how the game ended up encouraging me to not really experiment with gameplay (more on that later), I’m instead going to use this as a quasi-follow-up to the Back 4 Blood Beta Awful Archive. First I’ll go over something I like (and the problems the game adds to it) then address the first four core problems I had with the beta, then another thing I like alongside its issues, then address the last four core issues.
Characters
The story of Back 4 Blood is fairly simple. A year after what’s known as the collapse, some survivors are making an off-the-record delivery to a friend of weapons and supplies, when suddenly the Ridden (zombies, which I shall refer to as infected moving forward) appear for the first time in months. With their friend quickly dying and their commander not being happy when they radio in about what they did, they soon find themselves fighting for their lives while not exactly being in the good graces of mission control.
There is a continuing story that takes a bit more of the forefront than Left 4 Dead, but it doesn’t accomplish anything more (if anything, it accomplishes less) but it’s clear the survivors are meant to be the main attraction. When it comes to said characters, both in terms of design and personality, I like them at their core but Turtle rock made a lot of annoying choices that leave me refusing to give either any high praise. For both the character designs and personalities, I’ll go over the design choices at large and then use my favorite character (Holly) as a more precise example
The cast of Back 4 Blood follow a design rule of color schemes, and so each of the eight characters has a piece of clothing with that color (Holly’s yellow sweater, Doc’s white lab coat, Kaylee’s purple shirt, hair dye, and the black leather jacket, and Jim’s orange hunting jacket). The other four characters share some basic colors, (Walker and Eevee are both blue, and Hoffmann and “Mom” are both green) but have different silhouettes to remain identifiable.
Unfortunately, this only applies to the default costumes, as players can unlock costumes. This isn’t as big of a deal as I feared it would be in terms of telling who’s who – honestly everyone seems to just use the names above players to identify each other. No, the problem is that the customization sucks. There are costumes and outfits. Costumes are preset and outfits are mixed and matched. This means that there are (at least currently) no “outfit” pieces to make use of the default designs. You want to play as Holly in the yellow sweater and leggings but with her hair down? Too bad, the hair down is an outfit piece, so now you’re in a white shirt and sweatpants. There are only 4 types of costumes shared among all characters: default, recolor, militia (only the five characters from the Beta even have this one… conveniently when the season pass that unlocks it immediately went on sale), and a SWAT outfit. And the outfits? Only a total of three pieces across three slots. Combine that with how ugly some of those outfit pieces are, and you have one of the weakest cosmetic systems I’ve seen in a game.
Okay, why does this matter? Well, for three reasons:
Dead Rising 3, a game from 2013, handled this way better while having more cosmetics than all eight characters in B4B combined have with more diverse costumes to boot.
You have to see everyone’s outfits. I don’t care for Kaylee’s default design, but all of her costumes and especially outfits suck. So the friend I played this game with – we’ll call him Mr. Copper (no relation to “Mr. Pro”) – decided to dress her up in obnoxious bright purple with black jeans, making her look like a 4chan “missing texture-chan”, I have to see this eye-sore. I know this is standard for multiplayer games and L4D2 was the exception, but it still doesn’t change that I hate how characters look 90% of the time because it seems I’m the ONLY one who likes the default designs, and instead of breaking from the model and applying L4D2’s approach to modes to the unlockable costumes, forced players to see how everyone else wanted to look because of FOMO.
As an extension of the previous point, this means players can only customize the character they play as, which they’ll rarely see because it’s a first-person game.
There’s actually a fourth problem, but we’ll get to that later.
I like the designs the game has but not the designs everyone else tends to rock. So how about the characters themselves? Well… they can be good, but also annoying. Characters have two types of dialogue: gameplay and narrative. Gameplay dialogue is just the characters’ referencing the gameplay events: from a horde spawning to spotting a boss-tier infected to looting a car. Narrative dialogue is when the characters talk to each other, often about the story thus far or their own personal lives/outlook on the situation.
The gameplay dialogue is easily the worst of the two, as this is where most of the cringe-worthy lines are. From Holly having more than one joke relating to her having to pee (thanks, totally needed that) to her in every single level hoping that the car she’s looting would have a jar of pickles to make her millennium, the phrase “windbag” came to mind with all eight of these characters. Expect your character to talk almost every time they can. You get to hear the same six lines of dialogue for each type of interaction across the run with the added bonus of characters sometimes talking over each other when hordes show up (although this happened less and less so they may have fixed that part). Even then, I learned to savor whenever they actually stopped talking.
That’s a shame, too; the narrative dialogue fares much better. Holly even has my favorite line in the whole game, where she laments how after spending a year rebuilding society to some passing-resemblance of normal, only for it all to fall apart overnight. She then tells Walker she’s done talking when he mentions it’s not like her to be like this. This moment of implying that Holly’s humor is a coping mechanism instead of her just being wacky is greatly appreciated, and every character has moments like this. But it’s just that – moments. This is not a defining aspect of Holly’s character, nor do these moments ever carry on for other characters either. Each character’s dialogue for the story can make them feel like a separate character from their gameplay quips.
Of course, the humor being better would work wonders. Let’s use my least favorite joke in the game (thanks to Holly) to explain the various reasons why “the funny” isn’t here. In the chapter 3 finale, if both Holly and Walker are present, she’ll ask the team at large where the phrase “shooting fish in a barrel” comes from. Walker is the only one who answers her, not believing her theory before eventually saying he’d rather fight the infected instead of listening any further. This isn’t a bad joke if you ask me on paper, it’s the details that kill this joke.
First is that the location is inappropriate for this. That’s supposed to be part of the joke, but it doesn’t stop it from removing a lot of tension from the finale of this particular[ly short] campaign. Compare this to Ellis’ stories; regardless if it’s about Keith, Jimmy Gibs, Kiddie Land, or just something weird he thinks, the game saves it for downtimes. L4D2 has a lot of algorithms (known as the AI Director) that can (among several other things) measure the stress levels of the survivors and use that to determine when the game is in “downtime” and if Ellis and the team would be in the mood for one of his stories. This is on top of most of his stories being saved for safe rooms to begin with, and the only thing his buddy Keith hasn’t done yet is kill the mood.
This leads to the other two problems: repetition and variety. Both Left 4 Dead games had response lines that may or may not play, and [usually] each of the four survivors had at least a few lines for each situation. This meant that you could play a map and get different lines each time. Back 4 Blood instead just has it be that each location as a single major line of dialogue between a character and a few others, with some extra follow-up lines if the right playable character is present. So if Holly and Walker are present at the finale, you will hear the shooting fish in a barrel line. Every time. In its entirety. At most, Kaylee might add a few lines at the end if she’s there. It’s worth mentioning that some characters will reference a playable character not present in these locations if no one selected them, like with Hoffman during chapter 4-1. Even then, this hurts the dialogue as a whole while making even the good jokes lose their luster, especially since the game (unintentionally) encourages the player to not experiment with other characters by tying certain abilities to each one.
Finally, it’s rather unprompted in this case. Literally just here because it’s been too long since something funny was said. It’s not like Walker yells that if he kills an infected without missing, or maybe the restaurant sign offering to sell cooked fish or something. An underrated part of Ellis’ stories is how each of them relates to the location; it makes it more natural and ties into Ellis’ character better: he doesn’t quite appreciate the danger he’s in and is instead asking stupid questions or thinking back to old times.
If anyone who reads this is interested, I can do a future article going into my thoughts on each character, but in general these are my issues: the character’s default designs are fine with a customization system that makes it so I can only decide how the character I will almost never see looks, rendering the default designs almost mute, and the characters themselves have repetitive one-liners that often aren’t even funny the first time while failing to tie into what is actually meant to be their defining character traits.
Okay, enough talking about digital people. How did my thoughts on the Beta’s gameplay translate to the full game?
Difficulty
Recruit was made harder in the full game in order to make it so those who want to play on the lowest difficulty don’t have a brainless experience. And to be clear, that is a good thing: as one of my issues was the Recruit being too easy and effortless. However, that also wasn’t my big issue with the difficulty. First, although I didn’t voice it, I did think Veteran was too hard, if anything it’s only harder, but the lack of an inbetween of Recruit and Veteran was far more damning than the former being too easy or the latter being too hard. It made the jump between them too high and made the only way to get good at Veteran was trial by fire. That’s all still true. However, I didn’t explain how difficulty actually works in that old article. So allow me to remedy that and show how the difficulties have the big gaps they do.
Difficulty in B4B has two sides. On one side is the player’s stats. Veteran is treated as the normal mode, as Recruit (Easy) offers inherent damage resistance, removes friendly fire, and offers trauma resistance (trauma damage is the player’s max health lower after taking large amounts of damage) while Nightmare mode (hard) makes the player extra extra trauma damage when they go down and also doubles friendly fire. There are other elements such as the game-making medical cabinets costing copper (in-game currency) to use, but these stats are what matters. More accurately, it’s that trauma damage resistance being lost on top of taking extra damage that makes the jump too big. Since max health loss is connected to how much damage you take at a time, you’ll take more damage on top of losing that trauma resistance to begin with, so you’re actually taking 3 times the trauma damage instead of twice; assume on Veteran that you’ll only be able to recover half your health at any given moment.
Of course, friendly fire being turned on can’t be ignored, either. A big reason Recruit fails to prepare players for Veteran is that a lot of builds become far more dangerous when friendly fire is an option. In fact, most horde-clearing builds require you to be away from your team to safely attack since attacking quickly and indiscriminately is crucial to leveling the horde before you take too much damage. However, when you’re away from the team, the special infected can easily pounce you. Sure, only 3 of them can even grab you, but it only takes one pin and a few zombies to wreck your health bar. And on Veteran, that then translates to lost max health. Only medical cabinets (not even first aid kits) can recover trauma without a card effect, and on Veteran medical Cabinets only heal once for free and then cost 400 copper (making it cost more than 90% of what the shops in safehouses offer). So on this mode from stats alone, it’s very easy for a single mistake to snowball into a terrible situation just because enough things went wrong.
Then there are the corruption cards. These determine what threats will be encountered over the course of the level. Not counting the finale cards (which are really just the game telling you the objective for the finale), most of these cards simply added challenges to the level. Examples include but are not limited to:
Extra traps like alarms and crow gatherings that summons hordes if activated/startled
Riot zombies that take extra damage
Frenzied zombies that deal extra damage
Fire zombies that deal damage by just being close enough
Toxic zombies that leave a pool of acid upon death
All special zombies can have armor that covers their weak points, making them take more than a full clip to put down
Spawning extra boss-tier zombies on a map
Buffing the “Snitch” (Screamer) to always summon a horde when attacked even if killed before it screams
Making the entire place dark and/or covered in fog.
Auto summoning hordes every 3 minutes
It’s worth mentioning some cards always appear in certain levels for story reasons (like Riot zombies at the police station). Beyond that, Recruit has 1 to 3 randomly drawn cards, Veteran is truly randomized, and Nightmare maxes the draws. Since I’ve never had a run of Veteran where I got less than 4 extra cards, you’ll have to always be dealing with a lot more variables and ways the game can counter you. Probably the most manageable aspect of the jump between Recruit and Veteran, though.
Finally, there’s the continue system. Universal across all difficulties, the team gets one continue per run. Just one. If at any point in the 10-12 levels of the run your team wipes a second time, everyone is kicked back to the social space, and the run gets locked down. You’re only option is to start new. Sure, you can pick a level to retry from (although not every level at launch was an option on Veteran to start a new run at) and the game even lets you draw enough cards along with a bit of copper to buy some stuff, but keep in mind that you won’t have any weapon attachments, supplies, extra cards or team upgrades (those are really important). Given those elements can often make or break a run, most players will elect to just restart regardless of the difficulty.
The thing is, my original recommendation for an in-between difficulty – “Survivor” – would still be a welcome middle ground. Here’s what I’d go with:
Players lose their damage resistance but maintain the trauma resistance
Medical cabinets offer two free heals instead of four, allowing players to recover but forcing them to decide who needs it more
1 extra corruption card than recruit
15% friendly fire
Based on the last two updates, I’m not holding my breath that making a mode that isn’t as difficult is not on their agenda, though…
A.I.
Okay, this one is easy. I’m happy to say most of the crucial issues with the A.I. were fixed in the full version, but I’m disappointed in how they were fixed. The general issue appears to be pathfinding and uneven terrain. Survivor bots simply teleport whenever they get stuck, which still happens. That said, I haven’t seen anyone just mindlessly walk off as they did in the Beta, and while the infected can struggle to find the survivors (the Hag is really bad about this), it’s far more playable.
They also made it so the Bots can heal for free at medical cabinets without counting against free uses, but a player must alert them to the cabinet’s existence for each time. Survivor bots also have infinite supplies that operate on cooldowns. I think these cooldowns get longer on higher difficulties, but I don’t actually know.
Both of these changes fix some of the player frustrations but don’t actually address the core problems (A.I. can’t traverse the maps very well, and can’t judge situations enough to use even basic healing supplies). I believe these two problems to have long-term effects on the game, but I’ll get to that later; the moment-to-moment gameplay is improved in this regard.
Annoying Combat
In the original article, I talked about the combat being repetitive, and to be honest I’m just going to take the L on that one. That doesn’t mean they fixed the combat, I’m saying I shouldn’t have made that a point to begin with. The only part I stand by as being an issue, or at least a missed opportunity, is how firearm accuracy is tied to aiming down the sights, making running and gunning a non-option. Even shotguns will miss everything short of point blank (and sometimes even that with the sawed-off or the AA12) when fired from the hip. Shotguns simply gaining a higher rate of fire instead of accuracy when aimed down the sights would have been more interesting and allowed players to adopt a run-and-gun tactic on the fly without having to devote half a deck of cards to it.
So in its place, here’s just some parts of fighting zombies that I came to dislike over 40 hours of playtime:
Stingers and their variants can just instantly jump to any wall they want, effectively meaning that they have no rules for positioning themselves.
Stringers themselves can be hard to identify when getting hit due to poor sound design and the damage indicators not being well pronounced.
Hockers, the Stinger variation that can pin the player, has a stupidly short cooldown period that when topped off with their wall clinging can make them nearly impossible to kill without at least 2 players because they will almost alway land their shot.
Stalkers also have almost no cooldown if they get knocked off a survivor they are dragging away, meaning there will be times they just immediately grab the same survivor again.
The Crushers, a variation of the Tallboy that grabs a survivor and… well, crushes them, has the same problem with the bonus with the Stalkers along with being massive damage sponges. This is because their weapon points are on the arm, which can only be easily hit from the side or when someone is being lifted up and crushed. If one is coming at you, it may as well not have a weak point.
Boss enemies (Ogres, Hags, and Breakers) only appear in a small handful of locations, and even with the corruption card system most maps only have two locations they’ll spawn. Most of the time, boss zombies are simply set pieces to be run from or killed.
Retches (the fat zombies that spit acid instead of puke) have two design faults. First, they look almost the same as the Reekers, the vomitters that summon the horde, making identifying and countering them on short notice rather difficult (the Tallboy and Bruises have a similar issue). Second, the fact the acid sticks to them and leaves a pool everywhere they vomit is overkill. Top that off with they’re high health (only outdown by Tallboy types) and the stupid range (they can puke about a good 4 to 5 car lengths) for an obnoxious enemy.
I could go on, but you get the idea: the actual combat has a lot of small annoyances and a single update won’t fix them.
Rarity
In the Beta archive, I expressed a concern that the moment-to-moment gameplay would make things too complicated for a player to jump on in. I’m happy to say in the final game that is hardly a problem. Instead, it’s the weapon rarity (a mechanic I merely referenced before writing off as unimportant in the original archive) that turned out to be a big problem. More accurately, it compromises what appears to be the intended purposes of some systems.
Left 4 Dead 2 encouraged players to regularly switch weapons with ammo and attachments: grabbing the laser sight attachment made your gun more accurate, but only ammo piles would replenish its depleted ammo; a duplicate of the gun would simply replace it with an unupgraded version. Back 4 Blood ups the ante in terms of attachments. There are now laser sights (as in more than one kind) along with scopes to choose from, and there are also attachments for the gun’s barrel, clip, and stock. However, ammo is now separate from guns (there are four types of ammo in the game: pistol, machine gun, sniper, and shotgun) and so there’s really no reason to drop your weapon (among other problems).
This is where the rarity system comes into play. Weapons, attachments, and supplies all come in varieties (color-wise, white, green, blue, purple, and a few attachments get a yellow tier), offering direct upgrades to the stats of that item. However, the player cannot (at the time of this article’s writing) remove attachments, so one needs to think if dropping the upgraded weapon for a higher tier but basic weapon is a good idea. At least in theory. In practice, there’s never a good reason to hold onto a lower grade weapon if a higher tier is present unless you’re literally at the end of an act.
First, there’s the fact that the attachments operate in percentage values. This means that higher-tier guns will simply get larger benefits from attachments, to the point where even lower-tier attachments can get identical results. Second, guns themselves get ridiculous increases in stats, to the point where the statistical performance of trading would barely be felt. Third is how attachments are distributed: while gun rarity is determined by how far into an act the team is, attachments are determined by location. Typically, better attachments will be found in areas that require tool kits to open. So there’s never really a reason to not immediately apply a better attachment to a gun when you find it unless you’re letting a teammate get it instead. Finally, the game just gives out attachments like candy. If at least one player enters each level with a tool kit (which so long as the team collects copper as they go through is a non-issue), you can be assured you’ll always have some quality attachments for your weapons.
(Side note: items like first aid kits, pipe bombs, and defibs don’t come in separate rarities. Safehouse stores sometimes sell cards that just make each item for that equip slot go up a rank, which then affects all spawning items of that type)
Okay, so the rarity system doesn’t make for interesting decision making, but what’s actually wrong with it? Well, it’s what’s known as min-maxing. This is when players try to max out their stats, be it the player or weapon, in favor of neglecting or actively minimizing all others. The attachments even at their best only offer percentages high enough to where if the gun specializes in that area it can get a big effect, so typically players will be constantly searching for better guns, better attachments, and copper for upgrades. This will continue up until the final level of an Act, after which the run ends.
The rarity system turns this into a looter shooter where you don’t get to keep your loot. Every run starts from square one. All the while adding nothing to the gameplay loop that Left 4 Dead [2] achieved without the aid of this Destiny nonsense.
Level Design
Level design is a bit hit and miss. The main levels can be a bit too straightforward for their own good, as there aren’t as many nooks and crannies as either of the Left 4 Dead games had. It doesn’t outright lack them, but I’d be lying if I said it didn’t feel like there was less explorable space to help justify the placement of the tool-kit locked doors. The bigger downside comes with the mutated infected: since there’s not much in the way of dark rooms or corners for them to spawn in, they’re mostly just standing out in the open or spawning out of bounds before walking in. And since they can be shot before even agroed, even the most fragile of them have stupidly high health pools. Neither of these applies to the finales, though; they’re generally far more open and have more room to explore for both enemy spawns and supplies to find.
In fact, the campaign finales are my favorite part of the game. The level-sized finale has the exploration and proper scavenging that the main levels tend to skimp out on (which is a little embarrassing since the finales don’t skip out on the tool kit doors to achieve this), while the smaller ones are still open enough to give the infected flanking opportunities while forcing survivors to watch multiple flanks.
Variety in the levels is probably the strongest part. Not visually, that’s actually rather below average. But the level objectives don’t take long to go beyond surviving points A to B. From having to find and rescue survivors to boarding up a library (that in later missions serve as the entire safe house) to even option objectives like destroying mines to stop infected from spawning, Back 4 Blood does a good job mixing up the objectives. This reaches its apex during finales, as only a single finale falls into the “hold out until help arrives” angle, with the rest having either additional elements or entirely different objectives. My favorite level hands down is “bar room blitz” where the team needs to keep a jukebox going to distract the infected while the hospital loads up survivors. The infected prioritize attacking the jukebox and will only focus on survivors when it shorts out, but survivors are only loaded in while music is still playing. If there’s ever a mod for Left 4 Dead 2 to add this finale, I’m getting it.
That said, not all the attempts at variety work. Act 1 especially has some really annoying gimmicks to it. Chapter 3, a two-level campaign, requires players to carry supply boxes throughout both levels in what would normally be a mutation in Left 4 Dead 2. Act 1’s first chapter also has the worst finale in the game: you have to cross a bridge to blow up a boat, stopping the infected from leaving the now destroyed town of Evansburg. Ignoring how often random players can’t decide if they want to speedrun this section or take the time to prepare, the finale requires the players to escape the boat, pick up bombs, run back in the boat to plant them, then after they’re planted escape in 90 seconds. This is way too much for the first finale and is the only finale teams seem to regularly wipe on. You’ll only have a handful of cards and fairly mediocre weapons at this point in the run, so the special infected will give you a lot of hell here.
Combine all of that with the “wipe twice and you’re s.o.l. Try again and don’t ever make a mistake again” system and that each act is a two-hour commitment, and you have a really tiring level structure that undermines some creative levels and ideas.
Trauma
I’ll keep this one short. They made it so temporary health stops the player from receiving trauma damage. This is a good step in giving the player a way to prevent it. However, none of the issues I originally brought up have seen changes. So allow me to just copy and past:
“This one gets its own section because it’s a deal killer, especially on Nightmare. So, suffering “Trauma” means that as you get hit, your maximum health keeps getting lower and lower, and you lose extra health when incapacitated (especially on Nightmare). Everyone who brings this mechanic up hates it, and I’m no exception. Aside from the medical cabinets that are often locked behind doors and need a tool kit, there’s no way to recover Trauma damage on Veteran and Nightmare. So basically, most players are constantly going to have their max health lowered.
To properly illustrate my frustration, allow me to bring up some possible reasons to include this mechanic, and why I don’t think they’re a good idea.
Trauma is to punish players for taking too much damage.
Let’s say you take 2 damage per hit from the common zombies. If I get hit 20 times, why is taking 40 damage no longer enough punishment? Why all of the sudden is the balance they set for the enemy damage no longer balanced enough? My friend said that it was to make it so you can’t just keep absorbing damage, but isn’t that the point of a health meter in the first place? On top of that, the game also retains the incapacitation limit – and actually made it more strict than it was in Left 4 Dead at that time.
It’s to stop players from just healing all their damage away.
Isn’t that the point of making health recovery items finite? Even situations where you can buy health packs are limited by how money is finite and all items use the same currency, so if you spend money to heal up, that’s money not going to buying replacement equipment and team upgrades. It also is worth noting that it actually breaks the balancing of healing in the Beta. Because both first aid kits and bandages cannot exceed trauma damage but also don’t repair it, then the pain pills (whose temporary health can ignore trauma damage limitations) becomes the better option in the safe house and almost always the better option (especially for melee builds where damage is practically unavoidable).
The game needs to balance players being able to increase their maximum health.
I don’t think it does. Not like this, at least. Hear me out: if you increase your maximum health, it’s because you’re expecting to get hit and want more mistake allowance. If you are confident in your ability to deal with threats before they hit you, then health upgrades won’t appeal to you and you won’t devote slots to them in favor of abilities you will benefit from.
So in the case of players who take these health increases, the game incorporates a system that will further encourage them to do so because higher max health means it takes longer for trauma damage to reach crippling lows. If the idea is to fight against players just increasing their max health, the system will currently create a loop of the player constantly doubling down on it to help minimize the effect of trauma damage on top of being able to take more hits before going down in the first place.
And for players who don’t want to, there’s now a very punishing mechanic that they have to deal with because some players choose to increase their max health. Why should my friend playing as Walker have to deal with a mechanic because players like me are trying to make a Berserker class who need to be able to tank damage to work, anyway?
There are cards to reduce trauma damage or allow first aid kits to recover trauma. Why not use those?
About that…”
Cards
Through this article, one might have thought “wait, there’s a card to fix that. Why not just use it?” Every card you pick is a card slot NOT going to adjust your character’s play style. So if you try to get cards to fight against mechanics you’re not enjoying, such as Trauma, then it means it’ll take longer and longer to reach the point where the cards you’ve selected are making a difference in how you play the game. Do you stack up the cards that adjust the core mechanics to your liking or try to alternate between playstyle and stat cards? Either way, you’re playing a waiting game.
That’s the kicker for the card system: you’re not making builds per se, but are instead making a progression system for the act. You decide what perks you can acquire without paying copper, which perks you start with, and the order you can generally get the selected perks. However, just like in the beta, you don’t get to spend a lot of time with the full effects of your set. This encourages players to follow a basic structure for building a deck: the first six cards are designed for the first few levels as safe options, with halfway through the deck having the high-risk-high-reward options (the cards with the crippling downsides and massive upsides) with any beneficial cards that aren’t strong enough for the early game going towards the bottom. The final boss is the only time the player can draw all their cards, and I didn’t bother playing the game long enough to get to it (but I hear it’s not very good; go figure).
Also, remember how I said the game ends up discouraging experimentation? That’s because the card system encourages the player to play in a similar manner with each play-through. Let’s take a card I use: Mean Drunk. Increase melee damage by a whopping 60%, but you lose the ability to sprint. Now, you could devote a bunch of movement speed upgrades to make up for that… or use those spaces to max out your damage output so anything that attacks you dies instantly. Any card in the game with a detrimental effect will take several other cards to undo the effect of, basically meaning that one really good card now takes several slots to make usable; it’s almost always better to min-max a deck’s loadout to play into your strengths, and the one-card-per-level rule means that countering downsides is just not viable for a from-scratch run.
Then there’s the nerfs. You see, Turtle Rock decided over the past two months that some builds have been too effective and had players beating the game in unintended ways. As a result, early every melee, speedrunning, economics, and healing card in the game has been nerfed into the ground across the two updates. This further encourages min-maxing with builds because every time these cards get nerfed, it means those focusing on the builds need more of them to make up the difference while a single one cannot boost a different playstyle because the stat is too low to justify using it over something that plays into the strengths of your build.
Then there’s the grind. It’s even worse than it was in the Beta. The fourth issue with the cosmetics I alluded to earlier is that you have to unlock costume pieces because you need everything in a supply line to get rid of it and replace it with a new one, and you have to get them in order. No joke, 80% of the supply points earned from the game go to cosmetics you’re forced to get, basically creating a massive tax on most of the player’s rewards. That’s ignoring the player having to also buy cards they have no interest in using. This means that players are forced to just grind and squeeze the blood from the stone, as it can easily take 20+ hours. It took me 40+, as I didn’t want to tackle the final acts of the game until I perfected my melee build. Literally the night I got the final card (Face Your Fears) is when the infamous November Nerfs hit.
That’s what caused me to quit the game, and I bet several others as well: spending dozens of hours to get that perfect build only for it to be harshly nerfed (melee builds deal a total of 40% less extra damage, speedrunner run about 35% slower, etc) demotivated players. Why learn a new deck? They’ll just nerf that as well. Why earn supply points for more cards? The most recent patch dropped supply points earned in almost every level, and I have to spend most of them on crap I don’t want anyway. In my case, why even finish the game? It’s not like anything I would want is rewarded for beating Act 4 for the first time. I’m confident in saying many players were like me and just went “this isn’t worth it” and dropped the game.
The game also added burn cards, or one-time use cards. Most people think it’s for monetization. While I think that might be true, I have another theory. I think they’re added for infinite unlocks, as the game is built with the idea of grinding for more cards. So since you can have as many burn cards as you can hold, players who are desperate enough to justify the time spent (sunk cost fallacy) will now always have something to work toward, won’t they?
And the bad news is there’s still one more section.
Game Modes
For this final section, allow me to just point out Back 4 Blood has 2 of the 8 game modes from Left 4 Dead 2: Campaign Mode and Survival Versus. I would like to point out why I don’t think the other modes are likely to come later down the line:
Campaign Versus: the more gimmicky levels along with the lack of spawning occasions for the infected means that both sides will have levels that just suck for them. Imagine as a survivor having to save others in the supermarket and then the special infected players can just corner you and gang up on players isolated.
Realism/Realism Versus: The game already has elements of the traditional versus mode, and the idea of difficulties with added downsides is rendered mute by the card system. Even the idea of having a mode without cards means the entire game would have to be rebalanced to account for that since the game is already built around the players making their own strengths and weaknesses
Survival: Could very well be added, but character and card perks would make infinite survival actually possible. But if they just remove those cards, the mode will likely go unplayed.
Mutation: the closest they could do is pre-set challenges with certain builds (WWZ does something similar), but I don’t see anything like this being deemed worth the effort.
Scavenge: Probably the most achievable of the L4D2 modes, as all the VS maps are just arenas, so adding gas and a generator shouldn’t be too hard. But much like with mutation, I don’t see a side more like this being deemed worth the effort.
All of this is to say that the game is lackluster in terms of content, is forcing players to squeeze the blood out of the base content, and is not in a position to add additional game modes. Plus, with most of the new content (likely) to be locked behind DLC, it’s hard to say B4B is getting any better any time soon.
What a shame of a game. A game I wanted to love, still kinda liked, and came to hate. I got 40 hours out of Back 4 Blood at launch, and I had fun with those 40 hours, warts and all. But with the updates since launch, the game I tolerated but was having fun with no longer exists, and the Back 4 Blood that replaced it has all the problems along with new ones and lower highs. Frankly, I probably won’t come back to this game even if they fix it, which they probably won’t because they want to make a game they want to see played, not a game that their player base enjoys playing.
I never finished Back 4 Blood, but all this nonsense, I’m certainly done with it.
Dead Rising is my all time favorite game series, and at launch this game came off as attempting to make the game appealing to people who don’t like the series in the first place by ditching or modifying everything about the series. No time limit, psychopaths are replaced with maniacs (which doubled as trying to be less offensive in the eyes of many fans), survivors are just infinitely generated events with a handful of exceptions, weapons were nearly indestructible, and the map was only really populated with Ubisoft-style collectibles that where no where as interesting as Dead Rising 3’s, among other things. The fact that the DLC mode Frank Rising served as the overtime mode with a $10 price tag and the only mode with a time limit only made things look worse
Then came the final update a year later. It definitely fixed more than a few issues (maniacs were given more distinct encounters and movesets, unique side quests with unique survivors were added, weapons were rebalanced, etc) and even added a free arcade version of the story mode, but for most it was too little too late.
Then interviews with former Capcom Vancouver employees made it apparent how bad the development was. Between the fact the dominos where being set up since Off the Record’s development, how little time and resources they had, to the removal of the time limit being the devs feeling the game couldn’t justify it, Dead Rising 4 went from an example of how to kill a franchise to a group of devs trying to make the most of a bad situation. And as such, I’ve adjusted my approach in this article. In order:
Presentation: More so my thoughts on the aesthetics, and my theory on the graphics being so inconsistent.
Story: going over each overall problem I have with the story, and if there was any way to improve it if the game had the time to edit and refine the story.
Gameplay: Going over the core gameplay. What works, what doesn’t, and if anything should be brought back in future entries.
Multiplayer: Covering the multiplayer post-final update.
DLC: Finally, talking about the content added post launch.
So buckle up. I’ve been playing this game on and off for five years now; this is going to be a long one.
Presentation
When it comes to graphics, there are three things that stick out to me. The first is the particle effects, which are really well handled and even on the most simplistic version of the Xbone it doesn’t suffer framerate drops (although I hear the PC and PS4 versions aren’t well optimized). The second is that the game reuses weapon icons from DR3, which gets a bit distracting with weapons like the handgun or the assault rifle which have distinct designs from the previous game.
The character models are what I (and others) find to be the most distracting element of the game’s raw graphics – namely in how some look up to par with a 2016 release and others look worse than the original 2006 game. However, with the knowledge of the game’s rushed development, I think they were smart with where they placed their resources. Characters who appear in cutscenes got the high quality models while those who are only seen in gameplay are given less effort. This is seen best with the two bloggers: Darcy gets a higher quality model than the four multiplayer characters, while Paula (who only appears during gameplay) has a model barely better than any generic survivor and lacks any pre-rendered model. When looked at from this angle, it makes sense why the animation quality can be so good while the models are occasionally so horrible.
The other talking point about the game’s visuals is with the Christmas theme, and what I was the most concerned about. Thankfully, the game isn’t as in-your-face with it as I feared. In the mall or across town, it mostly amounts to wreaths and nut crackers for the stores and Christmas trees in homes with some presents everywhere. There’s also a few combo weapons with a Christmas twist to them, and some gingerbread cookies and yule logs as healing items every now and then. Unless you actually go into a blind rage in relation to the holidays, the Christmas angle is nowhere overbearing. That said, the fact all of Willamette is covered in snow might become a problem for some players – more on that later.
Then there’s the Christmas music that plays in a few mall stores, in the pause menu, and in the vehicle radios. And to be honest, I don’t get why so many people hate it.I don’t find it any more or less fitting than the earlier games having the mall music play as the player makes their way across the map. That said, I greatly prefer the instrumental music used in the pause menu to the acceptable but noticeably weaker lyrical covers of classic Christmas songs on the radio. Thankfully, pressing up on the D-pad will change the station, and pressing it a second time turns off the radio (how does nobody seem to know this?)
I’m also glad that the Christmas music is here because the original soundtrack is easily the weakest one in the series. Aside from Tom’s banger of a theme, most of the music is way too atmospheric for its own good. The final update even removed some of the really awful maniac music in favor of recycling previous boss themes for them (although the pirate boss got an original theme. It’s okay). Overall though, you’ll really notice that Celldweller wasn’t brought back for the OST.
The voice acting thankfully fairs much better than the music. Ty Olssen is very different from T.J. Rotolo, but it’s not hard to get used to. The dude certainly didn’t sleep through his performance either, which is true for all the voice actors as a whole. Character’s voices always match the expressions they’re supposed to have, a few dub deliveries from time to time aside. I may not like most of these characters, their dialogue or the events they describe, but it’s clear they tried their best with the material they’re given.
But you know what they say about trying to polish a turd.
Story
Right. The plot involves Frank going back to Willamette long after it’s been rebuilt with his student Vick Chu. After the two have a falling out and attempt to flee, Frank becomes a wanted man thanks to Vick leaving him behind and getting spotted. He’s brought back in a few months later (and 6 weeks into an outbreak) by ZDC director Brad Park. He soon discovers a military conspiracy, a survivor faction of questionable ethics, and that Dr. Barnaby was still working on something zombie-related well after returning from Santa Cabeza.
What went wrong? More like “what didn’t?”
Tone
Dead Rising 4’s tonal problems are the most consistently complained about in any given review of this game, and for good reason. Even assuming the plot itself is good for the sake of argument, this game’s sense of humor would work against it every step of the way.
The first way is through sheer surplus of jokes. I’ve already gone over how this in the Archives for Origami King and ZomBeer, so I’ll keep it brief: the sheer number of jokes combined with how weak a lot of them (especially early on) are results in even the good jokes becoming weaker by sheer fatigue of comedy on top of ruining a lot of emotional moments. This was likely a result of the rushed development, though; using comedy to fill out a bare bones plot is a surprisingly common tactic for productions facing crunch due to things going off the rails and having to start from scratch (see the movie Foodfight as an example), so it’s safe to assuming a lot of this would have not been the case if time wasn’t a factor.
The same can be said of the second problem: the jokes themselves. Most jokes in the Dead Rising series are a result of the extreme characterization or situations the characters fall in rather than characters making jokes directly. DR1 has the store manager stay alive long enough to say there’s a clean up (his corpse) at register 6. DR2 has a Magician peacefully killed by his assistant only for him to violently stab him repeatedly afterwards because he’s always wanted to. DR3 has Kenny belittled by the survivor he took captive because literally no one takes him seriously. DR4 has Brad accidently show Frank gay porn on his phone because it’s funny.
These two problems are symptoms of a bigger one. In DR3, the boss Zhi decapitates himself in sheer rage and despair. In order to avoid things getting too dark, the camera shows that he has a really goofy face as his head rolls on the ground. I used to think this was out of fear of being taken too seriously, but given that DR3 was a massive jump up in gore levels from previous games, then it’d make sense to have a more lighthearted death to ease players into it. After Zhi, the deaths only get more gruesome with fewer laughs. DR4 showed me what that would actually look like.
Dead Rising isn’t strictly a comedy or a drama. Instead, the series gives the players a chance to see it either way. If you want to see it as a comedy, the situations are very far out there, the dialogue is blunt and there’s a lot of silly outfits you can wear the moment you leave the safe house. If you want to take the games seriously, the characters treat the situations as life or death and don’t make jokes about how wacky and unrealistic it is (Hollywood, take note), the stories don’t take shortcuts, and the games have surprisingly damning commentary. Dead Rising 4 is the first time the player has to see it primarily as a comedy with serious moments, and hopefully it’ll be the last time.
Bloat, Don’t Tell
Dead Rising 4 has five plots to cover in only 6 case files. There’s Frank and Vick, the monster known as Calder, Tom and Kylie falling out, Obsurists involvement with zombies, and Barnaby’s research. This is ignoring the character arc of Frank, Vick’s antics off screen, and the mysteries of Calder. Everything struggles for room to breathe, meaning most storylines have to follow a three-prong rule that doesn’t take long to get annoying:
Interaction 1: The player is introduced to the concept and//or characters.
Interaction 2: The characters talk about how the situation has changed (bonus points if this is the first time this information is brought up)
Interaction 3: The conflict reaches its climax and is then resolved.
Not helping matters is that nothing actually happens for half the story. 90% of the story missions in case files 0, 1, 2, and 3 are just Frank going to a location, learning he’s too late to get what he needs, learning about the next location that might have what he’s looking for, and then that cycle repeating until he finds what something that helps, but often with a complication that starts the cycle anew. This also means that the player doesn’t directly engage with most of the plot. Imagine if in DR3, instead of being there for the raid on the safehouse with the illegals and Gary, the player arrives after the fact and is told by Red what happened and where to go next. Not nearly as impactful. Now apply that to half the story. Not much of a story at that point.
So, before even talking about the plot itself, the tone is tone deaf, the stories are fighting each other for screen time, and not a lot actually happens in the story to begin with. Great.
Frank West: Unwanted
This one is a short one, but the game establishes the idea of Frank West being a wanted man at the start of the game thanks to Vick leaving him behind, but once Frank is in Willamette, they don’t do anything with it. Compare this to Dead Rising 2 where Chuck being framed for the outbreak results in a lot of conflicts (making 5 survivor rescues more complicated than they needed to be, and being the result of two Psychopath battles). They bothered to establish in the final cutscene of Case 0 that Frank has had to go under the name Hank East (nice little nod to Saints Row) because he’s a wanted man, yet Frank is only ever referenced as the guy from the first outbreak. Combine that with how Brad finds Frank regardless in the very next scene, and I wonder why they bothered.
Also, Brad is the best character in the game but doesn’t get enough dialogue to justify getting his own section. I do wish I could play as him instead of Frank, though.
Frank Isn’t Frank
In Dead Rising 1, Frank West is introduced as a hard-edged war-time journalist. He enters Willamette on a tip that something big is happening, and a freelance reporter doesn’t pay the bills by waiting for the news to tell them the stories to cover. While the involvement of DHS has him realize this is the biggest story he’s ever worked on, it doesn’t take long for Frank to start acting to both save those around him (like when brad gets shot) to simply acting in what he thinks the right thing to do is (like carry an injured Isabela back to the safe house not long after she tried to kill him). This gets ahead in Carlito’s last conversation; despite violently yelling at him that his tragic backstory doesn’t justify what he’s done, he assures Carlito that the story of Santa Cabeza will be told. In short, Frank is shown to be more than just looking for the next big scope, even if that’s objectively what he was after.
In Dead Rising 4, Frank’s characterization is greatly, and annoying, exaggerated. Not only is Frank in it for the money, but shows little interest in what’s happening to the survivors of Willamette once the outbreak starts properly. This is at its worst when Frank leaves a character tied to a chair to go investigate what Obscurists are up to. He literally refuses to help a bunch of injured survivors who just gave him what he needed because lmao, got stuff to do. It’s literally not until Case file 5 that Frank actively tries to save someone, and it’s portrayed as character development.
And sadly it is, because Frank isn’t Frank. Frank is a greddy dick, and only a greedy dick. This one-note behavior, far more than any jokes, makes Frank a nearly unbearable character, makes every character interaction painfully predictable and makes the fact you can’t skip in-game dialogue actually painful. All this trait is used for is for Frank to learn to stop being an awful person, but all that amounts to is Frank saving Hammond and being slightly less angry with Vick.. So Frank’s character is backpedaled and simplified for a character arc that was out performed with How The Grinch Stole Christmas. The fact he’s not the worst character should say a lot about Vick. Speaking of which…
Vick vs Frank
Okay, for this section, let’s pretend Frank is a different character with the same first name as Frank West, just for the sake of argument. So Vick and Frank have their falling out in Case 0 when they discover Obscurist (although they don’t know the name yet) are using human clones for zombie research. They both have legitimate grievances with each other; Vick is disgusted by Frank’s apathy to the situation while Frank is not putting up with Vick’s reckless behavior because she can’t control her emotions. It’s a good setup for a conflict. But there are two major problems.
The first is the three-prong story structure. While Frank and Vick interact for the entirety of Cases 0 and 6, the only conversation they have face to face in between is a single cutscene in Case 3, and it is just them arguing about what already happened and basically ensuring they don’t work together. So basically, only the first and final scenes accomplish anything. Because of this, it’s actually through Kylie and Tom that Frank learns to care more deeply about those affected by the outbreak; despite Frank regretting getting into a fight with her back in Case 3 towards the end of the game, Vick is actually pretty irrelevant to Frank’s character arc despite being the moral measuring stick.
That’s the second problem: the game really wants to hold Vick up as being the morally superior one despite being no better if not worse than Frank. Vick sells out a group of survivors to Obscurists (a group she believes to be behind the outbreak) and takes their word that they won’t shoot them (she knows it ended in gunfire and then assumes Tom’s men must have shot first). She also ties an Obsurist scientist trying to escape up to a chair and holds her at gunpoint to try and get answers from her while Obscurists guards shoot anything that gets too close to the house. Oh, and she destroys a harddrive of Evidence and steals Frank’s camera because she refuses to let Frank sell the story to the highest bidder despite hearing him say this story is going straight to the New York Times.
Yet despite all of that, Vick is never called out on any of this while Frank is called out on everything he does. Even when it looks like Vick is about to be called out, it’s turned around on Frank every single time. That’s why I say this game sees Vick as morally superior – because it’s pretty straightforward with everyone else (more on them later). Apparently this is actually the better version of her as in an earlier draft of the script she was “too unlikable” as a character. Either that was a lie to make it sound like the story had more editing, or she ate kittens alive while stabbing starving orphans, because Vick’s the most unlikeable character in this franchise.
In terms of “fixing” Vick, my two solutions are to either make her the main character or remove her outright. With the former, cut the nightmare prologue out and have her start out investigating the military base in Case 0. Frank could even be kept in for this part, but after Case 0, have Brad track Vick down since Frank is off the radar as a wanted man. The story could then focus on Vick’s guilt over that night, showing that empathy is not the same as acting on emotions. Alternatively, cut Vick out by cutting out Case 0 and instead having the nightmare prologue extended. Frank can be woken up in the classroom he’s in at the end of Case 0 right as Brad enters. The only challenge in terms of adapting the story would be Vick selling out Kylie.
Paula and Darcey
These are two bloggers that survived the outbreak. I left them out of the plot synopsis because they really don’t contribute anything beyond pointing Frank in the right direction for the first half of Case 2.
No, really. Darcey appears at the end of Case 1 to introduce Frank to Paula, and gets kidnapped by Obscurists to send Frank to West Ridge. The thing is, even if Vick was written out of the plot, Frank would head to West Ridge because Paula informs Frank about the Obscurist setting a trap for the monster there. Speaking of Paula, her role in the story is to tell Frank about the sniper in Old Tow for the second Obscurist outpost. That’s it in terms of the main plot. She has three other conversations, but those two are the only ones that actually advance the plot.
Paula also informs Frank about the optional boss fights (Maniacs) via the radio, and she also has a set of collectibles called “The Undead Gospel”. (Part of me can’t help but think she’s meant to be a parody of religious people, possibly of zealots. Not sure on that, though). These two actually have some interesting tidbits to them: Paula’s Radio voice is just supposed to be a character while the actual Paula is very level headed, and her Podcast is suppose to have lead survivors into attack Obscurists thanks to her propaganda, which is why soldiers will yell about defending themselves in combat. However, 80% of Paul’s dialogue is over the radio, and the game never makes use of the propaganda angle with Paula in the story itself.
Both of these two could easily be written out of the game with the characters already in the game. Darcey in his entirety could be replaced with Connor, who has a similar personality, is introduced much earlier in the same case file, and has several appearances afterwards. Having him get kidnapped could also resolve the need for Kylie and Obscurists to clash if Vick isn’t in the plot to boot. Paula in Case 2 when she appears in person can be replaced with Jessa, a mechanic working for Tom who is in the same part of town for the same reason. Simply have her tell Frank about the Outposts and have her meet Frank and the Junkyard. Paula on the radio, informing Frank of the bosses can (and should) be done by Brad.
The undead gospel has two avenues. The easier of the two is using the four characters of the Co-op mode (Jessa, Connor, Jordan, and Issac) to host a podcast in their spare time (giving them more lines). The harder of the two is Luke and Dawn. These are two characters who have a side story in the collectibles that show how far Tom has fallen as a leader, and having their story play out with audio would be preferable (and less cringe) as well as connect better to the main plot while offering the propaganda to turn survivors against the Obscurists.
Personally though, I think the game has too many collectibles and doesn’t need the podcasts or Vick’s cloud updates. So much like Paula herself, her podcast could be dropped without losing too much if ya ask me.
Obscurists
On paper, the group of Obsurists have an interesting story. Introduced as a military group, the player comes to learn that the survivors assumed the worst in them thanks to Tom (and Paula), attacked out of that assumption, and now the soldiers after weeks of harassment are forced to fight back and cannot trust anyone out of uniform. And when their leader is dying while trying to complete their mission, she orders them to instead start evacuating. Sounds like a pretty tragic group of antagonists.
That being said, the fact they’re mercenaries really doesn’t matter. They look like a military army, act like a military army, have the same ranks, conduct themselves in the same manner, work for the US Government, and react to most situations as a military would. The game keeps using the phrase “para-military” to describe them because you’d probably forget otherwise.
Fontana and James, the two leaders, also undermine them. James is a non-character who just wants to shoot every survivor who snoops around with them, and he dies in Case 2 anyway. Fontana has the opposite problem. The game wants her to be someone to fear as the collectibles paint her out to have tortured two terrorist to death before the events of the game, but also want her to be light hearted and caring, so she doesn’t let James shoot Darcey (damn it) and makes light-hearted banter with Frank before their confrontation. The game says she looks after the men in her unit, but never references Frank murdering 30 to 100 of their soldiers (James included). Apparently the survivors keep attacking first, but she never gets dialogue to even address it. Fontana is supposed to be the face of Obscurists, but she’s used for nothing more than a plot twist that they aren’t the bad guys, and as such that’s about all most will remember from Obscurists.
Shame, too. Fontana actually doesn’t need much screen time in my opinion. Just keeping her in the shadows for the confrontation only to reveal she’s just doing her job isn’t a bad idea. I actually like the idea that Tom’s the real villain of the outbreak itself; just remove the MCU side of Fontana’s character and it’d work a lot better. Maybe have a few more named characters beyond Sargent Harris the player can save too, and you’d have a much better version of the same group.
Tom The Mad King
Tom and Kylie’s conflict is the one part of the story I wouldn’t say has anything that needs fixing, just fleshing out. It follows the three-prong beats to a fault. We meet tom and Kylie to learn they’re dynamics in Case 2. Case 4 has it revealed that Tom blamed and punished Kylie for what happened instead of Vick or Obscurists. Case 5 is the Coup against Tom failing and him planning to kill Kylie before Frank intervenes. This works as a story, just needs more to it. Things such as giving Tom and Kylie an extra story mission or two, the aforementioned idea of tying the podcast back to the survivor militia, adding more side quests related to them, or just letting Tom call Frank up from time to time on the radio would help.
The only actual issue I have is the game revealing the looters in the gas masks are actually working for Tom. The game literally says in the notebook they’re gone crazy from the stress of the outbreak, using anything they can find as weapons (from vacuum cleaners to assault rifles) while believing the gas mask will keep them from getting infected. Make of that as you will, but the choice to say “no, they’re actually Tom’s secret army” is really stupid. Something as simple as Tom working with them instead would work better if this plot point has to be there, and to be fair they may have been the intent.
But yeah, I think this part of the plot actually works otherwise.
Dr. Barnaby
Okay, let’s get this out of the way. They do NOT retcon what Barnaby was doing in Santa Cabeza. It’s in a blink-and-you-miss-it line of dialogue, but he explicitly references the failed attempt to mass produce cattle. He’s instead trying to make something out of the existence of zombies, and believes that they could be the key to human immortality. It’s stupid, but it’s a different kind of stupid. To be frank, it should be criticized for the kind of stupid it is instead of being criticized for the kind of stupid it isn’t. But make no mistake, it’s not just kind of stupid. It’s immensely stupid. The idea that Barnaby was working on human immortality up to literally the night he was called up to the mall is so pathetically desperate that I’m surprised Disney didn’t write it.
This goes from immensely stupid to unbelievibily stupid with how easy it is to fix: Dr. Blackburne. She’s an Obscurists scientist so irrelevant to the story I didn’t bother including her in the Obscurists section. Her only role in the story is to tell Frank where to find Barnaby’s secret lab. Now imagine if it was actually her lab, and she simply was using Barnaby as a red herring (down to having the automated voice in the lab address visitors as such) so Frank wouldn’t piece together that it was her trying to create immortal humans. It’s much less bitter of a pill to swallow to simply have the plot say “The old man wrote down the idea but refused to bring it up with the government because he wanted nothing more to do with zombies after Santa Cabeza”, instead that he was actively working on it from day one. Plus, it could make Frank being too late (yet again) when he gets to the lab double as a trap: she knew Obscurist already secured her research, and expected Frank to die either trying to get in or getting locked in with a horde of zombies.
Calder
The game’s plot is so broken by the time Calder actually becomes a factor that I’m not too sure what to say here. The big thing that hurts him as a character is that the fact he talks is not a character trait but a plot twist. So the game has him behave as an instinct-driven monster only to reveal he actually has plans and a goal. So he is just a plot point for the first 5 case files, and has to get all the information out there in Case 6. Luckily for him, his story is very simple: He was an Obscurist soldier who accidentally started the outbreak and got infected, but by falling into a testing chamber was able to halt the infection process; although not fast enough to keep himself entirely human. He now plans to stop Obscurists from allowing humanity to achieve immortality.
Okay, so i think Dr. Blackburne should have personally experimented on Calder to make him a half-zombie. It could be that, once his own unit turned on him at a single command, he developed a hatred for the group and wanted every major figure dead while having no mercy for the underlings. This blind rampage could be what released the wasps from the lab back into the town. You can also drop the whole “Calder leads the zombies” as not even I think that’s something Dead Rising as a series should have and instead just have him be after Obscurists and the intel of the experiment. This can then play into him, revealing to Frank he can still talk much sooner and is trying to accomplish this goal before his body and mind rot to that of a normal zombie. This could then be the set up for their final confrontation: Frank needs the evidence to expose what happened, but Calder wants to make sure he’s the last monster of his kind. Once Case 6 is underway, there’s no longer any compromise to be had between these two and they have to fight it out.
Sorry this section just devolved into me playing fan-fic writer, but there’s not much to say about Calder because he’s very important but a very late-game story beat. He has maybe 10 minutes of actual screen time.
Urg, what a mess of a plot. But I said it is the worst part, so how does the gameplay itself hold up?
Gameplay
Dead Rising 4’s gameplay is basically a simplified version of Dead Rising 3, with some improvements and a whole lot of downgrades.
Core Gameplay
The first of those is the controls for when Frank is on the ground at a standstill. Once you get him moving, everything’s fine, but at a stand still trying to change directions will result in him walking forward in that direction. While this does mean that you can accidentally fall off a ledge by changing directions, this is actually quite rare. The bigger issue is that you’ll walk away from the item you’re trying to grab or accidently get a little too close to a zombie walking right towards you. Plus, while Frank controls well when moving properly, he’ll often get stuck on things in tighter areas or in small doorways, forcing the player to stop and readjust themselves. Neither is the worst thing ever, but a constant annoyance from start to finish.
There’s also the addition of stealth mode and its effects on the controls. Stealth mode is mapped to L3, which is traditionally the dodge roll move in Dead Rising from the second game on. So for long time players, expect to accidently slow Frank down to a third of his running speed when you meant to quickly dodge something. And since zombies can tackle frank in this game, standing still when you intend to dodge will result in a lot of otherwise avoidable damage. Meanwhile, the dodge roll is now mapped to RB, which is the sprint button; tap to dodge, hold to sprint. So you’re also going to accidently dodge roll and waste stamina when you mean to run. All of this for a mechanic you’ll never use in the game properly because you’ll never be lacking in terms of weapons.
That is because of the multiple inventory system. Frank starts out with 14 inventory slots spread across 4 categories (4 slots for melee, ranged, and throwing, and 2 for healing). At max, Frank has 8 slots for each weapon and 6 healing items. Given that Frank can, by the end of case 2, very easily have all 8 ranged and throwing slots along with 6 melee slots and 5 healing slots, there’s just never a point where the player runs the risk of running out of weapons.
Also, all food items heal the same amount and are used the moment the player presses down on the D-pad (holding down is how you drop weapons, so expect to accidently heal from time to time when playing). This means that the player can instantly refill a large chunk of their heal bar at any given moment, making most encounters non-threatening unless it’s a boss that stunlocks you for several attacks. And since almost every human enemy drops food and food itself is plentiful, there’s very little threat of Frank actually dying in combat.
The other reason that stealth is worthless and Frank can feel near immortal is that the combo weapons are back and more broken than ever. It’s a combination of how easy weapons are to build (you just need one item and then any item in a certain category) and how deadly some of these weapons are. Even after the final update buffed base weapons while nerfing combo weapons, some are still way too useful:
Blast From The past: A sledgehammer with explosives. Instantly kills common zombies, is given early game, and is reasonably durable.
Ice Sword: Despite all the nerfs this weapon received, it’s still OP. It can be made with liquid nitrogen (which is stupidly common) and any bladed weapon. Has long range, freezes zombies, has a long combo, and does pretty good damage.
Raining Nail: A hand cannon made from a flare gun and anything mechanical. Each nail counts as a separate attack, meaning it has several chances to land a critical hit with each shot. Combine that with solid damage and a good ammo pool even after all the nerfs, and not much can stand up to one of these.
Holy Terror: A rapture gun made from a computer case and any gun. Causes zombies to instantly evaporate and deals heavy damage to tougher enemies.
Ion Cannon: A portable railgun made from a battery and any gun. Pint, Shoot, Delete. Better for human enemies.
Laser Splicer: A unique laser gun made from a Microscope and any gun. It takes a bit of effort to use effectively; each shot is fairly weak but lasers connect between shots for a pretty generous range, and with practice literally everything can be killed in seconds with a single Splicer.
Elemental Grenades: Exactly what the title says. It’s not that convenient to make, but saving survivors rewards the player with a random combo weapon, and they REALLY like dropping these. So you’ll always have a full inventory of grenades.
There have been some quality of life improvements, however. Collecting outfits is no longer as painful as it was in DR3 (thanks to the safe house shops selling clothes or even giving you missing pieces for free if you found part of a set), and the outfits themselves have the best variety in the series. Progress in PP trials carry over this time, compared to progress resetting each time in DR3. The minimap will mark human enemies and evolved zombies that are alert to your presence, aggroed, and/or in Frank’s eyesights. But the king of them all is that all weapons now use the background of the item slot to double as a durability meter; this is very useful for when players carry duplicates of weapons and need to know the one they just used half the durability on vs the one they only swung three times with. If anything returns from DR4, make it that.
Finally, driving is back as a major form of transportation like in DR3. Combo vehicles also return, but I never bother with them. Not because the vehicles control poorly (quite the opposite) or because the vehicles lack variety (it actually blows DR3 out of the water in this regard), but just because sprinting is just fine. Frank in this game is the fastest any character has ever been without Quick Step (fitting, given mixed drinks didn’t return) and his stamina doesn’t take too long to refill, so vehicles are only a major help in terms of moving across an entire district of the town. Combine that with how the best means of gaining PP is to run into each room/building to add them to your map for 500PP, and there’s really no benefit to driving unless you have a trip across town. And you can’t even use Exosuits, the game’s newest addition to the series, as trying to get in a car will instantly remove the suit. Shame, too; I like driving in a Mexican food truck.
Exo Suit
Oh right, the Exo Suits. These technological suits of armor give Frank the ability to casually push hordes to the side while having the power to launch cars like they’re made of plastic. There’s also a series of large weapons that require an exo suit to use, allowing for unparalleled devastation. If that’s not enough, there are items that can be jerry rigged into power ups to make the exo suit an outright tank, from using an arcade cabinet for electrical shockwaves to attaching military grenade holsters and a mounted gun on your shoulders. In short, the exo suit makes you the weapon.
I’ve softened up on this addition over the years. What was once the “jump the shark” moment for the series is now something I’m just fairly indifferent to that I personally wouldn’t bring back to the series moving forward. Even from a story angle I’m no longer bothered by it. Sure, 2006 me wouldn’t believe you for a second if you said in 2016 that this series would have robotic suits… but I don’t think 2006 me would believe anything from the past 5 years.
That got a little too somber, so I’d like to say I actually do have fun with the exo suit. While I’m very much a stick in the mud with this series (saving survivors is more fun than killing zombies – bite me), I do still have fun grabbing a big weapon, holding the attack button, and watching the corpse drop while the kill counter rises; the exo suits do a great job of hitting that particular part of Dead Rising’s appeal.
Where the exo suit starts to lose me is when I try to use it as an actual extension of the player’s ability. The suit has a 2-minute time limit for its use before the batteries die, so the player can only ever use it for anything in the immediate area. Power-ups can restore some battery if it’s below half its charge, but otherwise the only way to gain more is to replace the suit. If the game wants you to have an exo suit for a section, it’ll place a wireless charging station to give you infinite battery. On the other hand, these infinite suits tend to be removed the moment you enter a story section they don’t want you to have one (like with the showdown with Tom). Combine that with the fact the story loves to have the player stop and investigate or talk with survivors, and it’s very hard to ever take an exosuit anyplace it’d actually be useful.
The weapons the suit can use are generally dull too. The flamethrower is the only firearm good for zombies as the minigun and the railgun both are too specialized for human enemies to be much use against a large horde, and your fists outclass any exosuit melee weapon that isn’t just a better version of your fists. Also every single throwing weapon may as well be a giant saw blade in terms of function. Suit upgrades offer more unique combat styles, but most of them are so far out of the way of an exo suit you’ll use up a good chunk of the battery trying to get to one, and you’re locked into the power up until you over use it to the point of it break (I’ve never once had this happen) or the battery dies.
Overall, I find them to be harmless and ultimately pointless. A fun little distraction at best, a real wasted opportunity at worst. The game itself even treats them as a side-show, since there’s only three perks in the level up system that involve them, none of which increase the duration of the suit.
Levelling Up
Speaking of levelling up, this game has a slightly different way of earning it. Combo weapons no longer earn extra PP from zombie kills, and instead the PP values come from the enemy type regardless of how they’re killed so long as it’s not with a vehicle. Each collectible also earns 500PP, and since each location on the map counts as a collectible, running in and out of stores like an indecisive Christmas shopper can get you to level 25 before the end of Case 1. No joke, I think you can reach level 40 from locations alone. To compensate for this, the level cap is raised to 100 and now every perk only gives one benefit with some getting separated into 2 weaker ones.
I don’t like how levelling up works in this game. At all. The upgrade skill tree requires the player to both get all previous perks AND to reach a required level. Just a reminder: Dead Rising 3 only required the player to get the previous skill in the tree, with the only level gate being the final and often overpowered perk in a tree requiring a maxed-out player. In this game, the next perk will always require an additional 10 to 15 levels to become available, which can be doubly annoying if the previous perk has “levels” to make it more potent (and raising how many points you’re spending on upgrades you don’t care about). Granted, this game gives out PP like it’s candy so it won’t be too long a wait, but it also means there’s nothing to really save up to; players who want to use their level ups wisely are left with the only option of stockpiling their attribute points from each level up and then going on a spending spree every 5 to 10 levels.
The perks themselves aren’t that good either. There’s your bog standard stuff like more health, more stamina, more inventory, etc. But there’s some really crap ones too. Stealth is such a non-mechanic that I don’t know why anyone would bother upgrading it, and the exo suit can’t be used long enough for any of its three whole perks to make a difference. The ability to regenerate health is too weak to ever be practical since it needs 2 upgrades to it’s speed and 4 upgrades to its max value to heal the player to half health over time. But that only works outside of combat, at which point you’ll heal up because this game gives the player healing items like they’re PP.
And then there’s the critical hits, which take up a lot of the brawling and shooting categories. This takes the place of attack upgrades in previous games, and it’s a poor replacement. Landing critical hits allows the player to deal secondary effects to the target, but these effects are often too weak to make a difference on anything larger than a zombie, and zombies are too weak to really need those secondary critical effects to die. But then there’s the rng factor: since these random crits are unreliable even with maxed-out odds, you won’t be using weapons unless that weapon is good without the random crit, which defeats the purpose of having them in the first place. If players didn’t have to upgrade random crits to get the durability and ammo perks for each weapon category, I doubt anyone would get them at all.
And yes, you read that correctly: weapons are in several categories now in terms of upgrades. When I said perks were divided up into weaker ones, I was being polite. They’re actually made damn near useless because you need to get each upgrade 3 times to be applied to the whole arsenal. Take melee upgrade: you need to upgrade close quarter weapons, blunt weapons, and bladed weapons all separately from each other, instead of just upgrading your melee stat once like in DR3. This basically triples the actual price of any given upgrade that revolves around weapons, because the same applies to guns (handguns, shotguns, and rifles). All the while, some categories don’t get upgrades and there can never get better. Want more ammo for Flare Guns? Too bad, there’s no ammo upgrade for launchers. Want crossbows to have aim down the sights? Only handguns and rifles can get that perk. Want the minigun for the exo suit to have manageable recoil? Well it’s not considered a handgun, shotgun or rifle to you’re S.O.L.
Overall, a level 100 Frank isn’t much better than a level 1 Frank. You’ll use all the same tactics, you’ll just be able to do so longer and/or more recklessly than before. And frankly, that’s lame.
Map
The town of Willamette is fully explorable, although not at first. The player starts out locked in the mall for Case 1, but by Case 3 the whole town is free to explore, save a handful of buildings locked behind story progression. The mall is easily the highlight of the map, with it being divided into 5 sections: an Amazonian food court, a pirate stage show, a Japanese shopping center, a motor speedway and finally a send-up to the real-life Medieval Times Dinner And Tournament. The town itself consists of Old Town (what remains of the old Willamette), West Ridge (housing and farming district) and North Peak (industrial and commerce district).
New Willamette has some improvements from DR3’s setting of Los Perdios. The map now has the mall serve as a centerpiece for the map, with each safe house and the game’s sewer systems having a shortcut back to the mall. Verticality is now more easily accessible without vehicles thanks to the second floor to most mall districts and an increased use of fire escape in the town. Finally, the map isn’t littered with dead ends and roadblocks to force you out of your car while driving, opting to instead just put some busses tipped over for the player to drive around or climb over.
That said, the map is held back by it’s constant asset recycling. This has always been present in the series, but never this bad. Nearly EVERY building is repeated at least 2 or 3 times in the mall and in the town, sometimes in the same district, and often with the same textures. This is likely a result of the rushed development, or at least I hope it was. While it’s annoying in the mall, it makes the town very dull when combined with everything being dusted in snow; the farmlands are the only place that stick out because of a sheer lack of buildings.
Beyond that, the map itself is serviceable but unremarkable.
Enemies
While the combat itself is too straightforward to get it’s own section, the foes populating Willamette have earned a few comments.
Somehow, this game has the weakest yet most annoying common zombies in the series. They aren’t quite as resilient as they were back in DR3 (thanks to the final update, cutting them in half can actually kill them now), and most combo weapons can two-shot any member of the horde. Yet at the same time, since this game is trying to justify it’s stealth mechanics, zombies are even more sensitive to sound than ever before. And not only are there still no skill moves to help you evade the horde like in the first two games, but now you can’t even dodge roll or sprint pass zombies or Frank will bounce right off of them and back into the horde. So when you have to start fighting your way out of the horde, the noise you generate from even melee weapons (yes, zombies can react to the sound effects from combo or even base melee weapons) will draw in nearby zombies. So unless there’s a clear opening in the direction you’re heading in (which is almost never), be ready to fight off a good 30 to 50 zombies when surrounded. And when you try to save the randomly generated survivors, this can be the difference between life and death for them.
The new enemy is the Fresh Zombie – a human who was infected and turned so quickly they haven’t had a chance to properly start decaying. This allows them to run at full speed and tackle humans. This translates into gameplay as zombies that can outrun the player while sprinting, and a single zombie stumbling in front of you (because they hear you running) will be enough to slow you down and let them catch up. And once they tackle you, you’re losing at least 100 health because the QTE at its fastest takes a few seconds to throw them off. And after their introduction in Case 1, they’re everywhere (but ESPECIALLY common in North Peak), so they also don’t take long to get repetitive. The Holy Terror is considered OP just because you can shoot a fresh Zombie once and they’re gone.
Ironically, the Evolved Zombie is considerably easier to beat, if not the least threatening enemy in the game despite giving the most PP on defeat (250). While it’s annoying how their dodge attack and ability to cling to any wall basically lets them teleport, they spend more time planning to attack than actually attacking. Their preference to make distance and then pounce both makes them easier to dodge than fresh zombies, but also makes the pushback attack (which reset your combo counter and their PP bonus for combat) far less common. Just pull out a Raining Nails and put a few loads into them.
Then there’s the human enemies. Obscurists are basically the spec ops from DR3 combat-wise, with the only addition being some melee weapons. Looters, on the other hand, can be wielding any base weapon in the mall, from vacuum cleaners to shotguns. As such, human enemies don’t focus on being “melee or gun” archetypes the series has used before. In its place, enemy factions fight each other as well as the player. This technically isn’t new to the series, but this is the first time it was brought to the forefront. And honestly, it’s cool. It’s more so a shame there’s no way for the player to initiate these fights manually (like mixing perfume with chemicals to make a gas bomb zombies chase, or being able alert factions to the presence of enemy factions).
There’s also the Maniacs, but they will be talked about at a later date. All that matters in terms of this review is that their followers never appearing outside of their single encounter does not play into the strengths of human enemies in this particular game, and they’re just damage sponges with slightly more unique attack patterns.
Photography
Not sure if this is a hot take, but I’ve never cared for the photography mode in any Dead Rising. I get why it exists with Frank, and it was a cool flex on the 360 being able to capture and save a photo of gameplay and then score it on a consistent basis, all in real time. But it’s just never been appealing to me beyond occasionally capturing a memorable moment or earning enough PP to finish off a level up.
And that perfectly explains why I don’t bother taking pictures in DR4 – nothing interesting ever happens, and you get no PP from Photos. The first one has been overly explained at this point; so let’s make it clear the game says that Photos earn PP, but I have never once seen the matter be moved from pictures even in mass. While in DR1 and Off the Record pictures could earn over 1,000 PP if the player got a really good shot, the points earned from pictures only determines rank. I’ve never once seen any PP values on screen, and given the game has a tiny pop up for earning 2PP from destroying something or killing an enemy in a car, I doubt it’s just being subtle all the sudden. I’ve only ever gotten PP from completing Photography trials or certain collectibles that need photographing.
There’s no longer an erotica category (strange, but whatever), but the game does add an additional 3 categories: destruction (things blowing up), conspiracy (Obscurists) and CAPCOM Tribute (crossover material). New to this game are sub categories based on the two most prominent elements of the picture (for example, conspiracy + destruction = warfare).There’s also unlockable filters the player can apply once they clear certain trails. These are nice additions that I’d actually care about if I ever used the camera when i wasn’t forced to.
Yes, the game forces you to use your camera. Quite frequently at that. The game has investigations where Frank needs photos to piece together what happened (these pics aren’t saved and don’t count against the player’s maximum count), a night vision filter and a detective mode filter (not the actual name, but a spade’s a spade). Investigations kill the pacing and get increasingly annoying on repeat runs. They just become a case of “stop moving, get the camera, scan the thing, listen to Frank talk, repeat until you’re allowed to move on”. It’ll also be on repeat playthroughs that you’ll realise most of the investigations would be cutscenes in previous games. And then there’s how the game removes your ability to pick up or observe items in dark areas unless you have the filter out, even if you have a flashlight equipped. And the detective mode just adds extra steps to what would normally be picking up a key and unlocking a door, since every panic room also needs a key regardless of finding its location.
Unless it was to nab a photograph-based collectable like zombie graffiti, I didn’t really use the camera in DR4.
Collectibles
Not counting the 6 side quests added in the final update (which I’m not going over; they’re welcome additions that don’t add enough to justify putting a section for them) or the 7 maniacs (again, going over them another time), the major optional content in Dead Rising 4 are collectibles. They earn 500 PP each, with a collection bonus for getting all in a set (for example, all 4 cell phones that detail a bank robbery). The only collectibles that offer gameplay rewards are Blueprints for extra combo weapons/vehicles and training manuals that fill out otherwise unobtainable parts of the skill tree (none are needed to get a later skill, thankfully). The rest are just flavor text and the occasional side story; I don’t care for most of these narratives and especially the ones just meant to be jokes. Even then, I am glad these are here; their hiding locations can get surprisingly devious for a map as simple as this one.
There, that’s everything. Am I missing something?
Multiplayer
Oh right.
The multiplayer is inspired by the infinite mode from the original Dead Rising. There are four episodes that get progressively more difficult with two days each. The players must complete tasks each day before 9:00 pm, with the second day having an optional boss fight. These missions can range from clearing out a store to removing bombs people hide around to securing vehicles; overall a solid variety. Once all missions are complete, the game just challenges the team to kill zombies as much as possible until 9:00 pm. Items don’t respawn, so fresh zombies with bags of supplies (Loot Zombies) and rewards for clearing missions are crucial to be on top of the horde, freshies, Evo zombies, and human enemies. (all of whom are much more durable than the main game). Weapons break faster to boot.
Honestly, the multiplayer can be really fun with friends or even randoms if you get lucky (much to my surprise, people still play this game online 5 years later). The mode is only in the mall, but the final update increased the PP from all enemies that aren’t horde zombies to 100 PP or higher, so levelling up isn’t as painful as it used to be (since you’re starting from level 1 again). The game does a good job at encouraging both cooperation and competition: players receive PP bonuses for out-performing their teammates in certain categories while offering PP multipliers for however many teammates survive the night (at least one player needs to make it to the designated safe zone by midnight for the team to move on).
The biggest downside to this mode is the grinding on top of how you still need to finish the main mode. It’s not that it’s locked until you get the game’s ending, but blueprints and cash are shared between story and multiplayer. As such (and especially with how brutally hard this mode is), you’ll want to have as many blueprints and as much cash as possible. When starting at a low level, weapon durability is as bad as Breath of the Wild’s great plateau, so getting to level 65 as fast as possible is a must. So most players will grind episodes 2 and 3 until then to get enough durability, ammo, and inventory to handle the final episode.
I would greatly prefer it if each character has their own level tree, though. Lower the level cap to 50, and give two attribute points on level ups instead of 1. Finally, give each character a skill tree unique to them. Let’s use Connor (who is meant to be the medic) as the example: he could have a skill tree that lets him regenerate hp on hit, a lot of hp on kill, and heals teammates twice as effectively with healing weapons (a type of weapon exclusive to this mode).
Another type of weapon for this mode are golden combo weapons. With the blueprint, you can combine a combo weapon with a gold bar. The resulting golden weapon is functionally the same, but with massive buffs to counter the increased difficulty of multiplayer and to be on par with the single player version. These blueprints do actually carry into the story mode, though. One new game +, gold bars spawn in Willamette and the player can then create ridiculously powerful and durable weapons. It’s a nice little bonus.
Prior to the DLC and final update, Multiplayer was the best part, and to some the only good part of this game.
Minigolf
Minigolf is the first paid DLC mode added to the game. It has some solid customization, and some funny lines from Frank and Bob (who is literally just a zombie tied to a chair).
Positives over. This is a golf game without different types of grass or any grass at all. It’s just “the green” (which is made of metal), sand pits, and out of bounds. As such, you’ll have the ball roll of the course several times unless you get trapped in the sand pit. But on top of that, your default clubs are so crap that you can not make par on some later holes. Yeah, you need to use the zenny on the course to buy better clubs to increase your stats. But this isn’t like Mario Golf star clubs. Imagine if in Mario golf, you had to unlock 5 tiers of star characters for your favorite character. This also means you can’t buy any cosmetics if you want to be not awful.
I hate this mode. Moving on.
Frank Rising
The final update removed the glow from his eyes.
Now for the DLC that matters. Frank rising sees Frank West revived as a zombie and become a member of the horde. After eating some looters to satisfy his hunger, he gets shot by Kylie who has yet to escape. He has enough humanity in him to hesitate for a split second on lunging at her, but is flash-banged by Dr. Blackburne. She reveals he’s the very kind of zombie Barnaby wanted to create, but Frank insists on being cured. The rest of the game is Frank getting what Blackburne needs, she betrays him in an effort to learn about how he came to be, and is ultimately cured of his zombie infection.
If this sounds stupid, it is. But given that I treat the main game’s plot like I treat Boruto and The Last Jedi (pretending it never happened), I’m beyond the point of caring about the story by the time Frank Rising rolls around. And to be honest, I think the writing is generally better. Not in terms of storytelling, but the character banter’s not only not cringe-inducing this time but actually got a few laughs out of me. Thanks to the consolidation of the cast down to Frank and Blackburne (and Vick being nowhere in sight), the exchanges were just sharper across the board.
The gameplay is also overall better, thanks to the final update, though. Being a zombie doesn’t stop the horde from targeting Frank after the intro thanks to Blackburne’s treatments, but the final update gave Zombie Frank melee defenses from the get-go so only gun-toting enemies and survivors with combo weapons pose a big threat on it’s own.
Another thing buffed was Frank’s feast move. Unlike the core game, food items don’t heal Frank and he instead must eat others to survive. The game had it so that zombies gave far less health than human enemies, and health bar enemies couldn’t be eaten at all. This is all still true, but now the values are far more forgiving and it simply determines how high the hit combo meter must be to get a lot of health back (a level 4 feast on a zombie recovers about 500 health, while on a human it nearly maxes Frank out regardless of his health bar).
Frank also gains a pouce, a vomit attack and a scream. The former can be used to safely move a short distance and disarm an opponent, and the spit can be either rapid-fired like a shotgun or charged up from a long-distance attack. The last one is simply how Frank stuns enemies, zombies included. Frank’s dash (replacing the dodge roll) also gets priority over zombies. And to seal the deal, the upgrades for these moves are actually really useful (acquired through collectibles and side quests:
Increasing maximum HP
Increasing max stamina
Increasing damage of Frank’s melee attacks
Moves recharge faster
Yowl can deal damage
Pounce gains a shockwave attack
Vomit attack draws zombies in on that target
Dash attack doubles as a melee attack for zombies
Feast can be used more than once before resetting
That said… I don’t recommend trying to get everything in one run. The time limit is a mere 2 hours, and dying does not restore any lost time. I’d recommend gathering the collectibles the first run and then focus the second one on trials and story. Sadly, only collectibles are carried between runs. You’ll have to redo trials every single time, even in a new game plus. I get why in the sense that the mode is barely a half hour otherwise, but when you finally max out Frank, there’s only 3 enemy encounters left. So having the option to restart with all trails saved, only collectibles saved, or starting fresh would have been greatly welcomed. Because of that, Frank Rising is a fun change of pace for the series, but not something I can go back to as often as I may want to.
CAPCOM Heroes
CAPCOM Heroes is a free mode released with the final update. It basically applies the structure and approach of Frank Rising to the main campaign and the whole map. As such, I’m only going over the changes. Frank by default dresses like his classic self. There are no weapons nor outfits in this one. Instead, Frank attacks like he does in the Capcom VS series. Frank also has a revolver and a queen jar for his rechargeable ranged attacks, and his skill move lets him blind enemies with his camera. As he goes through the game, Frank unlocks Capcom characters to turn into, all of whom offer different dodge rolls, melee attacks, ranged options and skill moves. These characters are unlocked through story progression, collecting stars, and purchasing in safe houses.
Because character abilities are determined by trials, that gives the game 33 side quests (2 per character across 17 characters, minus Frank who only gets one), so there’s plenty to actually do. However, simply put, this mode gets dull after a while. I could go over how some missions are poorly designed (Viewtiful Joe’s second mission is nearly luck based), how the costumes are given in a questionable order (X is unlocked first but you max out Dante, who is way more powerful by default, way sooner), how the shadow costume share both hideous and poor design choices, how the healing system is just straight up worthless, or how unlocking costumes is mishandled. I could, but none of that matters. Regardless of any of this, you’re going through the same events, levelling up the same way, collecting collectibles for the same general reason, dealing with the same enemies in ultimately the same way. When it first came out and many players were playing the game for the first time since Frank Rising, it was a fun novelty with some design problems. As part of the big package? It’s hard not to feel like it was pure fluff and a questionable use of resources when the core game still needed more work. Like the maniacs, I’ll go over this mode more at a later date, but it was not exactly a bang to end on.
Final Thoughts
Sorry for the length of this one, but it’s not often I archive something I have this much to say about. But for my overall favorite franchise, Dead Rising 4 was a whimper instead of a bang to end the series on. Not the kind of final game a series wants. So, why do I come back to this game every year? Well, because Dead Rising at its worst is still more interesting than most AAA games to me. Compared to most of what EA, Activision-Blizzard, Ubisoft, and Take-Two put out, Dead Rising 4 is still more unique of a game, still more stable (somehow), and has more of an identity. Sure, that identity makes me want to punt Dead Rising 4 in the nose half the time, but that’s better than making me think “I could just play something else.”
I also didn’t have to pay for any of this; the game was a Christmas gift back in 2016, and through a string of events I got the Season pass for free thanks to Microsoft; maybe I enjoy this game because I have no buyer’s remorse.
I honestly thought Super Mario Party 2 was going to come out first. Oh well. I’ve been having a lot of fun with this one and I can actually get my friends to play this one with me, so by all accounts this was a welcome surprise. And since DLC has been confirmed for the game thanks to the in-app purchases (which simply means you can access a digital store from the game itself), why not go over what I want DLC wise? And the answer is pretty simple: I want Gamecube content. I think Mario party 4, 6, and 7 are far better than the N64 content, and I have a soft sport for 8 since it’s basically just a more refined version of 7. So with that, I have party-packs for each of the Mario parties that followed Mario Party 3. Well, 4-8 at least. Mario party’s 9 and 10 don’t fit this style, and since there’s a real chance that these packs would cost 10 bucks each (Nintendo Tax sucks), cuing off at $50 seemed best. Each Pack has the following:
2 Boards (Both from that Mario Party; the first board which I really would want, and the second board which would be nice)
1 Extra Playable Character (Does not have to be from that game)
11 Additional Minigames (Must be from that Mario party Game; includes one Deluxe Minigame only accessible from Free Play)
5 Additional Items (Typically but not strictly based on that Mario Party; these items can be turned on or off before a board game starts)
Free Update: Something added to the game for free to coincide with the DLC’s release.
I only went with 1 character per pack since Nintendo’s various teams in general seems to prioritize factors that affect gameplay when given new elements to game, be it in a sequel or a DLC pack (I’m basing this idea mostly on Mario Kart, though).
Mario Party 4 Party Pack
Ah, my favorite Mario Party. It’s just the most overall balanced experience. Some of the best minigames in the series, the bad ones are far from the worst, the boards are for the most part really solid, and features a greater deal of planning than it’s N64 predecessors. The only real downside is that it didn’t add any more playable characters to the core game (Volley Ball doesn’t count).
Primary Board: Game Guy’s Greedy Gala
OriginallyGoomba’s Greedy Gala, I think Game Guy would have been a better fit. Regardless, the Greedy Gala would be both an aesthetically and functionally distinct addition to Superstars. The aesthetics is obvious – the only other board that can claim to have anything close to a casino theme is Kamek’s board from Super Mario Party, if you want to count that. Functionally, though, the baord follows the “island hopping” trope from the Mario Party Series (Wario’s Battle Canyon, Mystery Land, and Future Dream to give examples). The take on this one is that the board gives the player a chance to bribe the roulette operator in the star of the board to get better odds of going to the section with the star (paying 20 coins basically guarantees a trip to it).
Assuming there would be no Mega or Mini Mushrooms, this presents some interesting adaptation changes. All the mini-pipes can be turned into key-lock doors well enough. It’s adapting the three minigames that would prove to be a challenge. The first minigame is the Die Roll off. This has a Goomba show up as three separate locations on the board to serve as a “toll” for the player. Both the Goomba and player roll a dice – out roll him to get 10 coins, roll lower and get sent back to start. The only change I’d add to this is to let the player give the Goomba any of their items should they lose to keep on track, giving players a reason to carry cheap items at all times. The other two minigames (and item minigame base on cards and a coin minigame based on slots) could have the player simply walk into a house of cards (or jump into it like it was a level in Super Mario 3D World)
Also Exclusive to this board (and the next one) would be the lottery, run by Game Guy. Would work exactly like it did back in the original: most outcomes are loses, blue gives a free mushroom, pink gives 30 coins, gold gives 100 coins.
Secondary Board: Toad’s Midway Madness
Most of my friend consider this one to be the worst board in Mario Party 4, and I don’t blame them. But I know a simple way to fix it: Make it so the skeleton key can alter the direction of the tea cups if the player is willing to expend the key. With the biggest problem of the board solved, it’s also a board theme that no other Mario Party can really offer. The elements of adaptation would following the same guidelines as the Greedy Gala, so apply them here to this board’s equivalents. Beyond that, it’s a very straightforward board.
New Playable Character: Blue Toad
I don’t know if I’m just blind and missing it, but I can’t find a single Blue Toad in this game. And since the more recent Mario games tend to treat the Blue Toad as a separate character (aka “The SMB2 Blue Toad”), I wouldn’t be surprised if they actually are planning to add him to the game. And since the Blue Toad has been seen as being larger than other (most notably, the one in 3D World is considerably larger than Captain Toad), he could fit into the minigames with little issue. Even if I’m just looking too deep into this… it’s still dumb Toad isn’t playable anymore.
I’d rather play as Toadette but that ship has sailed and returned to port with exotic spices, so Bluey it is.
New Minigames:
Photo Finish: A 4-Player minigame where players must place puzzle pieces together as fast as possible. Unlike the original, the Minigame goes on until three of the four players finish the puzzle.
Toad’s Quick Draw: A 4-Player minigame where balloons are let out or a train, and the players must shoot the one matching the flag Toad holds up. First to three wins. Similar to Mushroom Mix-Up, the balloons have extra decals to help colorblind players identify them.
Long Claw Of The Law: A 4-Player minigame where players must find three of the characters on the wanted poster. The minigame ends when someone gets all three. If two players tie behind first, they both get third. If everyone gets at least two out of three, then only the winner gets coins.
Mario Medley: A 4-Player minigame where all 4 players compete in a swimming racing. First to complete all three styles wins.
Chain Chomp Fever: Originally a battle game, this 4-Player minigame has players avoid a rampaging chain chomp. Fire cracks and the threat of falling off the edge makes this one of the most dangerous minigames in terms of survival.
Order Up: A 2 vs 2 minigame where both teams have to memorize as much from a circle of 12 orders as possible, and then find the two correct orders. One order will be from Toad and the other from Toadette, but the minigame is otherwise unchanged.
The Great Deflate: A 2 vs 2 minigame where both teams must ground pound to deflate a plastic beach Thwomp. Timing together deflates it faster. Beyond visuals, this minigame would remain unchanged.
Team Treasure Trek: A 2 vs 2 minigame where both teammates must find their teams item boxes (first gives the treasure chest, the second the key) and then reunite. This Minigame would remain largely unchanged.
Bowser Bop: Originally a story mode minigame, this Duel Minigame has both players trying to bop Bowser-themed bobble heads as they pop up. A Bowser Jr. head is worth a signal point while a Bowser head is worth three. As an addition, Bob-Omb heads would pop up. They offer two points but stun the player. Highest score at the end wins.
Teetering Koopas: originally a story minigame, this Duel minigame has the players engage in a three-level shell game. The first to clear all three stages wins.
Booksquirm Forever: This bonus minigame is an infinite version of Booksquirm where players keep going until everyone is squished. This can only be played in Free Play.
New Items:
Sparky Sticker: A trap. It’s effects are combined with the Zap Orb from Mario Party 7: the next player who walks over it will lose three coins per space remain in their role. Don’t walk over it yourself, though…
Gaddlight: Protects you from a Boo (yeah, Superstars doesn’t have an item like this). Unlike normal, however, the player will have to press B when a Boo shows up to use it. This is so it doesn’t have to be wasted on coins, since stealing coins is free.
Poison Mushroom: Removes 5 from whatever you roll. If your final number is a zero (cannot go below), you’ll reactivate the space you’re already on.
Lucky Charm: Use this on a blue space to make visiting the Lottery an option when passing it. Heading to the lottery will simply have a platinum warp pipe send the player to the lottery house, allowing any board to have this. Only two spaces on the map can allow lottery access; after that, the oldest lottery space added via this item will be delete if a new on goes up.
Go-N-Slow Hammer: A squeaky hammer you use on another player. Either forcibly adds or removes 5 from tehir next roll, depending on what they player manages to hit the center button on the hammer as.
Free Update: Custom Minigame List
As a free update, players can set a customs playlist of minigames (saving up to 3 different playlists) for party mode. The player must keep a minimum of 50 minigames active, and at least 6 minigames in each category (and at least three item minigames active).
Mario Party 5 Party Pack
My buddy loves this game, and he feels like he’s the only one who does. I don’t blame him, this game had some good boards, good minigames, and added three more playable characters. It’s just held back by the inability to select items due to the board building mechanic, and way too many luck-based minigames. So bringing some of it’s better boards and minigames into a Mario Party game with a better structure would be the most ideal outcome.
Primary Board: Bowser Jr’s Pirate Isle
Originally just known as Pirate Dream, this map would be recontextualized as where Bowser Jr. heads to pretend he’s a pirate. As such, he appears quite frequently on this board, especially on the ship at the bottom. Capsule Machines would be replaced with traditional item shops, although the second one most players would encounter is instead the Koopa Bank. The tunnel which was originally inaccessible in the original game (only severing for the boulder chase event) now has a door the player can use a skeleton key to open. As a result of how useful this shortcut is, skeleton keys cost more on this board. Skeleton keys can also be used for a free pass/ride on Whomps or Thwomps.
A small animation detail is that Toadette will never land but instead float above the star space on her balloons. If a Chomp Whistle is used, they’ll circle around the star space as Toadette slowly descends (while panicking).
Secondary Board: Deep Sea Reef
Originally known as Under Sea Dream, this board ultimately a straightforward one. The only detail of note is that they’d have to add an extra section to the board to get any use of the Skeleton Key, but would otherwise not be purchasable on this board.
New Playable Character: Pom Pom
That’s the big pink koopa girl who is seen as the ranged counterpart Boom Boom, by the way. She was also playable in Super Mario Party. The idea here is that she’d serve as the “Koopa Kid” stand-in, and has the benefit of having an identical hitbox to Donkey Kong, so she’d easily fit in to any minigames. Her personality (yeah, she actually has one) would also play well in a party game: a desire to be elegant, but is prone to losing her temper when losing. That sounds like some nice amination potential.
I’d rather play as Koopa Kid if given the choice, but I’m more likely to get Toadette as a playable character in an update.
New Minigames:
Hotel Goomba: A 4-Player minigame where everyone is trying to get to the best view in the hotel by knocking Goombas out of the way. The player can reset the room should they screw up. The minigame goes on until three out of the four make it, or until 60 seconds pass. The squares in the rooms are a tad larger to account for DK and Pom Pom.
Dodge Bomb: A 4-player minigame where players must try to pick up and throw a Bob-Omb at an opponent. Bob-ombs will explode on their own as well. The arena is slightly bigger (roughly the size of “See You Letter”)
Astro-Logical: originally a battle game, this 4-Player minigame has each player represented by a stamp. They must find the card with the symbol matching the center (which becomes easier to see as the timer ticks down). At least one player will get eliminated per round. Last player standing wins.
Twist N’ Out: Originally a battle game, this 4-Player minigame has the players inside a twister and trying to knock each other out. The windy walls slowly close in. Last player standing wins, although anyone who outlasts the time can also win.
Defuse Or Lose: A 2 vs 2 minigame where both teams must stop three lit wires from blowing up the King Bob-Omb by ground pounding the sparks. The minigame only ends when someone blows up.
UFO ID: A 2 vs 2 Minigame where both teams try to identify the two UFOs in front of them. They must ground pound on the correct panels at the same time. Both teams are independent of each other’s answers; first team to reach a score of 5 wins.
Mario Can-Can: A 2 vs 2 minigame where both teams must ground pound (ideally in a rhythm) to open a can with their can opener. First team to open their can wins.
Beam Team: A 1 vs 3 minigame where one player in on the ground and the other three are in UFOs. the UFO controls are very sensitive, and crashing into each other stuns them. The solo player wins by outlasting the timer, while the team wins by catching the solo player.
Bounds Of Music: A Duel minigame where both players must find invisible music not blocks. The blocks occasionally glimmer their locations tot he two players. whoever gets the most at the end of the timer or once all are collected wins.
Head Waiter: A Duel minigame where both players are in the wild west, tossing a Bowser head Bomb between them. The player can lower the counter (starting at 9) by either 1 or 2 points. Once the counter hits 5 or lower, the numbers become hidden, leaving the players guessing. When a player drops the number to 0, they lose.
Frightmare: A bonus minigame only selectable in Freeplay Mode. A single player minigame where the player must survive against and eventually fight against Bowser.
New Items:
Warp Pipe: Unlike the warp block, the Warp Pipe let’s the player warp to a board event (the start, a random shop, Koopa Bank, or Lottery should those be present). They can head inside the event should it allow them to.
Chance Time Clock: This item is rarely sold in stores, but it allows a player to activate chance time. It’s price costs 20 coins and charges an extra 10 coins for everyone the player is currenting beating.
Golden Dash Shroom: Adds a massive 8 rolls to a player’s roll, but it costs four times as much as a regular dashshroom.
VIP Pass: A passive item that allows players to not have to pay the Koopa Bank. It can be trading in the bank for it’s contents, up to 50 coins worth.
Koopa Bank Sticker: When placed on a blue space, it becomes a Koopa Bank space (pay if you pass, collect if you land). A Koopa Paratropper will run these, but it shares it’s contents with the main one on the board.
Free Update: Advanced Settings
When selecting the settings for a party, the player can opt to head into advanced settings to modify more precise details. Examples include but are not limited too:
Merciless Bowser: When enabled, Bowser Spaces have more damaging spaces, and losing Bowser minigames will now take half or all coins.
Bank Rates: Players can set the Koopa Bank toll to be anything from 1 to 10 coins.
Mega Mart: Doubles the number of items in the shop when enabled.
Downer Discount: When enabled, players in 3rd and 4th place receive discounts in item shops.
Boo Hoo: When enabled, Stealing coins now costs five coins but steals more money (comparable to Mario Party 4)
Mario Party 6 Party Pack
Mario Party 6 took the Day and Night system from Horror Land and expanded it to fit the entire game, right down to several minigames have day and night versions (often just a cosmetic detail, sometimes affected the goal of the game) as well as a few that can only be played at day or night. It also fixed nearly every structural issue with Mario party 5 (mostly in terms of items no longer requiring you to spend money to use on yourself). It also added Toadette, which is probably the most important addition in the series.
Primary Board: Fair Square
This board has one of the most unique gimmicks in the series. Similar to Peach’s Birthday Cake, the star remains in a single location but the price of it will change at night. It can be 5, 10, 15, 20, 25, 30, or 40 coins per star. On top of that, the player can by default buy up to 5 stars if they have the coins to purchase it. So do you save up and pray for night to give you a good deal, or do you seek the safety of daylight savings? The board’s structure would see no major changes, although a Skeleton Key can get past the Whomp for free, letting the player circle around for another quick star. The day and night also affects the board events as it did in the original. In order to emulate the Donkey Kong-Bowser dynamic in the original game, there are a total of five Lucky Spaces that become Bowser Spaces at night. Item boxes from Mario Kart would appear on the board to give free items. This holds true for boards from Mario Party 7 and 8 as well.
Secondary Board: E. Gadd’s Garage
This board is a more chaotic version of the standard Mario Party board, but it’s otherwise unchanged from it’s original form. Gooigi makes some cameos now. The big deal on this board is that there’s a lot of gadgets to mess with player’s locations, items, or coins, and day and night can change their function. The Skeleton Key can be used to turn the center station when the player approaches should they want too.
New Playable Character: Diddy Kong
I will never understand why it took until Super Mario Party to add Diddy Kong as a playable character. Seriously. I get dropping DK over Hitbox concerns as well as to make him the positive version of a Bowser Space. But Diddy Kong is just as popular (if not more so), and is roughly the size as Mario. But hey, good of a reason as any to add him to Superstars.
New Minigames:
…Must Come Down: The nighttime version of “What Goes Up”, this time treated as a separate minigame. This version requires the player to get to the bottom as fast as possible. In Party Mode, any board with a day and night feature will only place it in the roulette if playing at night.
Raft Drafts: A 4-Player Minigame where players must jump on moving platforms before they fall off a waterfall. This minigame has day and night variants, with the nighttime version switching the Spiny Shells with Fireballs. The finish line will arrive sooner if three players get knocked out buy one survives a few seconds.
Lift Leapers: A 4-Player minigame where all four partake in a platforming challenge. The first to get through all three sections is the winner. The minigame ends once second and third place is claimed.
Odd Card Out: A 4-Player minigame where the group is shown three cards, and they must find the odd card. Only the first person to raise the card gets the point, and answering wrong takes the player out of the next one. Unlike the original, the player must instead get five correct answers to win.
Pier Factor: Originally a DK game, this 4-Player minigame has each player pick a barrel and collect coins as they roll down the pier, turning at every chance. This is now a coin-collecting minigame.
Body Builder: A 2 vs 2 minigame where the two teams try to build a robot by hitting a slot at the right time for the next part they need. The first team to build their robot wins.
Dust Til Dawn: A 1 vs 3 minigame where the solo player cleans a personal room while the team cleans a living room. The personal room has far fewer items to clean, but each piece is filthier. The “team” that cleans their room first wins. This game has day and night versions, but with no gameplay changes.
T-Minus Five: A Duel minigame where players must ground pound on their panel when it is lit up to get to the next one. The timing gets faster and faster each succession. The first to get all five right and escape via the rocket wins.
Boo’d Off The Stage: A Duel minigame where players are in the woods while Boos try to catch them. The size of the Boos change over time. The minigame ends after 6- seconds or when a player gets caught.
O Zone: A Duel minigame where both players see a series of buttons before they spin around an go dark. The two players must then ground pound and find three circles (there are only five) and a X stuns them much longer.
Lab Brats: A bonus 1-Player minigame that can only be played in Free Play mode. E. Gadd send the player into his maze, challenge them to find their way out and even find the lost buddy on each floor. They are ranked after the fact based on time and friends.
New Items:
Metal Mushroom: Encasing the player in metal, they become immune to any stickers (destroying them when passed), red spaces, or Bowser spaces for two turns. Can also prevent piranha plants from stealing from you on Peach’s birthday cake.
Thwomp Sticker: A sticker that will make a Thwomp fall on the next player who passes by, forcing them to land there. Unlike most stickers, this can be placed on any pace.
Bedtime Clock: This item only appears on boards with a day and night system, but you can then change the time of day before you turn starts.
Lava Bubble Sticker: This sticker can only be placed on red or blue spaces. The next player who passes it will trigger the lava bubble, destroying 10 coins. On top of that, the color of the space will flip to it’s opposite (blue becomes red, or red becomes blue).
Klepto Sticker: This sticker sends the next player to pass the blue or red space it’s placed will be sent back to start.
Free Update: Final Five Turn Roulette
When enabled, the final five turns prediction is replaced with the final five turn roulette. The effects can be any of the following:
x3 Spaces: Red and Blue Spaces are tripled instead of doubled.
Bowsermania: All Red Spaces are Bowser Spaces
Chance Time: Adds another 5 Chance Time Spaces
Free Star: Stars are now free
Rare And Cheap: Item Shops have rarer items and cost less.
Duel For Stars: Duels can now wager stars instead of coins.
Mario Party 7 Party Pack
The Mario Party the world forgot. Sorta. In reality, Mario Party 7 is just unlucky – it lacks the distinct gimmicks for 6 and 8 (day and night, and motion controls respectively), so it’s only standout mechanic is the “world trotting” theme. It’s a nice theme, for sure, but it doesn’t affect the gameplay in any crucial way – it’s definitely the most straight forward Mario Party since 3. You’re ranking of it in the overall series will likely be based on that. Anyway, Koopa Kid was dropped as a playable character, but Dry Bones was added (as well as Birdo… for some reason), and brought in character specific orbs (Peach and Daisy’s were OP).
Primary Board: Neon Heights
Based on the united states (More accurately, Las Vegas with hints of Hollywood, Cape Canaveral, and New York City), Neon Heights has players head around the board to look for one of three star locations. Each of these star spaces has a floating chest available. Bowser Jr. will drop in on these chests when the player gets near, saying they’re his, but he’ll trade whatever’s in them for 10 coins. While it can be a star, it can also be 20 coins, a cheap item, nothing at all, or a Bob-Omb to blow the player back to start. Once the star is found, Jr will ask his dad for three new ones. Despite being annoyed, Bowser will agree, placing three more chests around the board.
Most board events would be about earning coins based on the section of the board. This can be playing a character in a movie, practicing baseball for the major leagues, or trying your luck at the slots. This board would also have a unique effect on Bowser Spaces – “Bowser Jr. Gift”. This can result in an empty chest being filled with a Ztar, stealing a star from the player unlucky enough to buy it.
Secondary Board: Pagoda Peak
Based on a Chinese mountain, Pagoda Peak has the players follow a linear path to get to the end to buy the star. The price starts at 20 coins, but can be 10, 30, or 40 as well after the fact. As such, most event spaces are about gaining enough coins should the price be high, although a few event spaces have the player hit a gong to change the price. It’s worth mentioning that, unlike Fair Square, the player can only buy one star regardless of their savings. Once the star is purchase, the price goes up by 10 (but once it hits 40, it goes back down to 10).
New Playable Character: Dry Bones
Dead and Loving It. Dry Bones is one of those strangely popular characters in the series. Probably because he’s the closest thing to a zombie this series has. Or maybe it’s because the crackling noises it makes are pretty funny. There’s also the comedy in the many ways Dry Bones can fall apart when losing. It’s also one of the more annoying enemies in the platforms, given there’s only a very limited number of ways to actually kill one of these. I don’t know why he’s so popular, but I enjoy playing as him as much as the next guy.
New Minigames:
Fun Run: A quick and simple 4-Player minigame where everyone is racing to get to the top of a spiral tower while avoiding the traps. First player to the end wins, but the minigame only ends when second and third place are claimed.
Take Me Ohm: A 4-Player minigame that’s about survival. Players must avoid electric lines created from the Thowmps on the sides. As time goes one, they become less forgiving with timing. Last player standing, or anyone who outlasts the timer wins.
Stump Change: Originally a DK game, the players must collect coins while barrel rolling on top of a stump. If the player falls off the stump, they’re done. More coins are thrown on as time goes on, up to 20 seconds worth. Players keep any coins they collect, even if they fall off the stump.
Track And Yield: A 4-Player minigame where all four players compete in track and field on a conveyor belt. Electrified hurdles are thrown in to stun players longer while the conveyor belt tries to make the players fall. The last player standing, or anyone lasting 30 seconds, wins.
Bob-ombic Plague: Originally an 8-Player minigame, this 4-Player minigame has each player eat a double cherry. With eight character, they then form a circle and pass a Bob-Omb around. Pressing A to toss it to the next player when one of your two clones has the bomb, it’ll take out the holder and the two player next to them when it goes off. There will be 8, then 5, then 2, then 1. Be the last player standing to win (if the player and their clone are left as the final 2, the clone simply dissipates).
Balloon Busters: Originally a Mic game, this 4-Player minigame has a player breath anywhere from 1 to 5 times into a balloon. Once done breathing, that player gets to head behind the shield until the next player stops. The idea is to make the balloon pop on the next person to knock everyone else out.
Spider Stomper: A 2 vs 2 minigame where both teams take on a den of spiders to free the Flutter at the end. The projectile attacks from the Spiders can stun but not knockout a player. First team to free the Flutter wins.
Gimme A Sign: A Duel minigame where players must keep an eye on the sign(s) a Shy Guy holds up, and get to the platform(s) before the others sink. Outlast your opponent to win. Unlike the original, there’s no time limit, so some one will lose.
Royal Rumpus: A Duel minigame that’s simply trying to crush more Goombas than your opponent in the time limit.
Weight for It: A Duel minigame where bother players use hammers to try and send balls to the opposing side. The player with more weight on their side loses.
Bumper To Bumper: Originally an 8-player minigame, this is a unique team-minigame only playable in free play. It’s treated as a 2 vs 2, but there will be an additional 2 teams randomly generated from playable characters not being used. Beyond this behind-the-scenes set up, it plays exactly like it did back in 7.
New Items:
Shroom Shake: Once drunk, the player gains the benefit of a Dash Shroom for the next three turns.
Kamek Sticker: The next player who passes this space will have Kamek swap places with the person who placed it. Unlike other stickers, the person who placed it can’t trip it.
Bob-Omb Sticker: This sticker drops a Bob-Omb on the next poor player to pass by, destroying one of their items.
Bowser Phone: Call up Bowser and tell him someone really wants to pay him a visit. He’ll be overjoyed to have guests over.
Bowser Statue: A golden statue of Bowser. Does nothing on it’s own, can save you from a bad time with Bowser.
Free Update: New Difficulties
Grandmaster: A difficulty above Master, for those crazy enough for the challenge.
Brutal: The AI’s strategy is focused on taking every victory it can. It’ll be particularly nasty in minigames
Underhanded: The AI focuses more on undermining other players than winning themselves – from making sure a player beating them loses, to stealing when given the chance.
Mario Party 8 Party Pack
Originally received as one of the weakest entries, Mario Party 8 has become rather popular as of late: between the people who grew up on the Gamecube and Wii era of gaming were not making internet content until 2015 minimum, and Rooster Teeth’s more beloved hosts (Michael, Gavin, Lindsay, and Meg) playing this game a hell of a lot, it’s not hard to see why. And to be fair, it did benefit from having 7 games of fine tuning come before it, making it one of the better early releases.
Primary Board: Koopa Typcon
This board has the players invest in buildings to get the stars in them, and when enough collective coins are invested, the value increases from 1 star to 2 stars, and eventually 3. Some board events and even the Bowser Space can result in coins being stolen from hotels, and if the value lowers enough, a star will be removed from play. Items work slightly differently here: Chomp Calls don’t appear at all (as well as in Fair Square and Neon Heights), and a Golden Pipe can send the player to any hotel (they cost considerably more as a result).
The Lucky Spaces are still on this board, and function just like they used too.
Secondary Board: Bowser’s Warped Orbit
The major change to this board is the additional of lava to the background giving visual nods to Bowser’s Galactic Generator from Mario Galaxy, and helping distinguish from Space Land. The board otherwise works as it did: each player starts with 5 stars, and must steal the stars from others. Boo does not appear on this board, and instead the player must use buffed items to do so. Read the item section for this pack to get a better idea of how that works.
The Lucky space is still here, but instead lets the player visit King Boo. King Boos prices in space are much cheaper, costing only 50 coins to steal from all 3 players.
New Playable Character: Hammer Bro.
I have nothing to really add here, other than they could give him the black armor from Super Mario Bros. 3 to distinguish from other Hammer Bros in minigames.
New Minigames:
Glacial Meltdown: A 4-Player minigame where everyone is trying to knock each other off of a chunk of ice. Lakitu will throw buzzy beetle and can be turning into shells if jumped on first. As with many minigames, punching and kicking is fair. A Buzzy Beetle shell has the impact of a kick with more knockback.
Aim Of The Game: Players must aim their cursors to get cards for points. The cards are added together in order at the end, with their being x2 and x0 cards. Highest score wins.
Mosh-Pit Playroom: A 4-Player minigame where all four players are trying to find and collect their 50 bouncing balls. First to get theirs win, and the minigame ends there with second and third being determined by the score remaining.
Shake It: A 4-Player minigame that is rewarded from it’s original version to have the player alternate between A and B. Whoever gets the soda the highest wins
Grabby Gridiron: A 2 vs 2 minigame where both teams are trying to get footballs that won’t stop bouncing to their goal. 2 balls are in play at any given moment, and they can be knocked out of a player’s hands. First team to get five points win.
King Of The Hill: A 2 vs 2 minigame where both teams are fighting on top of a mountain. The first platform has a player from each team try to knock each other off as the mountain falls apart, with the victor heading to the top mountain. Last team with anyone left standing wins.
Breakneck Building: A duel minigame where players must compete in a series of building and crafts challenges. The big change is the painting – while the players don’t need to point at the screen and can use the control stick, they must remember to put fresh paint on the brush from the bottom of the canvas.
Cardiators: A Duel minigame where both players are in a stadium. After drawing number to determine order, they each pick from the 12 cards to determine their attack. Each attack deals different damage, and both players have 20 health. Defeat your opponent to win.
Specter Inspector: A Duel minigame where both players are in a haunted house looking for characters. While the spawn location for each character doesn’t change too much, who spawns or not is randomized. On top of that, Ghosts will appear to spook players and stall for time. First player to find 3 characters wins.
Blazing Lassos: A Duel minigame in the old west where both players must use lassos to gather points. Pressing L and R rapidly to maintain a lasso, they must press A to fling it, gaining the points written on the barrel. barrels are replaced once gotten. Highest score after 30 seconds wins.
Star Carnival Bowling: A full game of bowling that’s playable in Free Play mode. Unlike most minigames, AI players can be deactivated. It’s controls are comparable to Monkey Bowling 2.
New Items:
Blow Away Candy: A twister-shaped stick of cotton candy that turns the player into a twister, sending anyone in front them them back to start.
Vampire Candy: A Swooper lollipop that turns the player into a vampire. By using a roulette, they can steal 1, 5, or 10 coins from all other players.
Bit-Sized Candy: A ? Block tin containing a bunch of 8-bit Mario hard candies. Become an 8-Bit sprite of your character, and earn 3 coins for every space you move. You by pass shops and most board events, but not the star.
Bullet Bill Candy: A piece of Bullet Bill shaped hard candy. Become a Bullet Bill and roll three dice blocks, steal 10 coins (or 1 star in Bowser’s Warped Orbit) from every player you pass.
Bowser Candy: A sugar cookie in the shape of the Bowser symbol. Puts the player in the Bowser suit as they roll two dice blocks and steal 20 coins (or 2 Stars in Bowser’s Warped Orbit) from everyone they pass.
Free Update: Alternates
For the final free update, the player can purchase from the Mushroom Village shop some alternatives for the party mode, such as replacing coins with either the original N64 coins/Star Bits (in the latter’s case, coin bags become purple star bit bags) or replacing stars with Power Moons or Shine Sprites.
And with that, this would be my ideal DLC update for Mario Party Superstars. If something like this were to happen, then here’s hoping teh big N wouldn’t assume it’s worth another game in and of itself at that point. Of course, they probably would…
Another write up for October, huh? Well, I actually have another one I made with a friend for a plausible (if not unlikely) Mario Kart 9. But I don’t want these vidya write ups to just be “Insert Mario franchise Sequel my friend and I want Volume XX” (because I have other Mario Sport Games write ups as well). So, I wanted this next one to be the opposite of Mario just to keep mixing things up.
And it’s hard to get much further from Mr. Video Game than with Lt. Balls Of Steel, huh?
So for this “Game Pitch,” I’ll go over a plausible guide to bring Duke out of hibernation and have him stand out from the new era of Boomer Shooters.
Part 1: Marketing
Listen to your Potential Customers, Ignore Pointless Complainers
What’s a “Pointless Complainer” in this context? Well, in short, it refers to people online who complain about the qualities of a product or a person who does not affect them, because they have no intention to ever buy that product or ever interact in any meaningful way with that person. The exact reasoning for why so many people do this is anyone’s guess (I personally believe it’s people who live exclusively online looking for something to fight for that doesn’t require any sacrifice on their part), but the important part is that they often have no desire to buy the products they complain about. Take note this is not a political stance, as both Jim Sterling and The Quartering count as Pointless Complainers.
Now I’m assuming the phrase “Potential Consumer” does not need explanation. But I ask: have you ever heard of the phrase “Get Woke, Go Broke?” I have, and I don’t like using it in any serious context these days; I greatly prefer the bold statement above. It’s not fair to say that when you get woke you go broke since “woke” is not the only ideology that can backfire or even destroy a product/business. On top of that, it breaks the age old rule of “customer is always right.” This mindset isn’t meant to be literal – customers don’t just get what they want; it’s to remind everyone that seeing yourself as better than those who fund your business is no way to maintain one.
For example: did the Comic Book Industry collapse because the traditionally left-leaning industry went too far left? That certainly didn’t help, but I’d dare say it was the hiring of people who did not care about their potential customers because the higher ups were too appeased in listening to pointless complainers who where upset over often trivial details that did not affect the products being sold. People who were more concerned with internet brownie points than actually keeping the company alive, hired by people who (in my opinion) believed the companies success to be forgone and far removed from active decision making; simply make product and they will consume.
That last part is why the “Potential” is there – you have to earn your sales. Every time. While Twitter has no influence over Duke Nukem getting a new game (at least until you hand it over to them), Duke Nukem Forever very well might. It wasn’t the worst thing ever, and in fact not even the worst game Duke’s been in. But the 11 year wait for a game of that kind of inconsistent quality is going to at best have people joke about maybe finishing the game this time. So while the game won’t need several expensive CGI trailers or top of the line graphics even, it needs to be on track and have a consistent vision when being made (and with Randy Pitchford no longer as CEO, that actually has a chance of happening).
So, the actual challenge to bring Duke back isn’t that he’s too problematic (sales make profit, not tweets). The problem is that it’s last entry was a decade ago, over hyped and at best anything but a stellar addition to the series. That’s the real challenge to overcome, and only showing off promising gameplay footage that’s accurate to the final product will fix that.
Part 2: Plot
Okay, enough with marketing and social media nonsense. On to the actual game itself.
Picking up where Duke Nukem Forever left off, Duke has successfully won his run for President Of The United States (with one hell of a red Tuxedo), and is currently in the middle of a press conference with some lovely news reporters. These questions, which can best be summed up as “Duke, why are you so awesome?” and “Jane, why don’t you wear proper clothes?” get interrupted by General Graves, who is then interrupted by an Alien teleporting into the oval office attempting to kill Duke (who promptly kicks it into the wall, making it splat).
Duke, realizing that the alien menace has returned once again, orders Jane to evacuate the White House while getting Tom and Jerry on the line, and orders General Graves to deploy the EDF as he gears up to head to the front lines. A different old man who claims to be Duke’s strategic officer tries to talk him out of it, but Duke tells him to kiss is ass. He tries to claim he already does that, but the automated door cuts him off. Graves hands Duke a briefcase, revealing Tom and Jerry to be his starting pistols. Duke then dawns a his jetpack, and decides if he wants to wear his presidential attire or his classic outfit (the player decides this; it has no affect on gameplay).
And in terms of a plot, that’s actually all Duke Nukem needs. At least, for the main story. Most additional cutscenes and character dialogues would be hidden in secret areas (like how there were Easter eggs in Boomer Shooters of Duke’s era). Beyond that, any dialogue is either between Duke and the character real time or via Radio (such as with Graves and Jane). Even then, most of the secrets would be various gags. So while there is a bit more context for the situation to be gained over the course of the game, the five episodes of the plot remains straight forward: Aliens are back, and Duke’s having none of that shit.
Part 3: Characters
Since the plot is about as simple as it gets, let’s use characters to transfer over to gameplay. Beyond Duke himself, whose personality is comparable to 3D and Forever, here’s who else he’d encounter:
General Graves
While President-Elect Duke Nukem operates under the rule that people answer to him, General Phil Graves serves as the exception to this rule – when Duke determines he himself is needed in battle, Graves is trusted to be his eyes and ears. Graves, for his part, simply wishes to serve in combat more often. He also commands over the EDF, although his leadership skills with them is more grotesquely debated.
Phil Graves serves as Duke’s mission control in most cases, often being the voice that is heard in the start of each level. Typically, his PDA calls are the most plot important in updating Duke on any changes in the Alien status. He can also call Duke and warn him of certain ambushes, although this isn’t always the case. On the more Comedic side, he will occasionally chastise Duke for loosing focus in the mission, normally if a secret is found, but Duke himself only occasionally responds to this.
Graves, outside of cutscenes, is solemnly seen in game. On the rare occasion he is in person, he has his classic green uniform from the earlier games – most notably in the final episode where he starts to appear in levels to help Duke. There are two secrets where he is found in a different outfit. The first is in a laundry mat where he’s in his blue uniform from Forever, in which he’s simply doing his laundry. The funnier of the two is Graves being in a hot tub with the news reporters from the opening, much to Duke’s annoyance (he was planning to do that).
Jane Fatale
Jane comes from a future where men have been wiped out and women were the only ones left to fight off the aliens. With most women being enslaved or killed for fighting back, Jan sought out Duke. However, while he was able to destroy the alien scourge, Operation Repopulate turned out to be a bust as the aliens radiation had left the women of the planet unable to procreate. Running out of options, Jane was sent back in time to prevent this dark future from happening, with the time machine being destroyed to lock her in Duke’s present.
Jane originates from the PS1 title Land Of The Babes; this games gives that ending a darker twist and brings her back as Duke’s “Babe-in-chief”. Compared to Graves, Jane has more light-heart and flirtatious dialogue with Duke. She tends to get on the PDA whenever Duke rescues a Babe, although she sometimes drops some information on the location Duke’s in.
Towards the end of the game, she appears physically as an ally alongside Graves. It’s revealed that these aliens are the ones who ruined Jane’s time line. After letting it drop that, during Duke’s presidential campaign the two had a lot of sex thanks to Jane’s infertility, they aren’t sure if this was the worst thing ever. General graves reminding them about the women in the lost future gives both of them a bloodlust for the aliens.
Jane and Duke agree to shag in the alien leader’s bed before the blow the ship up, because of course they do.
Dylan
One of the few members of the EDF (Earth Defense Force, and exclusively the American branch) who has seen multiple years of service. He’s prone to swearing… well, a lot. Like, way too much. But he’s really useful with a gun, and that’s all he needs most of the time. He has a loving girlfriend named Sally, although their relationship seems to be based entirely on fighting and making up after the fact. Despite Dylan’s low rank and lower standards, he’s still alive and they’re still together so he’s doing something right.
The foul mouthed soldier from Forever returns, as does most of the EDF. Dylan, however, has little actual role in the plot beyond finding the aliens alongside Duke. Instead, each episode has at least once chapter where Dylan fights alongside Duke, normally in levels with infinitely respawning enemies. Dylan himself can be knocked out, but will never die outright. In some levels, Dylan can be found in a secret room for some invincible assistance. Dylan has to reload but never runs out of ammo, so letting him thin out crowds or distract enemies while Duke handles the big guys is a legitimate strategy – one Duke will comment on to Dylan’s annoyance.
Brad O.G.
Brad Oswald Gibson is the finest sniper in the EDF, and even earned an illustrious Duke Nukems “As Good As Me” medal for his contributions to a minor alien resurgence at the start of his presidency. This tall African American is also well known for his top-of-the-line handlebar mustache, making him a truly distinguished individual.
Brad appears in the middle episodes to offer sniping support to Duke. While he’ll rarely kill an enemy, enemies hit by his laser rifle will take extra damage from Duke’s attacks. He will also serve as mission control for those missions. Here, he’ll get an almost sexual pleasure from killing aliens, eventually making Duke a bit unnerved. However, given that he’s kinda related to a lot of the dead EDF soldiers, it could be seen as payback.
Brad does not appear in the final episode in person, but gets some PDA conversations with Duke, Graves, and Jane.
Brad Clones
Brad’s services to his country doesn’t end with his sniping but only began – when Duke and Jane presented the idea of using Alien cloning technology to bolster the EDF forces, Brad volunteered himself for the program. The clone process worked, but there were some… unforeseen consequences. The cloning process rendered the clones less intelligent than their originator. Plus, Brad being a world-renowned sniper did not translate to frontline combat experience. As such, these clones don’t have the highest life expectancy.
Brad Clones, beyond the benefit of being able to reuse Brad’s character model, can be found in nearly every single level in the game. That said, they’re dead most of the time. While there isn’t anything that can be done for the corpses (or the Pigcops), their weapons and armor can certainly aid Duke on his adventure.
There are several secret rooms that contain a surviving Brad Clone, with some having three or four on standby. Duke can recruit them for combat in the levels, but don’t expect them to live long. Sure, they have full health and full armor when Duke recruits them, but they lack any sense of self preservation and generally just stand out in the open, even during a fire fight. As a result, Duke himself is very apathetic to the clones, often cracking a joke if one of them goes down (“I guess we’ll have to grow more.”). In fact, Duke can actively kill a Brad Clone with no repercussions, and even receive an ego boost for doing so, as if he killed an enemy.
Each Brad Clone has two letters next to his name for identification sake. In gameplay, these to letters can be A through E (A.B., C.E., D.A., etc). The only thing visually distinct between the clones is their facial hair varies between each other and the real Brad. Brad clones also can appear as passive NPCs in several maps, serving mostly comedic roles in these cases.
The Converted
A purple version of the Assault Commander enemy who has defected to Earth’s side, and is intent on helping the EDF stop the scourge’s efforts to converts Earth’s men into alien soldiers and women into organic cloning machines. He might not have a halo over his head, but this galactic lizard is on his way to earning his wings.
The Converted appears as mission control throughout almost the entirety of Episode 5, aside from the first mission where the player is tasked with breaking him out of prison on an alien ship. While he’ll come out of nowhere to the more casual players, several secrets involve messages from him from as early as Episode 1. The Converted is the only example of a mission control character who is encountered during gameplay first.
Gus
This kooky old miner has been paranoid about aliens longer than Duke’s been fighting them. As such, he’s put his profession to great use and mined out a bunch of caverns to make secret panic rooms for whoever may find them should aliens ever arrive. For Duke, this means that there’s several secret rooms with extra health or ammo. There’s just also a weirdo in most of them.
Gus was originally meant for Duke Nukem Forever but was cut out of the final game.
Gus has no plot relevance in the entire game; he’s the only character Duke never has to interact with and has no mandatory PDA calls; he’s the only major character in fact Duke can theoretically never see or hear. On the other hand, he has the potential to be the more reoccurring characters in the game, with every non-boss level having him hidden somewhere. This does not strictly mean he’s always in a panic room, as there are only 20 of them in the game and the final episode only has one in the first level. Gus can also be found at campfires cooking hot dogs, at a strip club doing nothing(?), or sniping Pigcops from a roof top (this last one is the most likely to be a casual player’s first encounter if they’re not looking for secrets, since his rifle can be heard).
Gus is also unlike most characters in terms of personality. Whenever Duke finds him, he’ll often take the piss out of him in some way (mocking his sun glasses, asking if he’s getting too old for this, mention Duke’s inability to keep it in his pants, etc). Duke also (somewhat uncharacteristically) pays no mind to this outside of a few examples to further a joke. Despite this mockery, Gus has no issue with Duke taking whatever he needs in terms of ammo or health.
Gus has a few PDA and phone calls Duke can part take in. In the final episode, Duke can discover Gus hijacked an alien ship and is shooting down as many of them as he can. He then plans to crash land into the ocean, just to scare the piss out some poor navy seals. It is unknown if he survives this endeavor or not.
Minor Characters
This is a list of smaller characters with bit roles or one-time appearances
Sex Workers – Found in a few levels. Aliens, Pigcops nor Brad Clones can keep their eyes off them. (Dylan is immune to their lure), Duke can make use of this to easily slay some enemies. If Duke actually kills a Sex Worker, he’ll audibly hate himself for it and spawn in extra aliens. Alternatively, he can pay them in hopes of getting some exposure (this feature can be disabled for online streaming)
Tommy Slov Jr. – A Fanboy of Duke’s. He wears Master Chief’s helmet, which Duke confuses for a bicycle helmet. Asking for an autograph, Duke signs it and promises him that he’ll some day be strong enough to not need power armor.
Myra Slov – Tommy’s hot mother. Duke laments that she’s taken, but when she shows concern over duke sending her husband to Mars to destroy their secret base, Duke will mention that he doubts he’s doomed.
President Ghost – The spirit of the president from Duke Nukem forever. When he is discovered, he’ll simply tell Duke to fuck off and stay away from his daughter. Duke intends to do neither.
Former President’s Daughter: Parody of Ashley Graham from RE4, and one of several babes that Duke can save is.
Dogs – Duke can find blood hounds in some levels. Pressing the interact button will have Duke pet him, boosting his Ego (25% the first time, and can be continually pet to gradually increase up to 100% max if not already there/over). Duke can kill them, but this’ll actually lower his Ego. Dogs can only be killed with Duke’s melee attacks
Duke Burger Mascot – The guy who works at the Duke Burger in the Mascot costume. He can turn hostile if Duke talks to him long enough. While he can be killed, knocking him out with a single punch or kick will instead boost Duke’s Ego by 25% and have him utter the line “Why do we keep hiring butt heads like that clown?”
Part 4: U.I., Jetpacks, & Controls
The MS Paint image above isn’t abstract art; it’s a simplistic representation of what the UI would look like. Or rather, two versions of the same UI. The left UI shows all six elements at 100%, while the right side shows the UI at various percentages either below or even above 100%. All of these meters carry between levels, but not episodes.
Red Bar: Duke’s health. Don’t let this hit zero or you redo the level. And that would suck. Thankfully, you can actually raise Duke’s health over 100% in certain circumstances. Restore Duke’s health with healing supplies.
Blue Bar: Duke’s armor. Not power armor, that’s for people without power; classic steel armor that reduces vital damage; The percentage varies between attacks (For example, armor stops 50% of bullet damage, 75% of fire damage, 25% laser damage, and cannot stop radiation damage). Keep in mind that any damage not coming out of your health instead comes out of the armor, and armor is a bit harder to find than health.
Yellow Bar: Duke’s Ego. Unlike the other two, Duke’s ego will slowly refill overtime up to 100%, although from zero this takes about a full 50 seconds. However, Duke can also raise his Ego well above that maximum through of a variety of means. From killing enemies to discovering secrets to saving Babes, Duke’s Ego can raise as high as 300% from those boosts. Duke’s ego serves as a universal resource for some of Duke’s tools.
Red Box: Gasoline. Unlike other games, Duke has his jetpack at all times. His Ego is potent enough to fuel this jet pack, but finding a can of gas will give Duke fuel for a considerable amount of time, allowing him to save his Ego for more important matters. Once emptied, the jetpack consumes Ego as usual. Once a gas can is picked up, the meter refills to exactly 100%, so be wise about picking one up to avoid wasting gas.
Blue Box: Oxygen. Duke’s Ego will double as his air meter (so don’t go swimming right after a long flight if you can help it). If Duke can find a tank of oxygen, however, he can breath underwater (or in space, if needed) without having to drain his Ego. Same rules as the gas can applies when running out or replacing an oxygen tank.
Yellow Box: Duke Boots. Duke’s armor does little to prevent the hazards Duke can step on, such as fire, acid, lava, electric water, radiation, and such. The Duke Boots (known previously as Protective Boots) are a unique form of armor for these treats. While this might seem more mundane, it can allow Duke to take short cuts or make risky plays he’d otherwise lose health for doing. Just remember the rules the Gas and Oxygen apply by when you find a new pair of Boots.
If your wondering why I didn’t color-code the text, it’s because WordPress’s editor is a bit of a pain to work with.
While Duke always has his jetpack and deep water is fairly common, not every single level would be open, as levels with hallways and mazes would still be around (especially the sewers). Mission Objectives can range anywhere from finding the exist to escorting an important character back to the entrance (usually the indestructible Dylan), or trying to collect/destroy set items. I won’t be listing levels in the write up; I personally don’t think the level themes are too important other than the desire to have them be different, and given that even the rushed Duke Nukem Forever didn’t have issues with level variety, I don’t think there’s any concern of a new game struggling in this area.
Now, for the controls, I’ll be using and Xbox One (Xbone) controller. Left and right sticks do exactly what you think they do, and I’m also assuming you can guess which button pauses the game and which one pulls out the map. There is no srpint button as Duke simply moves quickly. As for the rest:
A Button: Duke jumps. When Duke is flying, swimming or in orbit, hold it to ascend upward.
B Button: Cause Duke to interact with the environment.
X Button: Makes Duke crouch. When flying, swimming, or floating, hold it to descend.
Y Button: Duke quickly gives enemies the Quick Kick, serving as his melee attack. Duke has infinite stamina, but kicking will interrupt his gunfire.
L3: Activates or deactivates the jetpack. The jetpack can be used underwater or in space in increase his natural movement, but Duke’s Ego will drain rapidly.
R3: Activates lock on to a single enemy, allowing Duke to focus on strafing around them. Ideal for bosses or single annoying enemies.
RT: Primary Fire
LT: Secondary Fire
RB: Pulls up Duke’s inventory, allowing him to switch weapons while the gameplay slows down to a slower pace but not outright pausing. From here, either the left stick or the four face buttons are used to switch weapons. Weapons are divided into four sections with four weapons per section.
Yellow Top Section: “Good Old Reliables” Dukes weaker but dependable options. Can be quickly toggle with Y in the inventory menu
Blue Left Section: “The Artillery” Duke more power firearms. Can be quickly toggle with X in the menu.
Red Right Section: “Utility Belt” Weapons that focus on secondary effects outside of simply spitting bullets. Toggle through with B.
Green Bottom Section: “The Devastators” Duke’s heavy duty explosive weapons, and often the most ammo challenge. Toggle through with A.
LB: Use Duke’s quick slot weapon.
D-Pad: Switch out which of the four quick slot items is active. Can be done real time or in the inventor
Part 5: Guns, Gadgets, and Glory
So, what’s the Duke packing?
Good Old Reliables
The Dukes & The Mighty Kick
“Mama Nukem said Knock You Out”
“The Dukes” refer to Duke Nukem’s fists. Pressing the primary fire will simply have Duke throw a punch. The button can be held down for continuous punching, with Duke alternating fists every time. While this attack is not terribly strong, Duke punches pretty quickly and has no stamina limitations, making it a viable option against single opponents if the player is more concerned with ammo than speed running. Pressing the Melee Button will not have him kick, but instead upper cut. This does no more damage, but stuns the enemy without knocking it away like Duke’s kick does. The secondary fire actually has Duke support himself with his arms and use his feet for kicking. This skill is a reference to the beloved glitch in Duke Nukem 3D where Duke could kick and quick kick while moving with enough practice. When Duke starts doing this, his height actually lowers to being on par with crouching, allowing him to have a strong close combat weapon while moving faster than if he was crouching. However, he is slower than normal movement, cannot jump nor use the jetpack while in Kick mode and [unlike in crouch mode] cannot use guns.
Regardless of Duke’s melee choice, an experienced player can deal some serious damage while save on resources.
Saw Blades
“Time to unleashes my Wang.”
Ammo in pickup: 5
Max Ammo: 50
Look up Shadow Warrior to learn what Duke’s referencing. Saw Blades are improvised weapons that Duke throws at dangerous speeds. Primary fire has Duke throw it like a ninja star. While it’s damage output is pretty average, horizontally thrown saw blades can pass through enemies if the arc doesn’t have them hit the floor. Secondary fire instead has Duke use an underhand toss. This toss has it go higher up but arc harder, decreasing it’s distance but allowing it to be lobbed over cover. Generally an improvised weapon that can be found on most levels.
Sawblades excel the best against airborne enemies, who take extra damage.
Tom And Jerry
“Ready for service, old chums?”
Ammo in weapon: 48 (Pistol) and 24 (Magnum)
Ammo in pickup: 16 (Pistol) and 8 (Magnum)
Max Ammo: 240 (Pistol) and 120 (Magnum)
Tom and Jerry are Duke’s two starting pistols. As Duke’s default guns, they suffer from one massive downside almost no other gun does: a need to reload. While some guns are reloaded between shots, the two pistols have to be reloaded between magazines. Primary fire will fire Jerry (a golden M1911) while secondary fire will fire Tom (a chrome Desert Eagle). Duke starts every episode with these two guns, and any level that doesn’t involve Duke lacking weapons gives him one at the start if chosen in Free Play. overall, Duke can use these as backups
Jerry has a good rate of fire to compensate for it’s lower damage, while Tom does respectable damage for a side arm but has much more recoil and a slightly lower clip size. Both handguns are very accurate at a standstill, but only the handgun retains is while moving, so the Magnum is a poor choice for run and gun combat. While it is possible to fire both handguns at the same time, it is not advised as the accuracy will be abysmal (especially for the Magnum, even without moving). Reloading occurs automatically once all the ammo in a pistol has been fired, so if Duke only has a few bullets in either pistol, wasting it to reload might be wise, since neither pistol can be fired if one is being reloaded.
These two pistols ensure that Duke often has reliable ranged options at almost all times.
Baby’s First Gun
“If it bleeds, this can kill it.”
“Double your gun, double your fun.”
Ammo in weapon: 60
Ammo in pickup: 30
Max Ammo: 180
A fully automatic military rifle, and a classic of American action heroes. Duke finds this as soon as he starts seeing dead EDF soldiers, especially the Brad Clones.
This assault rifle is found in the second level of episode 1 pretty easily as well as being a secret in the first, and serves as the players first “powerful” weapon. Holding down primary fire allows for fully automatic ballistic carnage and is accurate at medium-to far range, making it an acceptable weapon in most situations. It’s ammo is fairly common too, which is good since the weapon can chew through it’s bullets pretty easily. Sadly, it’s raw damage output per shot is only a bit stronger than the handgun’s, so armored enemies that can negate DPS are not ideal targets.
Once Duke finds a second rifle at any point, using secondary fire will have him dual-wield M16s. The accuracy falls to the wayside here compared to him two-handing a single rifle, but the crazy DPS can mow down rooms of weak enemies or rack up damage on a single target. Pressing secondary fire again to go back to a single assault rifle.
The Artillery
First Love
“Groovy”
Ammo in weapon: 10 (shotgun) and 10 (gravity magnet)
Ammo in pickup: 10 (shotgun) and 5 (gravity magnet)
Max Ammo: 80 (shotgun) and 30 (gravity magnet)
A lovely pump-action red and silver shotgun, personally designed by Jane for the Earth Defense Force. It’s primary fire has it unleash pellet hell. It loses damage over distance, so waiting for close range is important. On top of that, it’s been given an attachment of reversed-engineered alien tech: the Gravity Magnet. Sure, it looks like a cartoon magnet, but pressing secondary fire will have it try to grab something to throw for three seconds. It’s worth mentioning that there’s a 2-second recharge between failed attempts to grab something. Once an item had been grabbed by it, pressing secondary fire again will launch it as a mighty projectile – it is at this point that ammo is actually consumed.
This can be used in interesting tactics, such as grabbing any enemy and then pressing primary fire to deal a max damage shotgun shell – but remember that enemies will start to melee Duke if he does this. Alternatively, if the player is feeling brave, they can try to grab an enemy’s explosive and then use the secondary fire to launch it back at them. Just remember not to shoot the bomb floating in front of you with your shells by mistake. That’s be embarrassing.
The Bulge
“Can you feel what the Duke is packing?”
Ammo in weapon: 2
Max Ammo: 20
The Bulge is a double-barrel shotgun that nears two and a half feet long. It’s also unique in that it shares it’s ammo pool with another weapon. This weapon’s ammo max will be added to the other shotgun’s once both have been acquired. It can be acquired the same level as the standard shotgun via a secret, but isn’t put on the main path of a level until the end of episode 1.
The Bulge operates similar to the Super Shotgun from Doom in that it can fire accurately and deadly at even long ranges, but it suffers from an awful rate of fire in needing to be reloaded every shot. On top of that, the primary fire uses both shells at once. While this doubles the damage per shot, it makes it poorly suited for horde combat whereas the standard shotgun fairs pretty well, even with the pump action. The gun also has the unique ability to deal double damage against armor, making it good for armored Pigcops. If the player needs a shotgun for longer range but wants to conserve ammo, the secondary fire will fire a second shell. Primary fire will only fire a single shell if only a single shell is left.
Ripper
“Oh yeah – time to Rip and Tear.”
Ammo in weapon: 50
Ammo in pickup: 50
Max Ammo: 250
A fully automatic chaingun cannon with three barrels. It’s bullets are massive and deadly, allowing it to utterly shred hordes of weaker enemies and can turn strong enemies into swiss cheese with concentrated fire. Primary fire is fully automatic while secondary fire fires in three-round bursts. This weapon is far stronger than any assault rifle and can even penetrate targets, but it’s lackluster accuracy makes it too unreliable at medium to longer ranges, and ammo isn’t as plentiful as the assault rifle or even the shotguns. As such, this weapon is better suited for enclosed spaces than the wide open.
Shots from this gun can penetrate targets and cause it’s victims to stumble, making it one of Duke’s more deadly options.
Radiation Rifle
“Welcome to the fallout, you Alien shits.”
This nuclear-reactor-powered sniper rifle has a mechanic in terms of it’s scope. R3, instead of activating lock on, will have Duke use the weapon’s scope. Pulling the weapon out will also remove lock on if already enabled on an enemy. When scoped in, Duke loses most of his mobility; his walking speed is slowed to a crawl, he can’t move at all with his jetpack or when swimming.
The positives are worth it, however. Not only is the range when scoped without parallel, but scoping in will have the miniature nuclear reactor charge the bullet the rifle with radiation instead of using the standard primer system; this grants a faster rate of fire and causes the bullet to explode on impact, maximizing damage. The primary fire is the standard issue sniper rifle shot, be it scoped or not. It’s secondary fire has the gun instead fire a nuclear green laser. This will still consume a bullet, and it actually does less damage. However, this laser can pass through several targets, and marks the shot’s first victim with radiation. Enemies hit with radiation will have a silhouette around them that appears trough walls, Radiated enemies also take extra damage from all bullets. This effect lasts 20 seconds.
Overall, a long range rifle that can serve more niche roles should the weapon ultimately need to.
Utility Belt
Dragon’s Breath
“Here’s some Chinese wisdom: He who stands in my way goes down in flames.”
“Let’s break the ice.”
Ammo in weapon: 50 (Napalm)
Ammo in pickup: 50 (Napalm) and 25 (Liquid Nitrogen)
Max Ammo: 500 (Napalm) and 200 (Liquid Nitrogen)
This napalm flamethrower is themes after a Chinese dragon. It’s primary fire unleashing hellfire from the “dragon’s” mouth. It’s flames can deal rapid damage to anything unfortunate enough to be within it’s range. Even if the rapid rush of fire is stopped or the enemy escapes it’s reach, the afterburn damage will hurt the enemy for 20 seconds. Duke could then switch to a weaker weapon that has more ammo, such as the M16 or his pistols to wither the target’s health down alongside the afterburn. This gives the flamethrower surprising effectiveness against most enemies: hit the target and strafe while the afterburn deals it’s damage, or melt a whole room of grunts.
The secondary fire is in the opposite direction: instead of a jet of flames, it shoots a lump of cold air that can go an exceptional distance. Enemies hit by it are afflicted with frost bite, slowing their movement down. Frostbite does not work on jet packs or enemies in space. Once slowed down, Duke has a few options: rush the target down with another weapon, use the reduced movement speed to close the distance for the flamethrower (although the fire will remove frostbite, so get close enough for the jets of fire to do their full damage), or continue to fire ice blasts to freeze the enemy solid and kill them with a single physical attack. Do note that some enemies take more shots to fully freeze than others.
The Dragon’s Breath can also be used to light fires or put them out, which more than a few secrets would rely on.
Up And Downer
“Time to downsize.”
“Hey Jane, you think we could repurpose the expansion ray to something more… beneficial?”
Ammo in weapon: 20
Ammo in pickup: 10 (Both)
Max Ammo: 100 (Each)
The Up and Downer uses two types of batteries for two different effects: the primary fire yellow circular lasers that shrink targets on hit (making this attack a projectile) while the secondary fire unleashes purple electricity (hitscan) that will make a target expand in size. Functionally, these weapons are fairly similar in use: adjust an enemy’s size for an easy kill. Subtle differences do make one fire mode more preferable than the other in certain situations: the Shrink function requires Duke to actively kill the enemy (he can simply walk on them, or punch them in the case of a flying enemy) while the growth ray will kill the target on it’s own once they’re big enough. However, most enemies only need two or three shots to be shrunk, and some only need one. On the other hand, the enlargement effect will always take a minimum of two and up to four. A Shrunk enemy takes extra damage, while an enlarged enemy is made slower, so there’s tactics beyond going for the instant kills
The Ammo for the primary fire are yellow A power cells, while the secondary fire takes DD power cells.
Master Blaster
“I don’t know how the fuck this thing tracks anything… but I like it.”
Ammo in weapon: 50
Ammo in pickup: 25
Max Ammo: 200
Visually speaking, the Master Blaster is visually a combination of of Halo’s Plasma Pistol and the Needler, and it’s functionality matches this Frankenstein approach. The primary fire will unleash crystal needles that can home in on targets, although they aren’t particularly strong. The secondary fire has all the crystals on the gun charge with electricity, and then unleash a single EMP needle. It loses it’s homing properties and isn’t even much stronger than a normal shot, but will stun enemies, completely disable robotic and machine-based hazards, and can even disable an enemy’s jetpack.
This weapon is encounter irregularly until episode 5, where it becomes absurdly common.
The Fan Girls
“The best offense is best hidden out of sight.”
Ammo in weapon: 50 (Mini Sentry) and 3 (Proximity Bomb)
Ammo in pickup: 50 (Mini Sentry) and 3 (Proximity Bomb)
Max Ammo: 300 (Mini Sentry) and 15 (Proximity Bomb)
Rather than being weapons, these are traps that Duke can find and deploy. Primary fire has Duke toss a proximity bomb. It has to be on the ground for about a second to arm, then explodes when something gets too close. This does include Duke. However, he can freeze the bomb and safely pick it up, adding it back to his ammo pool. Duke can set it off with a gun, but there’s little purpose to this. Between the hassle to retrieve safely and the second of arming, it’s recommended that Duke places these just before a conflict breaks out. Thankfully, his jet pack can allow him to either toss from the sky or safely traverse his own mine field.
The secondary fire has Duke place a mini-sentry down instead, which will take three second to fully turn on. This turret has full 360 degree field of view, but only has 90 degrees of effective fire – in that any place outside of that will require it to turn around to fire. Since Duke only carries one automated turret at any given time, he should be wise about placing it so it has the best field of view. It’s range and accuracy is better than on might think, making it a good anti-air weapon to deploy if jetpacks are involved. Pressing secondary fire when next to a deployed mini-sentry will have him grab it.
If Duke does not remember to pick up the sentry before leaving the level, he’ll lose it and need to find another. Between that and the proxy bomb’s chance to severally hurt Duke, these are not “toss and forget” tools.
The Devastators
The Solution
“I’m gonna blow the shit out of something with this.”
Ammo in weapon: 5 (Ballistic Missiles) and 20 (Stinger Missiles)
Ammo in pickup: 5 (Ballistic Missiles) and 15 (Stringer Missiles)
Max Ammo: 50 (Ballistic Missiles) and 99 (Stinger Missiles)
This loose adaptation of the M202 FLASH features two missile chambers on the top and six smaller missile chambers below it. The primary fire unleashes a single missile, which fires straight. Once it explodes, a fireball keeps going. This fireball lits enemies on fire, does massive damage, and can still destroy walls. This makes the ballistic missiles less ideal for hordes and better for bosses, bigger enemies, and cracks in the wall.
Whatever you do, do not try to rocket jump – the fireball when hitting something other than an enemy or destructible wall will have the fire and blast radius blast backwards, not just spread out. If by some miracle you have enough health and armor to survive such a stupid tactic, the afterburn will ensure that you die before you hit the ground.
The secondary fire unleashes stinger missiles. These missiles start to spiral out of control at longer ranges, but can be shot rapid-fire. This, along with the minimal blast radius, makes it the safest option for explosive damage, and can be a decent horde clearer. It’s also good for draining the health down of medium-to-high tier enemies. Sadly, the stinger missiles cannot destroy cracked walls.
On a bizarre note, The Solution is one of the only two in the game where the primary ammo is more rare than the secondary.
Bombs of Steel
“I’ve got Bombs of Steel.”
“Hell yeah – Balls of Thunder.”
Ammo in weapon: 25 (Grenades)
Ammo in pickup: 10 (Grenades) and 5 (Tesla Balls)
Max Ammo: 100 (Grenades and Tesla Balls)
The two drums at the back of this single chamber grenade launcher gives it a phalic appearance. The grenades used in the primary fire have a larger blast radius than either missile (full 360 degree destruction), but do not blow up on contact; instead, the ball hitting a surface arms it, and it donates a second and a half later. Even with this limitation, it’s a great weapon for destroying hordes of weaker enemies, and the most ammo efficient weapon for destroying cracked walls. The lack of any means to detonate in mid air makes it a poor boss killer.
The secondary fire involves Duke using Tesla Balls. These metallic balls don’t actually explode, but simply generate electricity. By itself, it’s not very effective. But the lightning jumps between the balls in any direction, and stuns enemies repeatedly while damaging them. Three to Five of these can even kill Pig Cops, and the lightning can disable jetpacks. Shooting one of these into the water will electrocute everyone in the water (Duke himself included), so if Duke has the health to spare and needs to clear the waters, this can work as a desperation attack.
Mine Launcher
“Now Stranger, this is a weapon.”
Ammo in weapon: 25
Ammo in pickup: 20
Max Ammo: 50
The mine launcher is the only weapon that doesn’t take two kinds of ammo. It’s primary fire unleashes it’s mine darts, with sink into walls, floor, and flesh indiscriminately. The secondary fire donates all the darts on the field. Only up to 10 darts can be deployed at a time; firing any more after that will cause the oldest one to explode. This weapon can be used to supplement the Fan Girls for defending an area, or as a makeshift boss killer if there’s no Ballistic or Stinger missiles available.
Duke’s Fucking Gamechanger
Ammo in weapon: 1
Ammo in pickup: 1 (Nuke) and 2 (HoloJanes)
Max Ammo: 3 (Nukes) and 10 (HoloJanes)
The DFG is the only weapon Duke doesn’t comment on when picking up, as the weapon speaks for itself: you’re launching a nuke.
This weapon’s primary fire will kill all non-boss enemies nearby Duke, These victims will be turned to ash, and all other enemies in the level will be afflicted with radiation for 2 minutes. Plus, the mere act of firing this weapon will fill Duke’s Ego back up to 100% if it’s not already so, and then there’s the kill bonuses. Given that ammo for this is really rare, ever shot must be used wisely.
The secondary fire flings out a disc that projects a holographic Jane, who will begin to start dancing. These “HoloJanes” will function like the Sex Workers in that they will effectively hypnotize enemies into look at her, allowing Duke to sneak around them or explore a room safely for the 20 seconds it lasts. Alternatively, Duke can look at Jane’s recording himself to regenerate his Ego faster. Unlike his natural regeneration, HoloJane can recover it beyond 100%. How fast it recovers is based on a few elements: how close is Duke, how many enemies are distracted, and is he over 100% Ego yet?
This is the other weapon where the primary ammo is harder to come by than the secondary ammo, but only just barely in this case.
Quickslot Items
Duke Brew
“Cheers.”
Duke Nukem’s personal brand of beer: it has the alcoholic contain of an entire six pack in a single glass. When consumed, Duke takes 90% less damage to his vitals (armor damage unaffected) and gains unlimited Ego (The Ego meter glows purple and slowly depletes to show the duration of the effect). And you need unlimited Ego to think using a jetpack while drunk is a good idea.
Steroids
“Dr. Valencia renewed my prescription.”
Steroids will double Duke’s running speed, makes his punches and kicks twice as powerful, and makes the saw blades an instant kill. Plus, he gains unlimited Ego when under their effects. They don’t last as long as the Duke Brew does, but turning Duke’s hands and feet into automatic weapons is always a viable option.
Instant Medical Attention
“Just a flesh wound.”
A first aid kit that can heal Duke for 100 health. It cannot heal Duke past 100% health, but the unused health will not go to waste if he doesn’t need all of it – he can simply heal up, and then save the rest. That heal will go to waste if he picks up a new first aid kit, so think before grabbing a fresh one.
Flash Banger
“And then Duke said: Let there be light.”
Unlike the other three weapons, Duke can actually story more than one Flash Banger, being able to hold up to three at once. This weapon is among the most straightforward Duke gets: throw it, it goes off, and enemies are stunned for a bit. Duke’s shades protect him from the bright light.
Recovery Items
Final section of this overly long section. None of these items can be stored in Duke’s inventory and are used when picked up.
Vitamins: A white pill bottle of vitamins with a blue cross on it. Recovers 10% HP.
Militant Medicine: A round glass bottle of a yellow liquid. Recovers 30% HP
Atomic Health: A translucent green box with a blue and red atom inside. Recovers 50% of Duke’s HP, and has the unique ability to overheal Duke. Typically only found in secret locations.
Armor: A full case of armor, giving Duke 100%. Found every now and then in the level, but often hidden in secret locations.
Used Armor: This armor has seen better days. Rewarded to defeating Pigcops, it restore 25% to 50% armor.
Although already covered, the Gasoline, Oxygen Tank, and Duke Boots all fit this category.
Part 6: Enemies
Okay, so that’s every Duke can shoot – but what’s he shooting at exactly?
Assault Trooper – The grunt of the alien forces. Uses a weak laser pistol, and are mostly cannon fodder for Duke. Can be a threat if left in large groups, though. They drop handgun ammo, and on occasion shotgun or assault rifle ammo.
Assault Commander – Leaders of an one given unit. Their jet packs allow them to fly, but can be shorted out with electricity. They can also mutate other humans into Pigcops, who are far more dangerous than their own soldiers are. Some variants wild Shrinkers to shrink down Duke; he’ll need to avoid being stomped on until he’s big again.
Assault Captain – A stronger, faster version of the Assault Trooper with the Jetpack of an Assault Commander, they’re mini-bosses disguised as an enemy. their gun is also capable of fully automatic fire, although they don’t lean their shots and it wil overheat.
Enforcer – A bulky alien lizard that can tank a lot of punishment. It lacks much in the way of mobility, so it often joins the faster Assault Troopers to tag team Duke.
Firefly Soldier – An airborne flamethrower equipped dinosaur alien with a jetpack. As such, staying away and avoiding it’s fireballs is very important.
Protozoid Slimer – a pile of goo of some kind. Can either kill or take over it’s host. it’s very weak on it’s own, though. If it’s attached itself to Duke, a human, or a babe, Duke can use his Dukes to rip them off if he quickly switches between them. When killed with a bullet, it’ll ooze out acidic blood; don’t step in that.
Bare Pigcop – A member of law enforcement who mutated into a Pigcop and then some. With no armor and little thinking, it’ll attempt to ram Duke down. When they appear in groups of three of more, this can prove to be a problem.
Pigcop – An improvised addition to the alien army, and frankly more dangerous than their own grunts. They wield shotguns by default, and are slow to fire but hit hard if they land. On rare occasions, can use an RPG. They can drop ammo for the weapon they’re using – shotgun, assault rifle, or even a ballistic missile. Can drop armor if they still had their armor.
Pigcop Tank – A small tank driven by a Pigcop with a window for it’s head. Weak to explosives and the Shotgun can tear the armor up, but it’s otherwise very durable. Has a self destruct button on the back.
Turret – It’s a automated Turret. You can easily kill it, and it can easily kill you; doubly so if it’s the rocket version. Depending on the type, it can drop handgun, assault rifle, chaingun, ballistic missiles, or mini-sentry ammo.
Turret Sentry – A flying robot that will explode next to a target. When you here it gunning for you, shoot it before it reaches you.
Newbeast – A human fully mutated by a Slimer. Despite it’s slender appearance, it’s very durable and can survive multiple direct explosives while resisting the elements. Combine this with it’s high jump, and it’s a resilient threat.
Sharks – Can easily kill Duke if he gets too close, but don’t actively go after him. Duke has to hover around them for a while for them to attack, they otherwise will ignore him.
Street Shark – A shark mutated by aliens into humanoid. They sometimes ride sea vehicles. The ability to have the shark bite on land makes them water more dangerous than most enemies. They take double damage from fire.
Octobrain – Can fight in water, air or even space. Mostly throws junk at the Duke. This makes explosives dangerous to sue against them, as they’ll pick them up and fling them back at Duke.
Muncher – An alien fish placed in earth waters to eat humans. Dies to any one hit and is gibbed on death, but a school of them can chews armor and health down quickly.
Dukeinator – A cyborg Duke Nukem from an alternate bad future. Appears as an elite enemy in the end of the game. Bullets aren’t great against these. When it still has it’s flesh, it’s weak to the elements. When the robotic skeleton is exposed, it’s not treated as a machine. They never fare well against explosives.
Part 7: Measuring Contest
Duke Nukem: Eleventh Hour would not feature the standard difficulty selection, but instead offers modifiers to add handicaps or challenges as the player sees fit.
Piece Of Cake – Removes some enemies from levels.
Doctor’s Orders – All healing items can heal Duke beyond the max
Serious Firepower – Doubles all ammo pick ups, increases ammo caps, and gives the pistols unlimited ammo.
In Another Life – Every time Duke dies to an enemy, he’ll drop an Atomic Health in that spot for the next run through the level, assuming the player doesn’t quit. Up to three can be saved in a level, then the oldest one will be despawned.
Ego Maniac – Damage dealt is converted into Duke’s Ego. This can recover Ego above 100%, but not above 200%.
Come Get Some – Adds extra enemies to levels, many of them making enemy encounters ore dangerous. This does not counteract the Piece Of Cake difficulty, as that only affects the enemies that appear by default.
Damn I’m Good – Take 25% extra damage.
Die, You Son Of A Bitch! – Enemies that are not gibed, shattered, melted, or otherwise destroyed will revive in 25 seconds with fairly low health. Enemies killed under the effects of radiation will revive with full health.
Precious Metal – Removes a lot of the ammo packs lying around the level, meaning the player needs to rely on ammo pickups and secret areas to restock ammo.
Bruised Ego – Ego auto regeneration is disabled. However, all sources of Ego Regeneration are still in tact.
When starting up a new run, the camera will zoom away from Duke and he’ll unzip his pants. A black bar then appears (nothing would be modeled below this). This black bar will grow or shrink depending on how hard they’ve made the game, complete with a name commenting on it’s size (activating all 5 easy mods is “Too Small For TV”, all hard ones is “Literally Just For Show”. and having an equal amount of both or none at all is “recommended package”). This is mostly a visual gag, but it will be labelled as the “selected difficulty”.
Part 8: Secrets
Secrets simply refer to anything in the level that the player needs to explore or otherwise mess around with in order to find. As such, many different types of secrets can be found:
Babes: Women in distress through the game. each level has a few glued to a wall for Duke to find, aside from boss levels. Their appearance is randomize across various assets. Duke will hold the babe on his shoulder (similar to the Duke Nukem Forever multiplayer mode) and pull out is default pistol. This only takes about 5 seconds, but Duke should still kill as many enemies as possible before saving them, since there’s no time limit for getting them back. Saving them rewards Duke with an Ego Boost.
Secret Weapon: a weapon that’s hidden out of the way or is otherwise easy to miss they are typically weapons that aren’t found until later levels or even later episodes. Duke will often have to do some platforming, swimming, or jetpacking to get these.
Movable Wall: A wall that can be moved to reveal a secret item, typically via a switch. This can range from a gun to extra ammo to even a babe. These are the easier secrets to find.
VIP Babes: While standard babes are relatively generic, VIP Babes have unique designs, professions, and interactions with Duke. More than a few of them need help, and as a result they offer two Ego boosts – a small one for discovering them, and a larger one for helping them. Once they can safely be rescued, Jane will teleport them out. Examples include:
Officer Jennifer Joy: A named member of the L.A.P.D. Duke must kill all the Pigcops around here, where she’ll reveal women are immune to the mutation.
Professor Claire Sinfolds: A scientist who violates every dress code, much to Duke’s delight A reference to the character from the SIN series. Simply getting to her is the hard part.
Kitty Pousoix: Duke’s personal maid, seen in Duke Nukem Forever. She’ll be saved very quickly.
Sandra Patvari: Light-Brown haired lightly-tanned female mechanic familiar with Alien tech. A reference tothe only good character in The Outer Worlds.
Ashley Ghost: The daughter of the 67th president of the United States. She has the hots for Duke (like most women in this world do), and is eager for some “Overtime”; Duke will need to carry her to a isolated room before getting teleported.
Marsha Walra: A red haired woman mutated into a mermaid. Duke needs to revert her back to her human form to save her.
Courtney Tightly: Blasain scientist who is a Half-Life reference. Drop’s Duke a unique all-access card when saved.
Erika Cashmere: Duke Burger Cashier, and a hot one at that. Even in a standard, non-sexy uniform, she’s more appealing that the food. As she put on her resume.
Eva Atoms: Despite having the large breasts and round rear that all women in the world of Duke Nukem possess, She is very tall (almost as tall as Duke) and fairly muscular. This is the result of Jane and Claire’s experimenting to amke “combat ready babes.” Duke, naturally, approves.
Gus’s Panic Rooms: often requiring an explosive or a key card (maybe both), these rooms are a great way for Duke to get a lot of ammo back, and are essential when playing with Precious Metal enabled.
Shout Outs: Like in Duke Nukem 3D, several recreations and references to other action heroes (with a special emphasis on FPS characters) can be found. Things like a temple devoted to Serious Sam, finding the alter from the start of Doom 2016, or entering Samus Aran’s gunship and looting the missiles.
Messing Around: While not considered secrets in terms of completion, several mini-games and interactable elements can be found in levels, allowing for Duke to gain small bits of Ego. These are crucial if “bruised ego” is enabled. Examples of these include:
Billiards
Pinball
Basket Ball
All you Can Eat Pizza
Working Out
Darts With Bullets
Part 9: Multiplayer
And finally, multiplayer. The game would mostly stick to playing as Duke, with some additional costumes the player can wear based on certain achievements (like getting his red Presidential suit for beating the story mode). The multiplayer mode has some unique weapon models, but most weapons are more straightforward weapons from the single player mode.
Melee Weapon
Semi-Auto Pistol
Magnum Pistol
Assault Rifle
Chaingun
Shotgun
Flame thrower
Ice Thrower (recolor of the Flame Thrower)
Rocket Launcher (Ballistic Missiles)
Devastator (Sting Missiles)
Laser Trip Wire
Jet Pack (Set Fuel)
Air Tank and Duke Boots are always equipped and regenerate over time, but also aren’t as effective as their campaign counterparts.
In all game modes, players can hold any four weapons. Upon death, they drop an Atomic Health and the weapon they’re using, but the rest of their weapons will carry to their next life. The game modes are:
Dukematch: Classic game of Death Match, with everyone trying to kill everyone else. Players can turn on teams, give set lives, set a time limit, and/or set a kill count to reach for victory.
Capture The Babe: Find and bring the enemy “Babe” back to yours. Capture the flag with a different context, basically.
Earth Defense Force: Team up with three other players to fend off waves of aliens.
Screw All Of You: Dukematch with a twist. Players are on a team as you all kill enemies in the arena for points, but once a player builds their Ego up, they can press secondary fire to enter Steroid Mode for as long as their Ego holds out and kill their teammates for massivepoints. The player must reach 100% Ego to enter rage mode, can store up to 200%, and loses all Ego upon death.
Vertigo: Enter a tower with countless floors. Everyone has a Jet Pack, enemies are everywhere, and everyone is an enemy. Who can get the highest? Floors have more distance between them as the player acsends, and check points become more scare. Enemies spawn indefinitely.
Part 10: Conclusion
To me, the most important parts of this write up is what’s not here. Why is there no level up system? Because not every game needs one. Instead, why not have Duke just get the full gun? Why not just let the player actually get the full effects of the gun when they find it, and leave the decision making to the combat instead of “which gun do I want to be more useful?” If the player shouldn’t have the secondary fire right away, just don’t put the ammo for the secondary fire in the gun right away. And instead of increasing Duke’s health, just let him heal above the max if the player is careful enough or skilled enough to keep it up. Why not have a in-depth story? Because Duke’s charisma is the story. The plot is a set up for Duke to kill aliens, save the babes, and be Earth’s hero once again. And that’s all Duke needs to be; not every game needs to be narrative driven. Just a handful of side characters to give Duke more than just pop culture references and you have enough to work with. Why keep the crass sense of humor? Well, that’s Duke Nukem. It’s not that we can’t have crass entertainment anymore – it’s that companies for some reason have convinced themselves that social media reputation affects sales (when the likes of FIFA/Madden have proven making literal casinos in your games don’t affect sales).
So long as the devs have a clear focus, don’t switch engines in a stupid obsession with being cutting edge, and remember that Twitter is filled with Jack Thompsons, Duke will be welcome back.
Team Fortress 2 needs literally no introduction. So I won’t waste your time with going over the class-based shooter. Instead, let me explain what this would be: the idea behind an update like this, it would be around rebalancing TF2’s weapons with a big focus on the game’s weaker guns getting buffed, with a handful of stronger weapons receiving nerfs. I’ll also explain my logic behind the proposed changes to these weapons.
Just for disclosure: my Team Fortress 2 abilities are on par with Spongebob Squarepants driving a Boatmobile: I know the technical stuff to an impressive degree, but struggle to ever pull it off when it matters most. Thankfully, a friend of mine on Discord who plays TF2 on a competitive level [whom shall be called “Mr. Pro” in this article] has helped me with all but one of these, so rest assured that more than “rule of cool” went into these.
We did, however, have some ground rules:
A weapon being “too niche” isn’t enough on it’s own, since the alternate weapons are meant to be side upgrades.
There is a difference between a weapon that’s bad at doing what it’s job is suppose to do, and a weapon that’s overshadowed by other choices (for example, Heavy’s Chocolate Bar has some good uses, but the Second Banana would be preferred by most players)
Weapons where the problem is due to glitches or the Source Engine showing it’s age alone (like The Righteous Bison) don’t count either, since they would amount to “fix this bug”
I’ll provide a visual for each weapon just to remind ya of what it looks like. If you don’t remember the raw stats, here’s a link to the TF2 Wiki having all weapons. The only reason I’m not posting the original stats is because well over twenty weapons are here.
Shortstop
[+] All Sources of Health Can Overheal
[+] +20% Health Gained from Mad Milk
[+] +Reload the entire clip at once
[+] Alt-Fire: Shove attack!
[+] +100% Damage On Pellets
[+] -50% Overheal Decay Rate
[-] Maximum Overheal lowered to 25% (156 HP)
[-] -60% pellets per shot
[-] -34% clip size
[-] Empties entire clip when reloading
Ever since the polycount sets were removed from TF2, the Shortstop has been left as an underpowered weapon with the honestly half-assed recreation of Left 4 Dead’s shove mechanic. I’d keep that in for the few people who still actually use it, but the idea is now that this weapon has the Scout trade his high damage output of his Scatterguns in favor of boosting his raw survivability (which was the point of the original Polycount set to begin with). This version would be very interesting with some Mad Milk and and the Candy Cane.
Baby Face’s Blaster
[+] On Hit: +15% Movement Speed for 3 seconds. Can stack up to 10 seconds
[+] Whoosh Meter: Meter goes up 1% for every 3 points of damage and/or every 0.75 seconds of running
[+] When Whoosh is activated, +40% Movement Speed, +45% Firing Rate, and +50% Reload Speed for 8 Seconds
[ ] When Whoosh is fully charged, Scout will say “Alright, I Feel Good”
[ ] Scout yells “Whoosh” upon activated Whoosh Meter
[ ] When Whoosh is active, Scout’s voice lines are sped up by 50%
[-] -34% Clip Size
[-] -10% Movement Speed
[-] Withdrawal: Once Whoosh is depleted, Meter earns are cut in half for 5 seconds
[-] Whoosh cannot be activated during Withdrawal, even if the meter is built back up
As it stands, the baby Face’s blaster really isn’t a bad weapon; it’s more so just requires a very precise play style of hit and run. As such, this rebalance was instead focused into activating a “hit and run” rage mode with the benefit of the Scout not losing all their speed the moment a class decides to aim in his general direction. While the scout wouldn’t be crippled faster than a speeding bullet, the lower clip size and the reliance on the Whoosh meter turns the Scout’s mobility into a resource with higher highs if used smartly.
I could see some people preferring the current version to this one, though; this was more so me being creative rather than seeing this as a weapon that really needs a reworking.
Sun-On-A-Stick
[+] 100% Crits on Burning Players
[+] 25% Flame Resistance When Deployed
[+] Heat Meter: Once fully charged, Scout can toss an exploding fireball to ignite targets (30 Damage)
[+] 100% Recharge rate when on fire
[+] Fireball Mini-crits burning targets
[-] No Random Crits
[-] -25% Damage
[-] 25% Slower Recharge rate
[-] Does not start with projectile
[-] Projectile not affected by resupply closets
The Sun-On-A-Stick suffers from several problems as it currently is. The first is that the Scout lacks any means to light a target on fire, so he’s left to hope a Pyro is on his team and that an enemy Pyro, Medic, or Dispenser doesn’t end that afterburn. Which is problem 2: afterburn is easy to get rid of. To be fair, it has to be; the real benefit to afterburn isn’t the damage but highlighting a target for your teammates to just try and hit. After all, if you can get a player to critical health, then the afterburn damage is a death sentence. Which is the third problem: the only classes that have to worry about afterburn regularly is Soldier (whose Rocket Jumping could make his HP too low) and Spy (where being easily tracked is a death sentence itself). And that’s ignore that the Pyro very rarely leaves survivors unless it dies first, and the Scout has several shotguns that can deal triple digit damage faster than his bats could ever hope to.
All of that comes into play with the desire to give the Sun-On-A-Stick a fireball attack. It would work similarly to the Sandman and the Wrap Assassin, except it’s cast for the weapon instead of being a ball literally hit. More importantly, the fireball explodes on hit. The blast radius is equal to that of a Soldier’s rocket should it directly hit a player, but is cut in half if it blows up on the environment instead. This allows the Scout to possible lit several classes on fire at once, which he could then spread pellets or even pistol fire onto them to shave their health down, or combine with Mad Milk for a LOT of recovery. Either way, increases the Scout’s utility beyond “dying less quickly to afterburn that probably won’t kill you in the first place” would be welcome.
Sandman
[+] Alt-Fire: Launch a baseball that stuns enemies
[+] Ball can damage enemy buildings
[+] When Bonked, Sentry Guns are flung 180 degrees, and suffer from 30% slower tracking for 4 seconds
[+] When bonked, Combat Mini-Sentries are disabled for 2 seconds
[+] When Bonked, Dispensers will be unable to tell friend from for for 5 seconds
[-] -15 Max health on wearer
Fun little fact: this weapon gave Mr. Pro and I the most trouble in terms of rebalancing, and we’re still not sure if we love this take. The problem is that the original stun mechanic (where players were actually frozen in place) no longer exists, and the new stun Mechanic isn’t a big deal and is glitched to begin with. Even if it was fixed, the slow speed does little to help Scout since you’ll be getting in their face to begin with and anyone you can reliably hit with the ball can probably be run down anyway.
So the version we settled on was one that allows Scout to more easily flank around sentries without having to give up his secondary slot to Bonk, or to save that Atomic Punch for a real emergency. Originally the idea was that the Sentry would track the ball until it hit the floor, but this proved to be too easy to exploit (three scouts with Sandman Balls would render any single sentry mute) while also having way too many variables to properly balance without just making a custom server (an option I don’t have atm). The Mini-Sentry and the Dispenser effects are extras, the important notes is the lower max health for the ability to escape a sentry or hit a player from a safe distance.
Liberty Launcher
[+] 25% Larger Clip Size
[+] 40% Faster Rockets
[+] -25% Self Damage from Rocket Jumping
[+] 20% Faster Firing Speed
[+] 20% Faster Reload Speed
[-] -10% Damage
[-] -10% Splash Damage
If this looks overpowered, you’ve never actually used this thing. The Liberty Launcher was originally called the crutch launcher in that it was a fall back for newer soldiers. Then they nerfed the damage to 20%, and turned it into the Soda Can Launcher. Seriously, all those up sides are really hindered by a lack of damage this thing has. So it would receive two buffs: it reloads faster, and it’s 20% damage damage is split between direct and splash damage. This turns it into a rocket launcher that is good at keeping up pressure but less useful for crowd clearing or one-on-one battles. Also, with it’s lower damage and left self damage, it’d be an okay Rocket Launcher to graduate to from the Rocket Jumper.
Equalizer
[-] -33% Base Damage
[-] -90% Healing from all Medic sources when deployed
[-] -50% Healing from all medic sources when not deployed
[+] +1 point of damage for every point of HP below max, up to half health value
[+] +1% Speed Increase when deployed for every 5 points of HP below max, up to half health value
[+] 40% Damage resistance when deployed
Most of you probably already know this, but the Equalizer and the Escape Plan used to be one and the same, but were separated as a nerf (if you had the Equalizer already, you got an Escape Plan of the same quality for free in the update). And without the speed boost, the extra damage just isn’t worth anything since you need to lose half your HP to break even with this weapon; by the time your health is low enough to deal any significant damage, you’re literally a single hit away from death.
The first change was to make the math easier in that the player is effectively dealing crits when at half health (150 damage) at half health, making this an actual threat. The Speed boost is because Soldier needs a boost in speed for his general lack of HP (I’m not great at calculating hammer units, but if my math is correct, Soldier’s speed boost cap will place him at being faster than a Demo but slower than a Medic), and the damage resistance is to make it so either his attack or retreat will have the endurance to work.
Gas Passer
[ ] Replaces your Shotgun with a Gas Pump Pistol, and a recharging gas can
[ ] Gas Meter resupplies weapon after 200 damage or 15 seconds
[+] Pistol does not need reloading
[+] +50% Primary Ammo
[+] Targets covered in gas suffer are ignited on hit
[+] Double Burn: Afterburn from gas deals full damage in half the time
[-] Gas meter not affected by ammo boxes, dispensers, nor resupply closets
[-] Gas meter starts out empty
[-] Shares ammo with primary weapon
This weapon isn’t worthless, but it isn’t worth what it asks for. Waiting a full minute or killing 4 Soldiers for what amounts to an extra 80 damage on a handful of enemies that they can easily cancel out because afterburn’s damage is not it’s strong suit is not a good deal. So the timer and damage requirements are greatly lowered while the afterburn damage is made an actual threat. The addition of the pistol is to make it so that way the Pyro can have some mid-range options when it comes to gas-soaked opponents. However, what the stats don’t tell you is thee pistol is considerably weaker than the Scout or Engie’s (the Gas Pump Pistol, at point blank range, would do 15 damage). The added buff of more max ammo also means that those who still don’t find the gas tank useful can get something out of this weapon (especially in MvM, where running out of ammo is a real problem for Pyros)
Manmelter
[+] Does not use ammo
[+] Fires a straight heat laser with no downward arc
[+] Mini-crits burning players
[ ] Heat Meter: every shot fired raises the heat meter by 5%
[-] -33% Damage
[-] Suffers Damage dropoff
[-] When overheated, weapon becomes unusable until completely cooled off
[-] Cooldown speed is halved if weapon is not deployed
The fact the Pyro has more Flare Guns than Shotguns upset me. The fact this is easily the worst Flare Gun is hardly surprising. So, instead of it being a flare gun, it’s basically the Spy’s revolver. It no longer ignites players, but operates with the usual rules for revolvers. What’s really different now is the overheat meter, forcing the player to not rely on this weapon as a primary. Overall, a good weapon to follow up a retreating player you’ve burned.
Sharpened Volcano Fragment
[+] On Hit: ignites target in flames
[+] Can ignite enemy Pyros
[+] Double Burn: Afterburn deals full damage in half the time
[-] -20% Damage
By dealing afterburn damage twice as fast and being able to ignite other Pyros, the Sharpened Volcano Fragment would finally have something it lacks: a proper utility.
Hot Hand
[+] Hits twice
[+] Extinguishes teammates on hit
[+] +20 HP restored when extinguishing a teammate
[+] When it extinguishes a player, the glove catches fire; Pyro receives a speed boost until the flame is out.
[ ] Flame duration equal to remaining duration of afterburn acquired from burning target(s), capping out at 10 seconds
[-] -14% damage split across two attacks
[-] Extinguishes enemies on hit
This was just me having some last minute fun, so Mr. Pro has never actually read this one. The idea is that it is better suited for a more defensive Pyro, while the Powerjack is more well suited for a Pyro on Offense. Otherwise, the stats should speak for themselves here.
Ullapool Caber
[ ] Deals 126-140 damage on the first hit in terms of explosion, then does a flat 50 damage afterwards.
[+] Bomb Meter repairs the Caber after either 6 kills of damage or 30 seconds. Dispenser can refill the meter 50% faster
[+] +20% Weapon deployment speed when health is below 50%
[-] Cannot receive random crits
[-] +25% extra fall damage
[-] Bomb Meter not affected by ammo boxes
The idea with this rebalance this weapon into a “last resort” melee weapon with the possibility to troll Snipers on 2Fort again. The extra fall damage is to avoid any cases of a Demoman flying to enemy spawn and trying to instantly pick the Medic at the start of the round. The Bomb Meter is to give it more than one use per life.
Natasha
[+] On Hit: 100% Chance to Slow Down Target
[+] +20% Damage Against Buildings
[+] +20% Damage Resistance against enemy buildings
[-] -20% damage against players
[-] 30% slower spin up speed
Minor change to make this the “Sentry Buster” of Heavy’s mains. Otherwise unchanged in any major way.
The Huo-Long Heater
[+] Produces a Ring Of Fire when revved up
[+] On Hit: Target it lit on fire for 3 seconds; can stack up to 15 seconds
[+] +25% damage against burning targets
[ ] Gas Meter: The Heavy has a meter for his minigun for gas. When revved up, the meter will start to deplete. Takes seven seconds to deplete and 10 seconds to recharge from zero.
[-] -10% damage
[-] -66% Afterburn damage
[-] Once gas meter is depleted, 4 ammo is consumed per second to produce fire ring
[-] Gas meter not affected by dispensers or payload carts
Beyond the ability to lit players on fire from a distance, the weapon isn’t that unchanged. It’s biggest new requirement is that it’s reliant on the player’s ability to follow up their shots, but the afterburn itself does very little damage. The Gas Meter is so that way the gun doesn’t require the heavy to marry a Dispenser to actually fire the gun for 12 seconds. For those who are interested: it takes 7 seconds to deplete and 10 seconds to recharged, going from full to empty and back again.
Buffalo Steak Sandvich
[-] When consumed, Heavy is locked in melee until the effect ends
[-] Meter does not recharge while rage is in effect
[+] Heavy gains a speed boost for the duration of rage
[+] Melee Weapon downsides are negated for duration of rage
Okay, so you now get a speed boost, and your melee weapon of choice lacks any given downsides. The exact benefit of the rage would depend on what melee weapon you equip, giving it some level of versatility that the other lunchbox munchies lack.
Pomson 6000
[+] Projectile cannot be reflected
[+] Projectile can pass through Teammates
[+] Unlimited ammo
[+] On Hit: Target is ignited if within close range
[+] Full Charge: Empties Clip but unleashes a single blast that can pass through enemies and deal minicrit damage
[+] 25% faster reload
[+] 25% More Damage Against Burning Targets
[-] -33% clip capacity
[-] Only does 20% damage to buildings
Ah, the worst weapon in Team Fortress 2. Hands down. There’s a bit to unpack here, so let’s go through the buffs that would make this thing usable without being brainless like it was when it first came out:
Giving the weapon the ability to pass through teammates but not enemies means the slower projectile doesn’t have to worry about teammates getting in the way but still have to try aiming in a 1-on-1 fight.
Unlimited ammo and unreflectable projectiles really won’t matter since Engies are always getting ammo boxes or Dispenser refills and no Pyro is wasting the ammo when moving to the side achieves the same thing.
Igniting targets on fire is a makeshift way to let the gun counter Frenchies without completely shutting the class down; Engie has no business countering Medic so the Ubercharge loss was removed.
More damage against burning targets rewards Engies for actually aiming.
Full charge gives it a taste of the “glory” days, and the Cow Mangler shows it can work.
Stock Syringe
The stock gun for Medic wouldn’t actually have any stat changes but receives a single buff: Uber effects remain in effect while the Syringe Gun is deployed, meaning that the player can fend off close range threats in a worst case scenario, or possibly try some more interesting plays. This trait would not be shared with any of Medic’s other primaries, giving the Stock option some utility the others lack.
Ubersaw
[+] On Hit: +10% Uber Charge
[+] On Kill: +10% Additional Uber Charge
[-] 10% Slower Swing Speed
[-] Cannot receive random crits
A simple nerf: the Ubersaw requires 10 hits, 5 kills, or a combination of the percentages to fully Uber Charge. And without random crits, even casual players need to actually think “I’m not about to get myself killed doing this, am I?”
Cleaner’s Carbine
[-] 25% Slower Firing Speed
[-] -25% Lower Clip Size
[ ] Crikey Meter fills up after dealing 100 damage with this weapon, taking 100 damage in general, and/or landing 5 fully charged rifle shots. Alt Fire when the Crikey Meter is full to activate buffs. When active, the gun glows green.
[+] 50% Faster Weapon Holstering
[+] 25% Faster Reload Speed
[+] When Cirkey is active, this weapon fires 60% faster (40% faster than stock)
[+] When Crikey is active, this weapon has 50% tighter bullet spread
The obvious buff is that there’s more than one means of filling the meter. The not so obvious buff is the removal of mini-crits. At the end of the day, this weapon should achieve what Jarate can’t. So when active, instead of dealing mini-crits the gun becomes more accurate and fires faster. However, it’s low reserve ammo means that it can only be used to clean up around the sniper, and actual rampages will be quite rare.
Darwin’s Danger Shield
[+] +25% Explosion Resistance
[-] +20% Bullet Vulnerability
I hate how Sniper secondaries have just nullified his weaknesses in exchange for a weapon 90% of snipers never used to begin with. Jarate, even with that melee weapon allows him to quickly dispose of a close range threat, the Razorback completely shuts down Spy (a class that’s already hard to paly properly), and this weapon does so for Pyro. Yeah, the backpacks have no actual downsides in their stats. So with this version, the sniper case better withstand explosives (like, let’s say, a trolling Demoman with a Caber) but has to be careful of bullet-based weapons.
Enforcer
[+] When Sapping a building, +20% Firing Speed
[+] 20% Damage against buildings
[+] Ignores all damage reductions
[-] When not sapping a building, -20% firing speed
[-] Cannot receive random crits
Remember when this was the best revolver? I do, if only just.
Anyway, the point of the new stats is to make this the “anti-sentry” revolver. I wasn’t aware of this but as Mr. Pro brought to my attention, a competitive “Sixes” strat is for a Spy to sacrifice himself early game to destroy a sentry gun since a Spy for a Sentry is always a worthy trade. This would make this a scary tactic. On a more reckless note, a Spy could sap an Engineer nest and try to go on a shooting spree before the sappers are removes (the revolvers aren’t amazing, but they are lethal)
Diamondback
[+] For every backstab or sapped building, the player receives two guaranteed mini-crits
[-] -15% less damage
[-] Cannot receive random crits
The only real nerf is that you get two mini-crits instead of a single crit. This means the Spy needs to be good with follow-up shots to get the full damage, while also being a little more thematic (Backstabs and Sapped buildings earn two points, and now earn two mini-crits).
Red Tape Recorder
[+] Delevels and deconstructs buildings
[+] +50% building durability
[-] -100% Sapper damage
Literally everyone has recommended this buff, and everyone who isn’t playing Engineer at the moment agrees. So I won’t waste your time on this one.
Dead Ringer
[+] +50% Cloak Regeneration Rate
[+] +40% Cloak Duration
[+] On Kill or building destruction, Spy gains a stealth
[+] 25% Speed Boost on Death for 3 seconds
[+] Each stealth increases cloak time by 10%, by up to 3 can be in effect
[+] Each stealth offers 20% damage resistance when cloaked, up to 30 in effect
[+] Spy can store up to 10 stealths
[-] -50% Clock Meter upon usage
[-] Damage resistances slowly lower the usual 20%
[-] Upon decloaking, 3 stealths are consumed
That’s a lot of stats, huh? Well, let’s break this down.
First, the only direct stat change is that ammo boxes cannot replenish this weapon, as a trade off the damage resistance when cloaked is lowered to the default 20% unless the player has some “stealths”
And that’s where the big changes are: the weapon is perfectly usable as it is, but collecting “stealths” will allow the player to either more convincingly escape while faking their death, or pull off some of the crazy things that could be done back in the day with the original Dead Wringer. It would also be unique in that it’d be the only snowball-type weapon to actively consume it’s “levels” upon proper usage. It also means that you need to be good as Spy to keep using this thing as anything other that a get out of jail free card.
Okay, there. Every weapon from TF2 I’d give a change too. Special thanks to my friends on Dsicord who helped me with this. Now if you don’t mind, I’ve spent 6 hours re-formatting this damn thing line-by-line, and I’m rather tired; Good night, and yiff in hell Scouts.